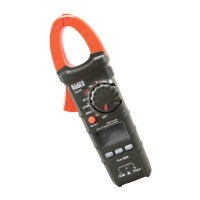
8
RANGE
The meter defaults to auto-ranging mode Auto. This mode
automatically determines the most appropriate measurement range
for the testing that is being conducted. To manually force the meter
to measure in a different range, use the "RANGE" button
7
.
1. Press the "RANGE" button
7
to manually select measurement
range (Auto is deactivated on the display). Repeatedly press the
"RANGE" button
7
to cycle through the available ranges, stopping
once the desired range is reached.
2. To return to auto-ranging mode, press and hold the "RANGE"
button
7
for more than one second (Auto is reactivated).
MAX/MIN
When the "MAX/MIN" button
8
is pressed, the meter keeps track of
the Maximum, Minimum and Average values as the meter continues
to take samples.
1. When measuring, press "MAX/MIN" button
8
to display the
Max value on the primary display line. MAXMIN and Max will
be shown on the display. Pressing "MAX/MIN"
8
will toggle
between the Maximum (Max), the Minimum (Min), and the
Average (Avg) values. The active measurement continually
updates on the secondary display line in this mode. If a new
maximum or minimum occurs, the display updates with that
new value. The average value continues to update as the meter
continues to take samples.
2. Press "MAX/MIN" button
8
for more than one second to return to
normal measuring mode.
DATA HOLD
Press HOLD
9
to hold the measurement on the display. Press
HOLD
9
again to release the display to return to live measuring.
FUNCTION BUTTONS
ENGLISH