EasyManua.ls Logo

Kobalt 53278 User Manual

Kobalt 53278
20 pages
To Next Page IconTo Next Page
Page #1 background imageLoading...
Page #1 background image
Questions, problems, missing parts? Before returning to your retailer, call our customer service
department at 888-3KOBALT (888-356-2258), 8 a.m. - 8 p.m., EST, Monday - Sunday. You could
also contact us at ascs@lowes.com.
Serial Number _______________________ Purchase Date _________________________
ATTACH YOUR RECEIPT HERE
ITEM: #5266230, #5266838, #5266839, #5266840, #5266841, #5266842
4-DRAWER
TOOL CART
MODEL: #53278, #53285 #53286, #53287, #53288, #53289
Español p. 11
KOBALT and logo design are trademarks or registered
trademarks of LF, LLC. All rights reserved.
SS23475
Question and Answer IconNeed help?

Do you have a question about the Kobalt 53278 and is the answer not in the manual?

Kobalt 53278 Specifications

General IconGeneral
BrandKobalt
Model53278
Product TypeTool Chest
MaterialSteel
Number of Drawers5
ColorBlack
Lid TypeHinged
LockableYes
CastersYes
Depth (Inches)18
Drawer Weight Capacity (lbs.)100 lbs

Summary

Product Safety Guidelines

Critical Safety Warnings

Critical warnings on unit stability, tipping, and weight distribution for safe operation.

Safe Usage Cautions

Cautions on caster use, product mounting, alterations, weight limits, and drawer/lid operation.

Package Contents Overview

Pre-Assembly Preparation

Assembly Steps

Step 1: Mount Locking Casters

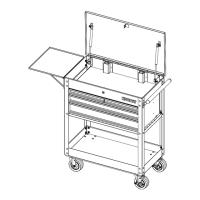
Attach two locking swivel casters to one side of the bottom tray.

Step 2: Mount Swivel Casters

Attach two swivel casters to the other side of the bottom tray.

Step 3: Attach Frame Cross Support

Connect frame cross support between frame legs using specified hardware.

Step 4: Mount Frame Leg Assemblies

Install frame leg assemblies into the bottom tray with bolts and nuts.

Step 5: Mount Chest to Frame

Lift and position the main chest onto the assembled frame supports.

Step 6: Attach Handle

Secure the handle to the chest using handle bolts and nuts.

Step 7: Attach Side Table

Fasten the side table to the chest using bolts and nuts.

Step 8: Secure Chest to Frame Posts

Fasten the chest to the frame leg assemblies using bolts and nuts.

Step 9: Final Hardware Tightening

Ensure all hardware connections are tightened for structural integrity.
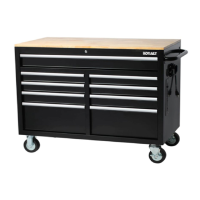
Care and Maintenance

Product Warranty Information

Related product manuals