This document outlines the assembly, usage, and maintenance of a 3-drawer workbench, identified by Item # 0484712 and Model #3DPCWB2013. The workbench is designed for various tasks, providing storage and a sturdy work surface.
Function Description
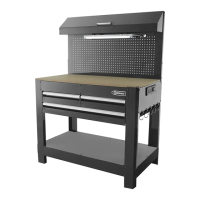
The 3-drawer workbench serves as a versatile workstation, offering a combination of a robust work surface, organized storage through multiple drawers, and a pegboard for hanging tools. The primary function is to provide a dedicated space for tasks requiring a stable platform and easy access to tools and supplies. The three drawers, two small and one large, allow for systematic organization of different-sized items, keeping the workspace tidy and efficient. An integrated power strip, accessible through the right side panel, provides convenient electrical outlets for powering tools and other devices directly at the workbench. Additionally, a light fixture is incorporated to illuminate the work area, enhancing visibility and precision during tasks. A storage cage with a hinged lid offers additional secure storage, while hanging hooks on the side provide quick access to frequently used tools. The wooden table top provides a durable and aesthetically pleasing work surface.
Usage Features
The workbench is designed for ease of assembly and practical use. The assembly process involves attaching the legs, side panels, bottom frames, and base panel to form the main structure. Drawer slide panels are then installed, followed by the upper panel and intermediate slide supports. The drawers themselves are constructed by assembling the drawer fronts, side panels, backs, and bottom panels. Once assembled, the drawers are inserted into the workbench, with a specific procedure for engaging the slides. The pegboard is attached to the rear legs, providing a customizable area for hanging tools using various hooks and accessories. The storage cage is assembled and attached to the pegboard, offering a contained space for smaller items. The light support brackets and light are then installed to provide illumination. Finally, the wooden table top is placed on the workbench, and hanging hooks are inserted into pre-drilled holes on the side.
For optimal use, it is crucial to follow the assembly instructions carefully, ensuring all screws are properly tightened after the entire workbench is assembled. The drawers are designed with a detent mechanism; users should apply even pressure to engage the detent when closing drawers, avoiding slamming. When removing drawers, a specific two-lever release mechanism (pushing down on the right lever and pulling up on the left lever) must be followed to disengage them from the slides. The workbench is equipped with a power strip, allowing users to plug in tools directly. The maximum weight capacity for each drawer is 100 lbs, and this limit should not be exceeded to prevent damage or instability. It is important to open only one drawer at a time to maintain stability and prevent the workbench from tipping over. The integrated light enhances visibility, making it suitable for detailed work or use in dimly lit environments. The pegboard and hanging hooks offer flexible tool storage solutions, allowing users to customize their setup based on their needs.
Maintenance Features
Proper maintenance ensures the longevity and continued functionality of the workbench. Regular cleaning is essential: the workbench should be cleaned using a mild liquid soap and rinsed with clean water, then thoroughly dried. Abrasive detergents should be avoided as they can damage the surfaces. Any spilled water or other liquids should be wiped off immediately, and the unit dried completely to prevent moisture damage. To protect the workbench from dust and moisture when not in use, it is recommended to keep it covered.
Troubleshooting guidance is provided for common issues. If tools plugged into the power strip are not working, the first step is to check if the power cord plugs are loose and ensure they are properly plugged in. If the lamp light is flickering or not working, the lamp tube may be old and require replacement. Additionally, users should check if the lamp plug is loose and ensure it is properly connected. The manual emphasizes several safety precautions that also contribute to maintenance and prevent damage: avoiding standing in or on the drawers, not opening more than one drawer at a time, and not altering the product in any manner (e.g., welding external lock bars or attaching electrical equipment). These guidelines help preserve the structural integrity and electrical safety of the workbench. The 3-year limited warranty covers defective parts and workmanship, but it does not cover damage due to mishandling or abuse, highlighting the importance of proper usage and care. For replacement parts or any questions, customers are directed to contact the customer service department.