CLEANING
The
optical system of
your
projector
must
be
kept clean if
it
is
to
continue
to
give the best results.
Dust
or
fingerprints
on the lenses will reduce the
brightness
of
the
picture
on the
screen and will cause
it
to
appear cloudy or flat.
Projection
Lens-Turn
the
focus
knob until the lens is
out
as
far
as
it
will go. Carefully push the
focus
knob
toward
the
side
of
the
projector;
at the same time,
withdraw
the
projec-
tion
lens.
With
a soft, clean,
lintless
cloth or
KODAK
Lens
Cleaning Paper, wipe the
front
and back surfaces
of
the
lens.
Replace the lens by again
pushing
the knob
toward
the
side of
the
projector
and
guiding
the lens back
into
position.
The
lens should
be
far
enough
into
its recess
that
the
gear
teeth on the side
of
the lens barrel will be engaged by
the
gear
on
the
focus-knob
shaft.
Condenser
Optics-Turn
the
projector
bottom
side up. Open
the
optics
cover as described on page
14.
Carefully
lift
out
the
condenser
lenses and the heat-absorbing glass, one at
a time. Clean both sides of the
condenser
lenses and heat-
absorbing
glass with a clean, soft, lintless cloth
or
KODAK
Lens Cleaning Paper.
Be
careful
not
to
leave
fingerprints
on
the elements. Replace the
condenser
lenses and heat-
absorbing
glass.
The
small
condenser
lens
fits
in
the
guides
nearest the projection lamp, with the
flat
side
of
the
con-
denser
toward the lamp.
The
heat-absorbing glass
fits
in
the
center
guides, and the large
condenser
lens
fits
in
the
guides
nearest the
front
of the projector. Close and secure
the
optics
cover.
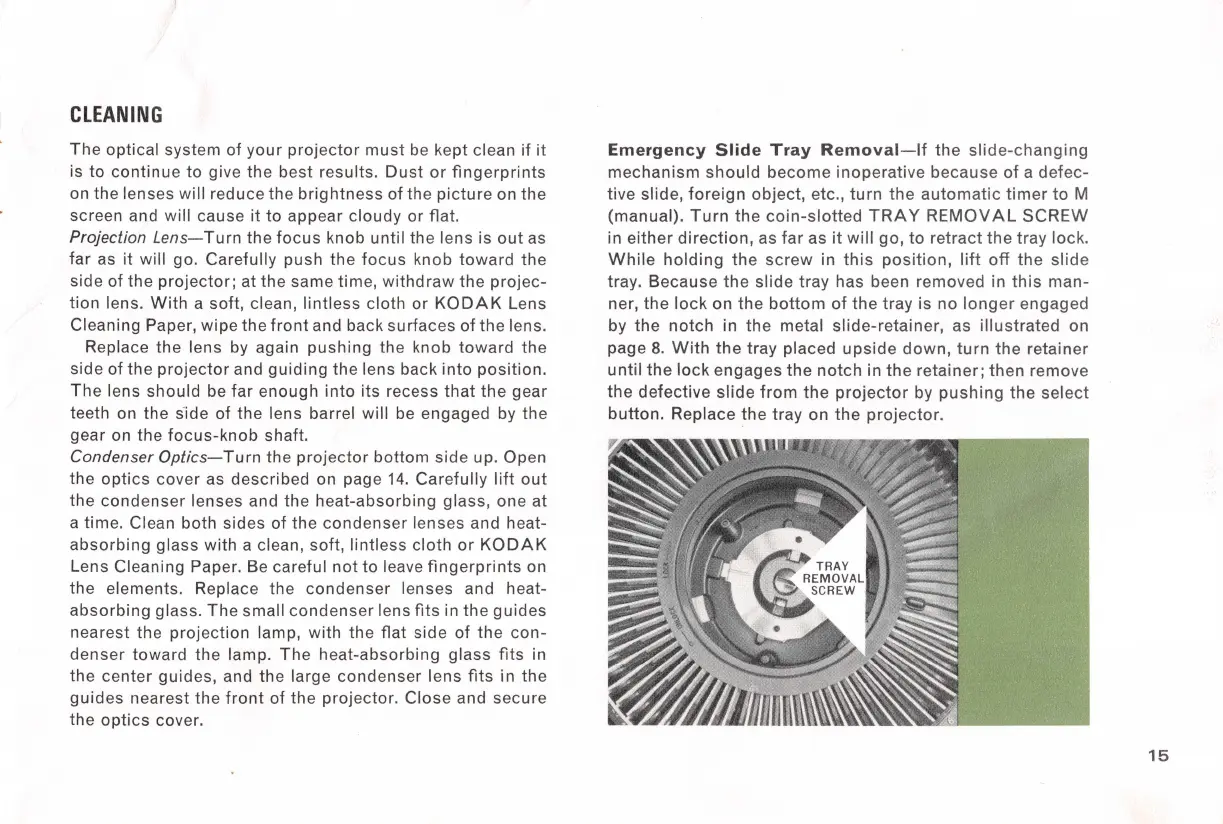
Emergency
Slide
Tray
Removal-If
the
slide-changing
mechanism
should
become
inoperative because
of
a
defec-
tive slide,
foreign
object, etc.,
turn
the
automatic
timer
to
M
(manual).
Turn
the
coin-slotted
TRAY
REMOVAL
SCREW
in either
direction,
as
far
as
it
will
go,
to
retract
the
tray lock.
While
holding
the
screw
in
this
position,
lift
off
the
slide
tray. Because
the
slide
tray
has been removed in
this
man-
ner,
the
lock
on the
bottom
of
the
tray is no
longer
engaged
by
the
notch
in
the
metal slide-retainer, as
illustrated
on
page 8.
With
the
tray placed
upside
down,
turn
the
retainer
until
the
lock
engages
the
notch
in
the
retainer; then remove
the
defective
slide
from
the
projector
by
pushing
the
select
button.
Replace the tray on
the
projector.
15