Printed in China
The Kodak trademark and trade dress are used under license from Kodak.
La marque de commerce Kodak et son apparence sont utilisées sous licence Kodak.
La marca y la imagen comercial Kodak son usadas bajo licencia de Kodak.
A marca e a imagem comercial Kodak são usadas sob licença da Kodak.
Kodak und die Kodak-Markenausstattung werden unter Lizenz von Kodak genutzt.
Товарный знак Kodak и товарная упаковка используются по лицензии
компании Kodak.
A Kodak márkajelzés és kereskedelmi jelzés használata a Kodak engedélyével
történik.
Il marchio Kodak ed il trade dress Kodak sono usati sotto licenza di Kodak.
Торгова марка Kodak та фірмовий стиль використовуються за ліцензією
Kodak.
© 2014 by JK Imaging Ltd. All rights reserved.
JK Imaging Ltd. 1411 W. 190th Street, Suite 550, Gardena, CA 90248, USA
www.kodakpixpro.com
Licensed Product Produit Autorise Producto Autorizado
Prodotti con licenza
Ліцензована продукція
Engedélyezett termék
Lizenziertes Produkt
продукт
Лицензированный
Bajo Licencia
2
Insérer la batterie
1. Ouvrez le couvercle de la batterie.
2. Insérez correctement la batterie dans l'emplacement comme indiqué dans le
schéma .
3. Refermez le couvercle de la batterie.
4
Prendre une photo
1. Maintenez fermement l'appareil photo.
2. Utiliser le levier de zooming pour sélectionner les positions tele ou Large pour
zoomer en avant ou en arrière sur votre sujet.
3. Appuyez sur le bouton déclencheur à moitié pour faire la mise au point sur
l’objet. Quand la case de mise au point devient verte, appuyez complètement
sur le bouton déclencheur pour prendre la photo.
5
Utiliser la molette de mode
L’appareil photo est doté d’un sélecteur de commande pratique permettant de
commuter entre les différents modes avec facilité. Toutes les commandes
disponibles sont listées ci-dessous:
Mode auto Embellisseur de visage
Programme AE Mode Wi-Fi
Priorité à la vitesse
Mode scène
Priorité à l'ouverture
Mode lm
Mode manuel
Réglages personnalisés
7
Utilisation des bouton menu
3
Régler la langue et la date, l’heure
1. Appuyez sur le bouton Marche pour allumer l’ appareil photo. Le menu Langue
apparaît, utiliser les boutons haut/bas pour sélectionner la langue, puis appuyer
sur pour conrmer votre choix.
2. Utiliser à nouveau les boutons gauche/droite, haut/bas pour régler la date et
l'heure, appuyer ensuite sur pour conrmer.
1
Vues de l’appareil photo
Guide de démarrage rapide
6
Utilisation des bouton d'enregistrement vidéo rapide
En mode de prise de vue, appuyer sur le bouton pour commencer à
enregistrer une vidéo. Après l'enregistrement, appuyer sur le bouton pour
arrêter l'enregistrement. L'appareil photo va stocker la vidéo et retourner à l’écran
de prise de vue.
En chaque mode (sauf pour le mode Wi-Fi), appuyer sur le bouton pour
accéder au "Menu Facile". Appuyer sur le bouton [ ]/[ ] pour
déplacer parmis les options, puis appuyer sur pour faire une décision.
Choisissant dans cette liste va fournir l'accès au "Menu Complet":
Réglages de prise de photos1 Réglages de chiers
Réglages de prise de photos2 Réglages de connexion
Réglages de lecture Réglages Wi-Fi
Réglages générale
1
Port Micro HDMI
18
Bouton Menu
2
Port Micro USB
19
Bouton I
3
Molette du zoom
20
Manette jog-shuttle
4
Déclencheur
21
Bouton Disp (Afch)
5
OEillet de courroie
22
Bouton Lecture
6
Bouton de correction
d’exposition
23
Bouton AF / Bouton Haut
7
Bouton de capture en rafale 24
Bouton Flash / Bouton Droite
8
Bouton d’alimentation
25
Bouton Supprimer / Bouton
Retardateur / Bouton Bas
9
Voyant Rayon aide AF /
Voyant du retardateur
26
Bouton Macro / Bouton Gauche
10 Flash 27
Bouton SET
11
Objectif
28
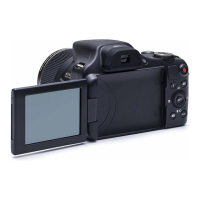
LCD Angle vari
12
Micro
29 Haut-parleur
13
Viseur électronique (Electronic
View Finder ou EVF)
30
Levier d'anneau de fonction de
lentille
14
Bouton Interrupteur EVF / LCD
31 Anneau de fonction de lentille
15
Voyant
32 Couvercle de la batterie
16
Molette de mode.
33
Embase letée de trépied
17
Bouton d'enregistrement vidéo
rapide
8
Connexion Wi-Fi
La caméra peut être raccordée à votre périphérique intelligent grâce à l'application
"PIXPRO Remote Viewer" .
1
Vistas de la Cámara
1. Oprima el botón Power para encender la cámara. Aparecerá el menú de idioma,
Utilice las teclas Arriba/Abajo para seleccionar un idioma, Pulse para
conrmarlo.
2. Pulse Arriba/Abajo/Izquierda/Derecha de nuevo para congurar la fecha y la
hora, Pulse el botón para conrmar.
3
Conguración idioma/fecha/hora
4
Como Tomar una fotografía
1. Sostenga la cámara con rmeza.
2. Utilice el control del zoom para seleccionar las posiciones Tele o Wide, para
acercar o alejar el objeto.
3. Presione el Botón Disparador a medio camino para focalizar el tema.
Cuando la caja de focalización se torna verde, presione el Botón Disparador
completamente hacia abajo para tomar la fotografía.
5
Utilizando la Modalidad de sintonización
La cámara ofrece un dial de modo conveniente que le permite cambiar entre
distintos modos con facilidad. Todos los modos disponibles son los siguientes:
Modo automático Embellecedor facial
Programa AE Modo Wi-Fi
Prioridad de obturador Modo de escena
Prioridad de Abertura Modo de película
Modo manual
Conguración Personalizada
7
Utilización del botón de menú
Guía de Inicialización rápida
2
Inserción de batería
1. Abra la tapa de batería.
2. Inserte adecuadamente la batería en su ranura, según lo indicado en el
diagrama.
3. Cierre la tapa de la batería.
6
Utilización del botón de grabación rápida de vídeo
En el modo de Disparo, presione el botón para empezar a grabar un vídeo.
Después de grabar, presione el botón de nuevo para dejar de grabar. La
cámara guardará el vídeo y regresará a la pantalla de disparo.
En cada modo (excepto en el modo Wi-Fi), presione el botón para acceder al
"Menú fácil". Presione los botones [ ]/[ ] para desplazarse entre las
opciones, luego presione para hacer una selección. Al elegir dentro de esta
lista le permitirá un acceso al "Menú completo":
Conguraciones de disparo 1 Conguraciones de archivo
Conguraciones de disparo 2 Conguraciones de la conexión
Conguraciones de reproducción Conguraciones de Wi-Fi
Conguraciones generales
1
Puerto Micro HDMI
18
Botón de menú
2
Puerto Micro USB
19
Botón I
3
Barra de zoom
20
Rueda de Desplazamiento
4
Botón del obturador
21
Botón de disparo.
5
Ojal para correa
22
Botón de reproducción
6
Botón de compensación de
exposición
23
Botón de AF/Botón ariba
7
Botón de Captura continua
24
Botón de ash/ Botón derecha
8
Botón de encendido
25
Botón Eliminar/Botón de temporizador
automático/Botón abajo
9
Indicador de Haz Asist. EA/
Luz del disparador automático
26
Botón de macro/Botón izquierda
10
Lámpara de ash
27
Botón SET
11
Objetivo
28
LCD de ángulo variable
12
Micrófono
29
Altavoz
13
Visor electrónico (EVF)
30
Palanca de anillo de funcionamiento
del lente
14
Botón selector EVF / LCD
31
Anillo de funcionamiento del lente
15
Indicador de luz
32
Tapa de la batería
16
Dial de Modo
33
Rosca de trípode
17
Botón de grabación rápida de
vídeo
8
Conexión "Wi-Fi"
La cámara puede conectarse con su dispositivo inteligente a través de la aplicación
"PIXPRO Remote Viewer" .
http://kodakpixpro.com/Americas/
support/downloads.php
Americas
http://www.kodakpixpro.com/Europe/
support/multi-lang-downloads.php
Europe
The RAW le format provides lossless compression of the image data, which is not
processed by the camera. The RAW le may be opened and modied using the image
processing software, PhotoStudio Darkroom, that is located on the CD-ROM included
with this camera. PhotoStudio Darkroom supports Windows vista/7/8 and Mac OS X
v10.6.8~v10.8.
The Camera User Manual and the "PIXPRO Remote Viewer" User Manual are
available at the website location below:
1
5
4
Sound Settings
Power Saver Auto
Language
World Tim
ome
Date & Time
English
LCD Brightness
2014.04.23 00:00
ExitSet
Select
Language
য檥Иކ
এѽИކ
মୁ
㷼ᄙⱥ
English
Français
Date & Time
H-M
Exit
26
27
28
1
Camera Views
2
Inserting the Battery
1. Open the battery cover.
2. Correctly insert the battery into the slot as the diagram shows.
3. Close the battery cover.
1. Press the power button to turn the camera on and the language menu will
appear. Use the up/down buttons to select a language, and press the button
to conrm the language.
2. Use the up/down/left/right buttons again to set the date and time, and press the
button to conrm.
3
Setting the Language/Date/Time
4
Taking a Picture
5
Using the Mode Dial
This camera provides a convenient mode dial that allows you to manually switch
among different camera settings with ease. Available modes are listed below:
Auto Mode Face Beautier
Program AE Wi-Fi Mode
Shutter priority Scene Mode
Aperture priority Movie Mode
Manual Mode
Custom Settings
7
Using the Menu Button
6
Using the Fast Video Recording Button
In Shooting mode, press the button to begin recording a video. After recording,
press the button again to stop recording. The camera will store the video and
return to the shooting screen.
In each mode (except for the Wi-Fi mode), press the button to access the
"Easy Menu". Press the [ ]/[ ] buttons to move among options, then
press the button to make a selection. Choosing the within this list will
provide access to the "Full Menu":
Shoot Settings 1 File Settings
Shoot Settings 2 Connection Settings
Playback Settings Wi-Fi Settings
General Settings
Quick start guide
1
Micro HDMI Port
18
Menu Button
2
Micro USB Port
19
i Button
3
Zoom Lever
20
Jog Dial
4
Shutter Button
21
Display Button
5
Strap Eyelet
22
Playback Button
6
Exposure Compensation Button
23
AF Button/Up Button
7
Continuous Shot Button
24
Flash Button/Right Button
8
Power Button
25
Delete Button/Self-timer
Button/Down Button
9
AF Assist Beam/Self-timer Lamp
26
Macro Button/Left Button
10
Flash Lamp
27
SET Button
11
Lens
28
Vari-angle LCD
12
Microphone
29
Speaker
13
Electronic View Finder (EVF)
30
Lens Function Ring Lever
14
EVF/ LCD Switch Button
31
Lens Function Ring
15
Indicator Lamp
32
Battery Cover
16
Mode Dial
33
Tripod Socket
17
Fast Video Recording Button
Quick start guide
The camera can be connected with your smart device through
"
PIXPRO Remote
Viewer" App
.
8
Wi-Fi Connection
Le Manuel d'utilisation de l'Appareil Photo et le Manuel d'utilisation de 'PIXPRO Remote
Viewer' sont disponible dans le site internet suivant:
El manual de usuario de la cámara y el manual del usuario de "PIXPRO Remote Viewer"
se encuentran disponibles en el siguiente sitio web:
Руководство пользователя камеры и руководство пользователя "PIXPRO Remote
Viewer" размещены на веб-сайте:
A kamera Felhasználói kézikönyv és a "PIXPRO Remote Viewer" Felhasználói
kézikönyv az alábbi webhelyen található:
інструкції до камери і "PIXPRO Remote Viewer" користувача доступні на
веб-сайті нижче:
Le format RAW fournit la compression sans perte, qui est une sorte de chier de données
original non procédé par l'appareil photo. Le chier RAW pourrait être ouvert et modié
utilisant le logiciel de procession d'image, PhotoStudio Darkroom, qui est situé dans le
CD-ROM inclut avec cet appareil photo. PhotoStudio Darkroom est compatible avec
Windows vista/7/8 et Mac OS X v10.6.8~v10.8.
El formato RAW ofrece compresión sin pérdida, un tipo de archivo de datos originales que
no han sido procesados por la cámara. El archivo RAW puede puede abrirse y editarse
con el software de procesamiento de imágenes PhotoStudio Darkroom, que se encuentra
en el CD incluido con esta cámara. PhotoStudio Darkroom es compatible con Windows
Vista/7/8 y con Mac OS X v10.6.8~v10.8.
O Manual do usuário da Câmera e o Manual do usuário do "PIXPRO Remote Viewer"
estão disponíveis no site Web abaixo:
O formato RAW fornece compressão sem perdas, um tipo de arquivo de dados originais
não processados pela câmera. O arquivo RAW pode ser aberto e modicado usando
software de processamento de imagens, PhotoStudio Darkroom, localizado no CD-ROM
incluído com a câmera. O PhotoStudio Darkroom suporta o Windows Vista/7/8 e Mac OS
X v10.6.8~v10.8.
Файловый формат RAW обеспечивает сжатие изображения, не обработанного
камерой. Файл формата RAW может быть открыт и изменен при помощи ПО для
обработки изобаржения PhotoStudio Darkroom, которое находится на CD-ROM,
поставляемом вместе с камерой. PhotoStudio Darkroom поддерживается системами
Windows vista/7/8 и Mac OS X v10.6.8~v10.8.
A RAW formátum veszteségmentes tömörítést biztosít, amely olyan eredeti adatfájl,
amelyet a kamera nem dolgoz fel. A PhotoStudio Darkroom képfeldolgozó szoftverrel a
RAW fájl megnyitható és módosítható. Ez a kamerával érkezett CD-ROM-on található.
A PhotoStudio Darkroom támogatja a Window vista/7/8 és az Mac OS X v10.6.8~v10.8
alkalmazást.
RAW формат забезпечує стиснення без втрат, який є свого роду вихідному файлі
даних не обробляються камери. RAW файл може бути відкритий і змінений за
допомогою програмного забезпечення для обробки зображень, PhotoStudio Darkroom
(поміщений у частинах CD-ROM), який знаходиться на компакт-диску в комплекті
з цією камерою. PhotoStudio Darkroom підтримує vista/7/8 Windows, і Mac OS X
v10.6.8~v10.8.
1. Hold the camera securely.
2. Use the zoom lever to select Tele or Wide position to zoom in or out on your
subject.
3. Press the shutter button half way to focus on the subject. When the focus frame
turns green, press the shutter button completely down to take the picture.
Das Benutzerhandbuch der Kamera und Benutzerhandbuch " PIXPRO Remote Viewer"
sind auf der folgenden Website verfügbar:
Il manuale dell'utente della fotocamera e il manuale dell'utente "PIXPRO Remote Viewer"
sono disponibili al sito web riportato sotto:
RAW-Format bietet verlustfreie Komprimierung, die eine Art von Originaldatendatei,
die von der Kamera nicht bearbeitet wird ist . Die RAW-Datei kann mit der
Bildverarbeitungssoftware, Photostudio Darkroom geöffnet und modiziert werden, die sich
auf der CD-ROM in dieser Kamera bendet. Photostudio Darkroom unterstützt Windows
vista/7/8 und Mac OS X v10.6.8~v10.8 .
Formato RAW fornisce una compressione senza perdita di dati, che è un tipo di le di
dati originali non elaborati dalla fotocamera. Il le RAW può essere aperto e modicato
utilizzando il software di elaborazione delle immagini, PhotoStudio Darkroom, che si
trova sul CD-ROM in dotazione con la fotocamera. PhotoStudio Darkroom supportato in
Windows Vista/7/8 e Mac OS X v10.6.8~v10.8.
CR294080899-2
Quick start guide
Guide de démarrage rapide
Guía de Inicialización rápida
Guia de Inicialização rápida
Schnellstartanleitung
Краткое руководство
Üzembe helyezési útmutató
Guida avvio veloce
Коротка інструкція