65
Para los siguientes terminales, utilice cables de 3 m o menos para
evitar anomalías de funcionamiento:
Jack para auriculares, jack DAMPER, puerto USB B.
Jacks OUTPUT L/MONO, R: Conecte estos jacks TRS a un mezclador,
interfaz de audio, sistema de monitorización, etc. Ajuste el volumen con el
mando VOLUME.
Jack para auriculares: Conecte aquí los auriculares. Transmite la misma
señal que la de OUTPUT L/MONO y R.
Jack DAMPER: Conecte un pedal de resonancia Korg DS-1H o un
conmutador de pedal PS-1/PS-3 (vendidos por separado) para controlar la
función de damper. La polaridad del pedal se detecta de forma automática;
para ello, compruebe que el pedal no esté pisado al conectarlo o encen
-
derlo.
C
onectores MIDI IN, OUT: Utilice estos conectores para conectar el
modwave module a un dispositivo MIDI externo para intercambiar
mensajes MIDI. Compruebe que los canales MIDI estén correctamente
configurados.
Puerto USB B: Conéctelo a un ordenador para intercambiar datos y
mensajes MIDI.
Ja
接続
ACアダプターの接続
1.
付属のACアダプターのDCプラグを、リア・パネルのDC 12V端子に接 続しま
す。
必ず付属のACアダプターをお使いください。他のACアダプターを使用
した場合、故障の原因となります。
2.
ACアダプターのコードをコ ー ド・フ ッ ク に引っかけます。
コードをコード・フックから外すときは、無理に引っ
張らないでください。プラグが破損する原因になり
ます。
3.
ACアダプターのプラグを電源コンセントに接続します。
電源は必ずAC100Vを使用してください。
その他の接続
お使いのシステムに応じて、適切に接続してください。
接続するときは、すべての機器の電源をオフにした状態で行ってくだ
さい。電源をオンのまま接続すると、スピーカー・システムなどを破損
したり、誤動作を起こしたりする原因となります。
下記の端子については、製品の誤動作等を防ぐため、3m以下のケーブ
ルをご使用ください。
ヘッドホン端子、DAMPER端子、USB B端子
OUTPUT L/MONO、R端子: ミキサーやパワード・モニター・スピーカーなどを
接続します。音量はVOLUMEノブで調節します。
ヘッドホン 端子: ヘッドホンを接続します。OUTPUT端子からの出力と同じ信号
を出力します。
DAMPER端子: 別売のコルグDS-1Hダンパー・ペダル、PS-1、PS-3ペダル・ス
イッチを接続し、ダンパー機能をコントロールします。
modwave moduleはハーフ・ダンパー機能に対応していません。
MIDI IN/OUT端 子: 外部MIDI機器を接続し、MIDIデータを送受信します。
外部MIDI機器を使用するときは、外部機器の送信MIDIチャンネルと
m
odwave moduleのMIDIチャンネルを合わせます。
USB B端子: コンピューター等を接続し、MIDIデータを送受信します。
De Anschließen
Anschließen des Netzteils
1.
Schließen Sie den kleinen Stecker des AC-Netzteils an die DC 12V-
Buchse auf der Rückseite des modwave module an.
Verwenden Sie unbedingt das beiliegende AC-Netzteil. Die
Verwendung anderer Netzteile könnte zu Schäden führen.
2.
Wickeln Sie das Netzteilkabel nach Anschließen des
Steckers um den Kabelhaken.
Ziehen Sie das Kabel nie mit Gewalt vom Haken.
Sonst könnte der Stecker beschädigt werden.
3.
Verbinden Sie das Netzteil mit einer Steckdose.
Wählen Sie immer eine Steckdose mit einer für das Netzteil geeig-
neten Spannung.
Andere Anschlüsse
Schließen Sie den modwave module an die geeigneten Buchsen des Ver-
stärkersystems an.
Schalten Sie alle Geräte aus, bevor Sie die Verbindungen herstellen.
Das Anschließen von eingeschalteten Geräten kann zu Funkti-
onsstörungen und Schäden an den Lautsprechern oder anderen
Komponenten führen.
Verwenden Sie für folgende Anschlüsse Kabel bis maximal 3 m
Länge, sonst kann es zu Fehlfunktionen kommen.
Kopfhörerbuchse., DAMPER-Buchse, USB-B-Port
OUTPUT L/MONO-, R-Buchsen: Verbinden Sie diese TRS-Buchsen
mit einem Mischpult, einer Audioschnittstelle, einem Abhörsystem usw.
Stellen Sie die Lautstärke mit dem VOLUME-Regler ein.
Kopfhörerbuchse.: Hier kann ein Kopfhörer angeschlossen werden.
Das hier anliegende Signal ist mit dem von OUTPUT L/MONO und R
identisch.
DAMPER-Buchse: Schließen Sie ein Korg DS-1H Dämpferpedal oder
einen PS-1/PS-3 Fußtaster (Sonderzubehör) an, um die Dämpferfunkti
-
on anzusteuern. Die Polarität des Pedals wird automatisch erkannt. Das
funktioniert aber nur, wenn das Pedal beim Anschließen oder Einschalten
des Instruments nicht gedrückt ist.
MIDI IN-, OUT-Buchse: Über diese Buchsen sendet bzw. empfängt der
modwave module MIDI-Befehle zu/von externen MIDI-Geräten. Denken
Sie daran, die richtigen Kanalnummern zu wählen.
USB B-Port: Verbinden Sie ihn mit Ihrem Computer, um MIDI-Befehle
und Daten auszutauschen.
Es
Hacer las conexiones
Conectar el adaptador de CA
1.
Conecte el conector pequeño del adaptador de CA incluido a la toma
DC 12V del panel posterior del modwave module.
Asegúrese de utilizar exclusivamente el adaptador de CA incluido.
Si utiliza cualquier otro adaptador de CA, puede provocar un
funcionamiento anómalo.
2.
Después de conectar el conector de CC, enrolle el
cable del adaptador de CA al gancho para el cable.
No aplique una fuerza excesiva al tirar del cable
del gancho. De lo contrario, podría dañar el
conector.
3.
Conecte el conector del adaptador de CA a una toma de CA.
Utilice siempre una toma de CA del voltaje correcto para su adapta-
dor de CA.
Otras conexiones
Conecta el modwave module según corresponda para su sistema de audio.
Compruebe que todos los dispositivos estén apagados antes de
realizar las conexiones. Si alguno de los equipos está encendido al
realizar las conexiones, puede provocar un funcionamiento inco-
rrecto o daños en el sistema de altavoces y otros componentes.
Fr Connexions
Connexion de l’adaptateur secteur
1.
Branchez la petite fiche de l’adaptateur secteur fourni DC 12V à la
prise en face arrière du modwave module.
Utilisez exclusivement l’adaptateur secteur fourni. L’utilisation de
tout autre adaptateur peut provoquer des dysfonctionnements.
2.
Après avoir branché la petite fiche, faites une boucle
avec le câble de l’adaptateur secteur autour du crochet.
N’utilisez pas de force excessive lorsque vous
décrochez le câble du crochet. Cela risque de
d’endommager la fiche.
3.
Branchez la fiche de l’adaptateur à une prise secteur.
Choisissez une prise secteur de tension appropriée pour l’adaptateur.
Autres connexions
Branchez le modwave module à votre installation audio.
Veillez à couper l’alimentation de tous les dispositifs concernés
avant d’effectuer les connexions. Si l’alimentation n’est pas coupée
lorsque vous effectuez des connexions, cela risque d’endommager
les haut-parleurs et d’autres composants.
Pour les bornes suivantes, utilisez un câble de 3 m maximum afin
d‘éviter les dysfonctionnements.
Prise casque, prise DAMPER, port USB-B
Prises OUTPUT L/MONO, R: Reliez ces prises TRS à une console de
mixage, une interface audio, un système d’écoute etc. Réglez le volume avec
la commande VOLUME.
Prise casque: Vous pouvez y brancher un casque. Le signal présent est
identique à celui des prises OUTPUT L/MONO et R.
Prise DAMPER: Branchez une pédale forte Korg DS-1H ou une pédale
commutateur PS-1/PS-3 (vendue séparément) pour piloter la fonction
“Damper”. La polarité de la pédale est détectée automatiquement. Pour
cela, veillez à ce que la pédale ne soit pas enfoncée lors de la connexion ou
de la mise sous tension.
Prises MIDI IN, OUT: Utilisez ces prises pour brancher le
modwave module à un dispositif MIDI externe afin d’échanger des mes
-
sages MIDI. Vérifiez que les canaux MIDI sont bien réglés.
P
ort USB B: Branchez-la à un ordinateur pour échanger des messages
MIDI et des données.
En Making connections
Connecting the AC adapter
1.
Connect the DC plug of the included AC adapter to the DC 12V jack
on the rear panel of the modwave module.
Be sure to use only the included AC adapter. Using any other AC
adapter may cause malfunctions.
2.
After connecting the DC plug, loop the AC adapter
cord onto the Cord Hook.
Do not use excessive force when pulling the cord
off the hook. Doing so may damage the plug.
3.
Connect the plug of the AC adapter to an AC outlet.
Be sure to use an AC outlet of the correct voltage for your AC
adapter.
Other connections
Connect the modwave module as appropriate for your audio system.
Be sure that the power on all of your devices is turned off before you
make connections. Leaving the power on when you make connec-
tions may cause malfunctions, or damage your speaker system and
other components.
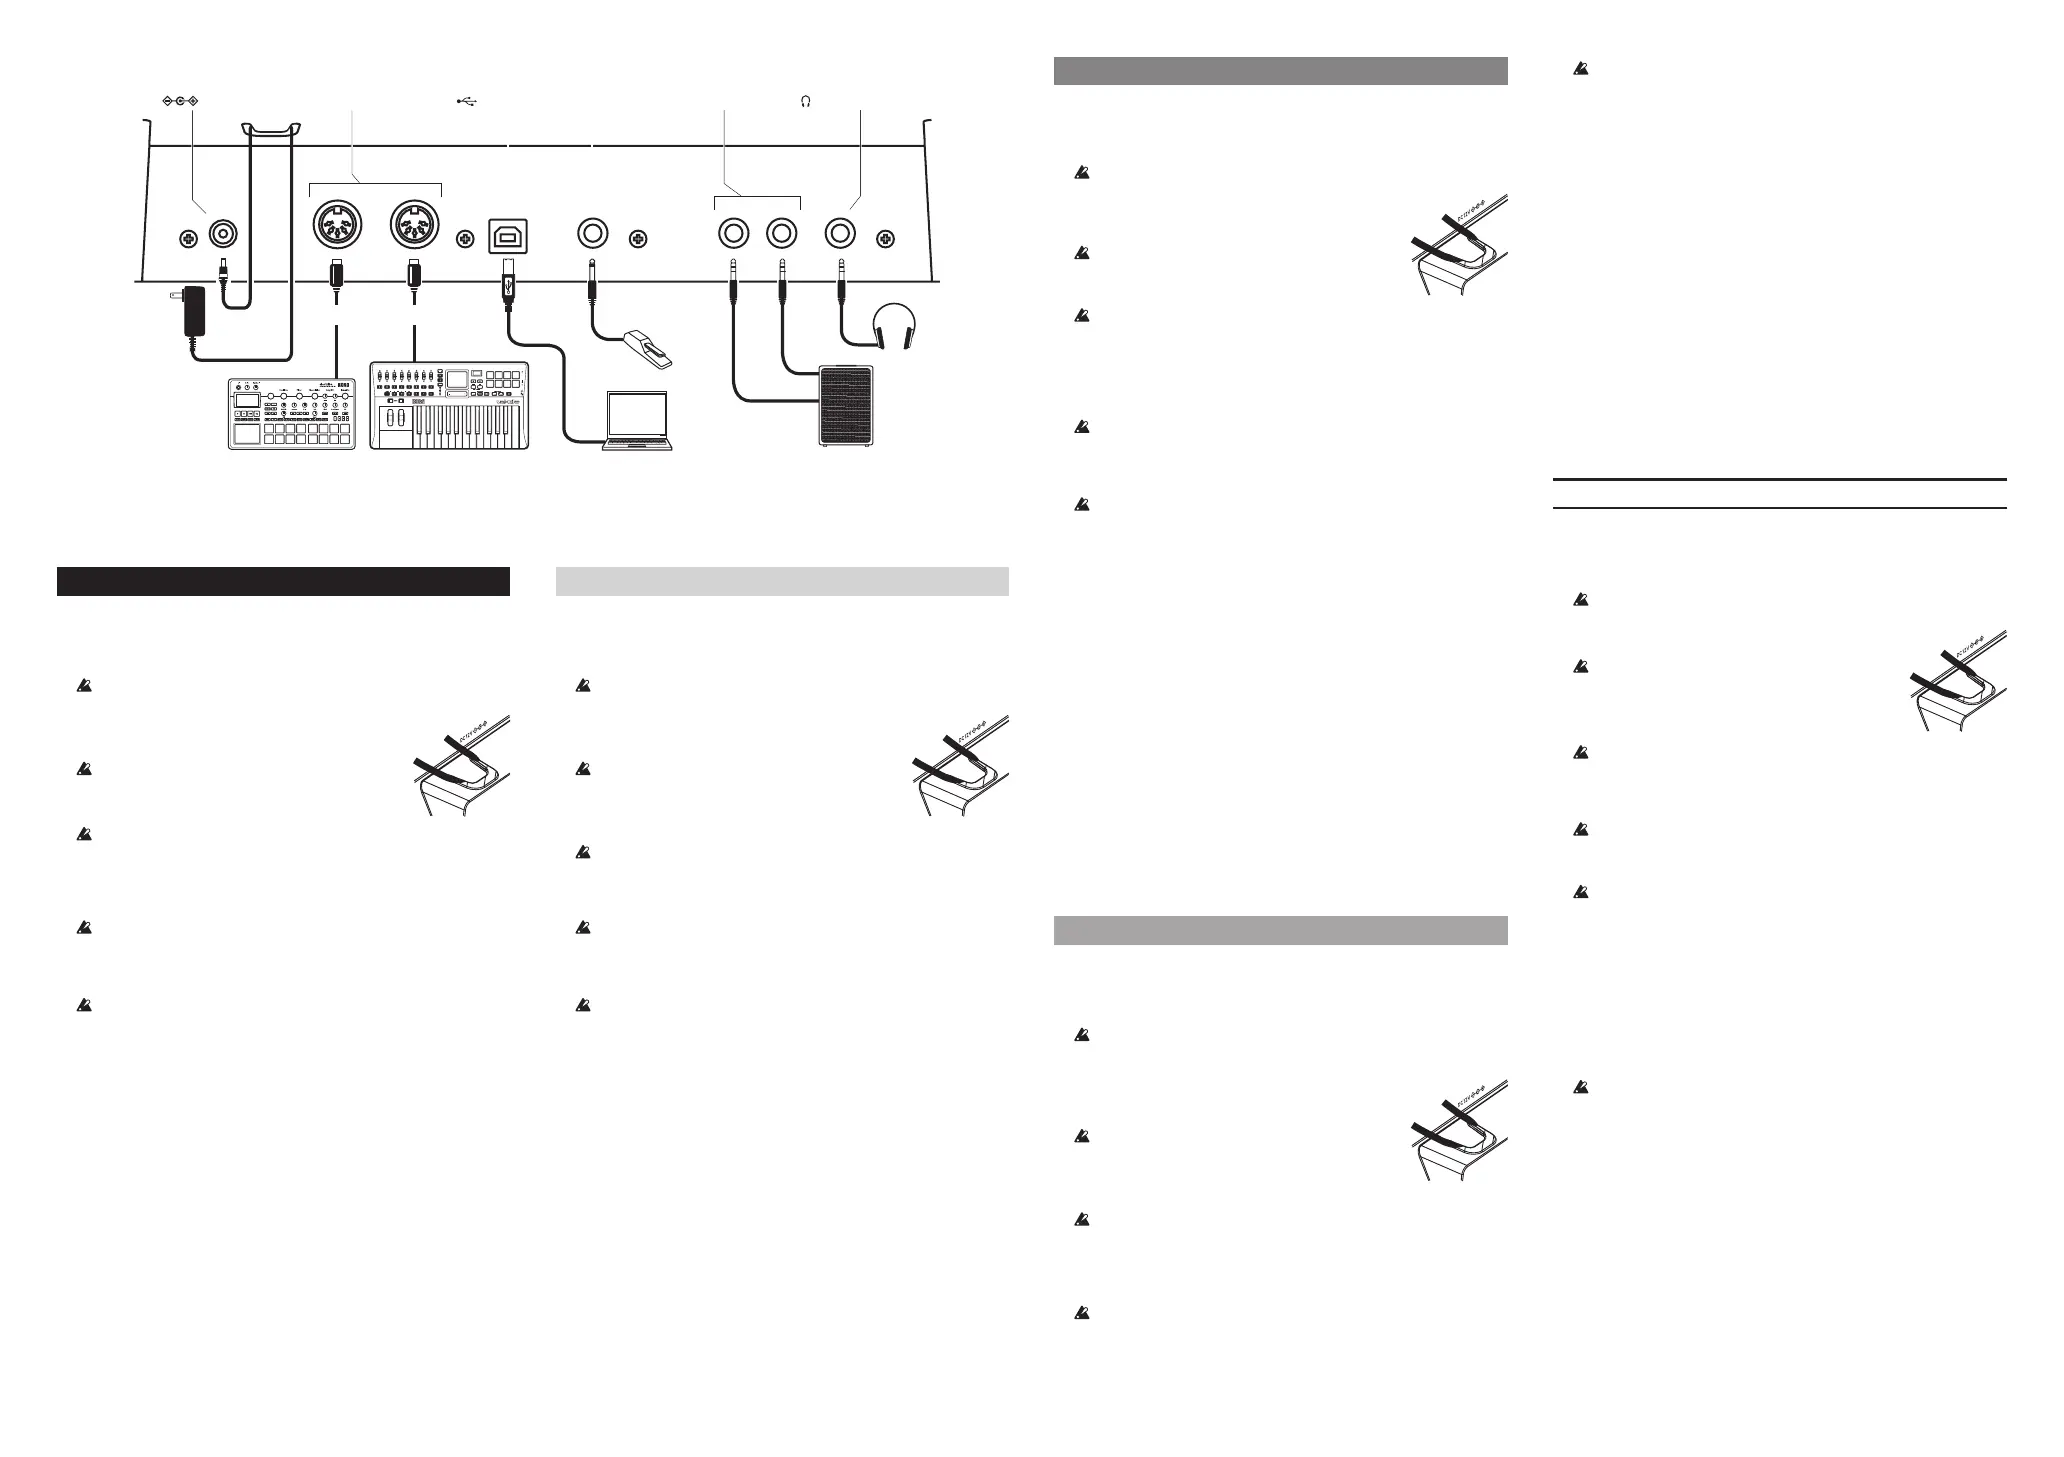
For the following terminals, use a cable of 3 m or less to prevent
malfunction.
Headphones jack, DAMPER jack, USB-B port
OUTPUT L/MONO, R jacks: Connect these TRS jacks to a mixer, audio
interface, monitor system, etc. Adjust the volume level using the
VOLUME knob.
H
eadphones jack: Connect the headphones here. This carries the same
signal as that of OUTPUT L/MONO and R.
DAMPER jack: Connect a Korg DS-1H damper pedal or a PS-1/PS-3
pedal switch (sold separately) to control the damper function. Pedal polar
-
ity is detected automatically; to allow this, make sure that the pedal is not
h
eld down when connected, or while turning on power.
MIDI IN, OUT connectors: Use these connectors to connect the
modwave module to an external MIDI device for exchanging MIDI mes-
sages. Make sure that the MIDI channels are set appropriately.
US
B B port: Connect this to a computer to exchange MIDI messages and
data.
MIDI IN, OUT connectors
OUTPUT
L/MONO, R jacks
Headphones
INPUT L
INPUT R
Mixer, Monitors,
Damper pedal,
Pedal switch, etc.
DAMPER jack
Cord hook
(Headphones) jack
(USB B) port
AC adapter
(included)
USB
Computer
USB cable
MIDI keyboard,
MIDI OUT
Sound module,
MIDI cable
MIDI IN
MIDI cable
DC 12V jack
 Loading...