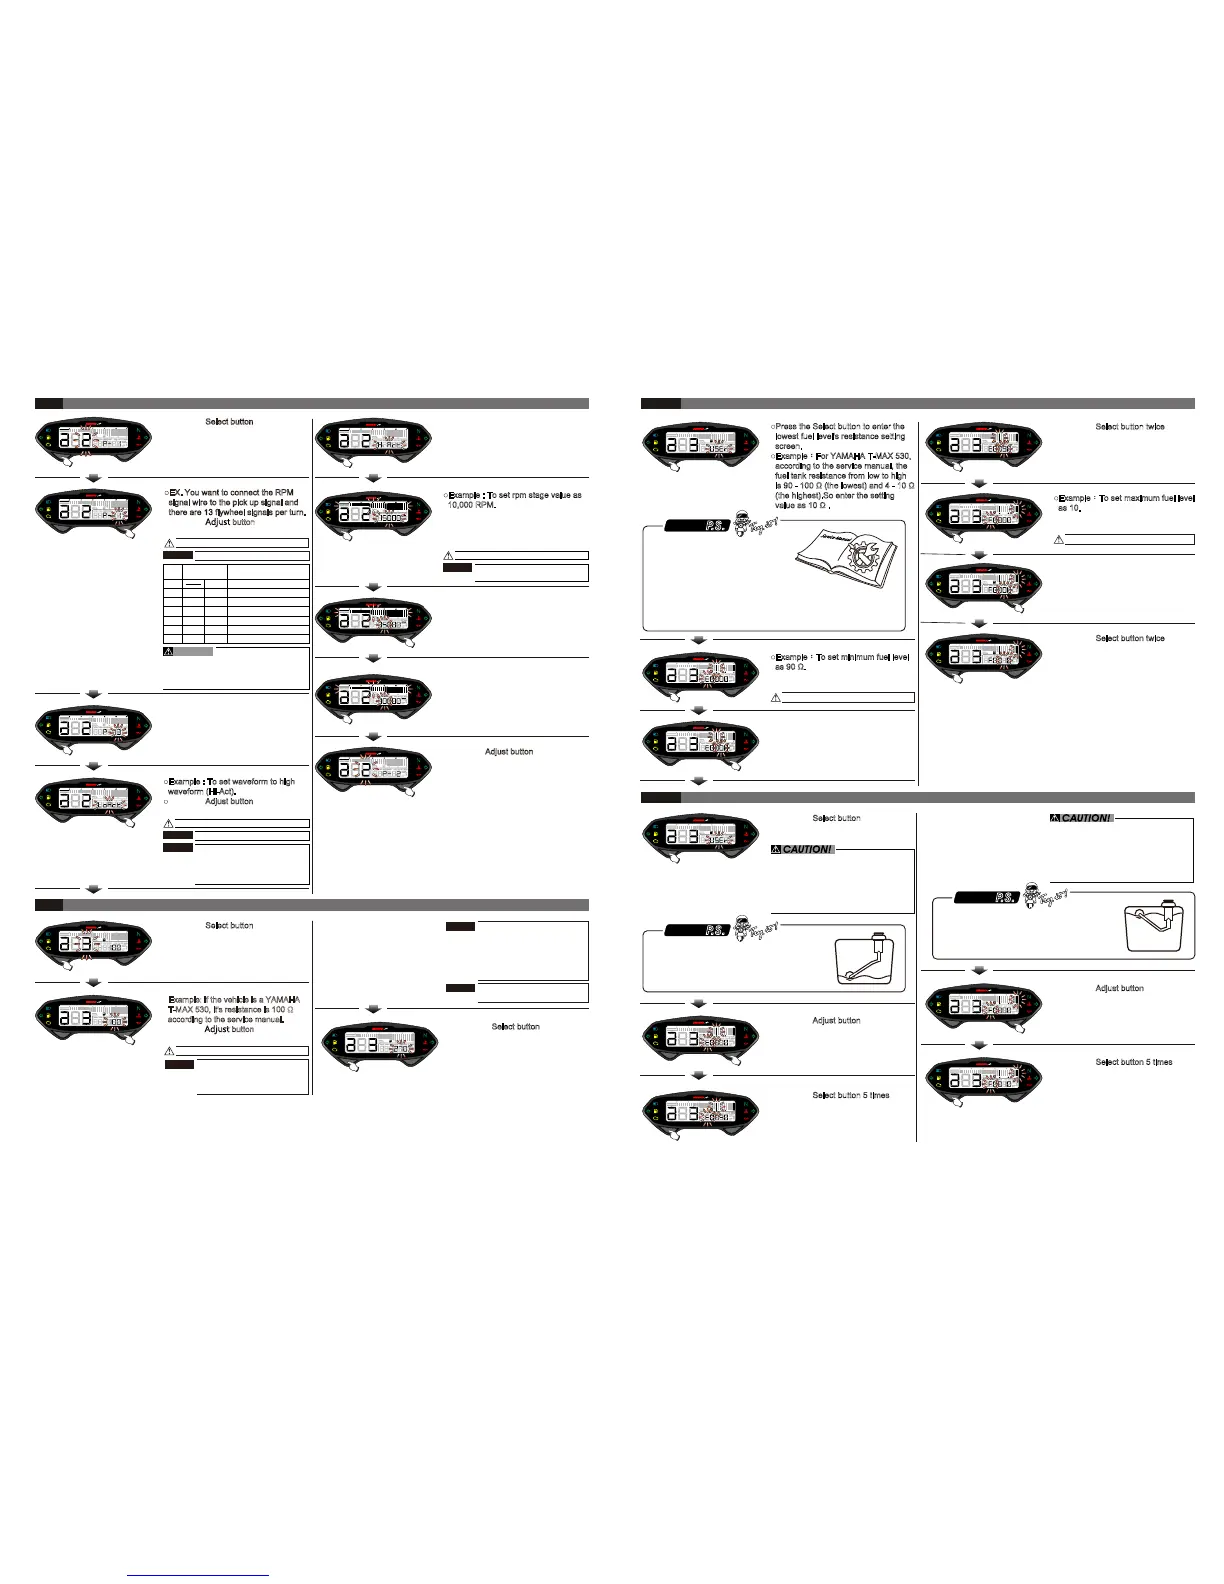
●Press the Select button to enter the
lowest fuel level's resistance setting
screen.
●Example:For YAMAHA T-MAX 530,
according to the service manual, the
fuel tank resistance from low to high
is 90 - 100 Ω (the lowest) and 4 - 10 Ω
(the highest).So enter the setting
value as 10 Ω .
4-3-2
Fuel level resistance auto detection setting
4-3-1
Fuel level manual setting
●Press the Select button 5 times to
enter the lowest fuel level resistance
auto detection screen.
●EX. Auto Detection the lowest fuel
level resistance is 90 Ω.
P.S.
P.S.
●For example of YAMAHA T-MAX 530,
if the fuel surface sensor float in the
lowest position then it will detect the
resistance around
90 Ω.
●Press the Select
button to enter the
lowest fuel level's resistance auto
detection screen.
●Press the A
djust button to detect the
lowest fuel level's resistance.
The lowest position
●Before detection, ensure that your current
fuel level is in the lowest position that you
would like to have.
●Stop the vehicle for a few seconds to allow
the fuel surface to become steady, then
start the detection of the resistance.
●Before detection, please ensure your
current fuel level is in the highest
position that you would like to have.
●Stop the vehicle for a few seconds to
allow the fuel surface become steady,
then start the detection of the resistance.
P.S.
●For example the YAMAHA
T-MAX 530, if the fuel surface sensor
float is in the highest position then it
will detect the resistance as around 10 Ω.
●Press the Adjust button to detect the
highest fuel level resistance.
●Press the Select button 5 times
to go
back to the fuel gauge resistance.
●EX. Automatically detect the highest
fuel level resistance value as 10 Ω.
The highest position
Currently setting value will blink.
●Example:To set maximum fuel level
as 10.
●Press the Select button
to choose
the setting number.
●
Press the
Select button twice
to enter
maximum fuel resistance value setting
screen.
●
EX:Setting minimum fuel level
from 0 to 90.
●Press the Select button twice to enter
4-3-3 fuel warning setting menu.
●EX. The highest fuel level setting is
changed from 0 to 10 Ω.
●Press the
Adjust button
to choose
the setting number.
Currently setting value will blink.
●Example:To set minimum fuel level
as 90 Ω.
●Press the Select button
to choose
the setting number.
●Press the
Adjust button
to choose
the setting number.
●You could find your fuel level sensor
resistance range in the electronic
components section in the service
manual.
●Normally, we will recommend to choose the
closest number set as the range to ensure that riders
will not run out of gas before the fuel level indication. example, for
YAMAHA T-MAX it’s 90 - 100 Ω and 4 - 10 Ω , in which case we will
suggest to use 90 - 10 Ω as the lowest and highest range.
wh041ba02a(P6-4)
Currently setting value will blink.
4-3
Fuel gauge resistance setting
●Press the Select button to enter 4-3-3
fuel warning setting screen.
●EX. Setting fuel meter's resistance
value from 100 to 270.
●Press the Select button to enter the
circumference and sensing point
setting screen.
NOTE
The fuel gauge resistance
setting range:USER、100 Ω、
250 Ω、270 Ω、510 Ω、
1200 Ω、SW (turn off)
NOTE
NOTE
Fuel meter will be displayed with
the wiring connected.
Custome fuel level resistance:
1) Manual - Please check 4-3-1
Fuel Level Resistance Manual
Setting Instructions.
2) Auto - Please check 4-3-2
Fuel Level Resistance Auto
Setting Instructions.
●Example: If the vehicle is a YAMAHA
T-MAX 530, it's resistance is 100 Ω
according to the service manual.
●Press the Adjust button to choose the
setting number.
NOTE
Setting range: 0.5、1 ~ 25
Currently setting value will blink.
4-2
RPM pulse setting
NOTE
●EX. You want to connect the RPM
signal wire to the pick up signal and
there are 13 flywheel signals per turn.
●Press the Adjust button to choose the
setting number.
●Press the Select button to enter the
RPM pulse setting screen.
Setting range:Hi-Act、Lo-Act
●Example : To set waveform to high
waveform (Hi-Act).
●
Press the
Adjust button to choose the
setting number.
NOTE
Currently setting value will blink.
NOTE
Setting range:10,000、
12,000、15,000 RPM。
Currently setting value will blink.
●Press the
Select button
to enter
waveform setting screen.
●EX. Setting engine ignition angle from
P-1 to P-13.
During RPM signal detection,
if there is any bad sensing or
interference, please select
another RPM sensing waveform.
●Press the Select button
to choose
the setting number.
●Example : To set rpm stage value as
10,000 RPM.
●EX. Current rpm stage value is
15,000 RPM.
●Press the Select button
to enter rpm
stage setting screen.
●EX. Setting from high wave (Hi-Act) to
low wave (Lo-Act).
●Press the Adjust button to enter next
operation setting.
●Press the
Select button
to return to
rpm stage setting screen.
●EX. Setting rpm stage value form
15,000 RPM to 10,000 RPM.
●Press the
Adjust button
to choose
the setting number.
The corresponding RPM signal
number per ignition.
2C-1P 4C-2P
4C-4P2C-2P
The
setting
value
0.5
2
4C-6P2C-3P
3
4C-8P2C-4P
4
4C-10P
5
2 RPM signals per 1 ignition.
1 RPM signal per 1 ignition.
1 RPM signal per 2 ignition.
1 RPM signal per 3 ignition.
1 RPM signal per 4 ignition.
1 RPM signal per 5 ignition.
1 RPM signal per 6 ignition.4C-12P2C-6P
6
1
4C-1P
The correspond-
ing stroke and
pistons number.
Most of the 4-cycle bikes
with one single piston are igniting every
360 degree once, so the setting should
be the same as the bike with 2-cycle
and one piston engine.
CAUTION!
 Loading...