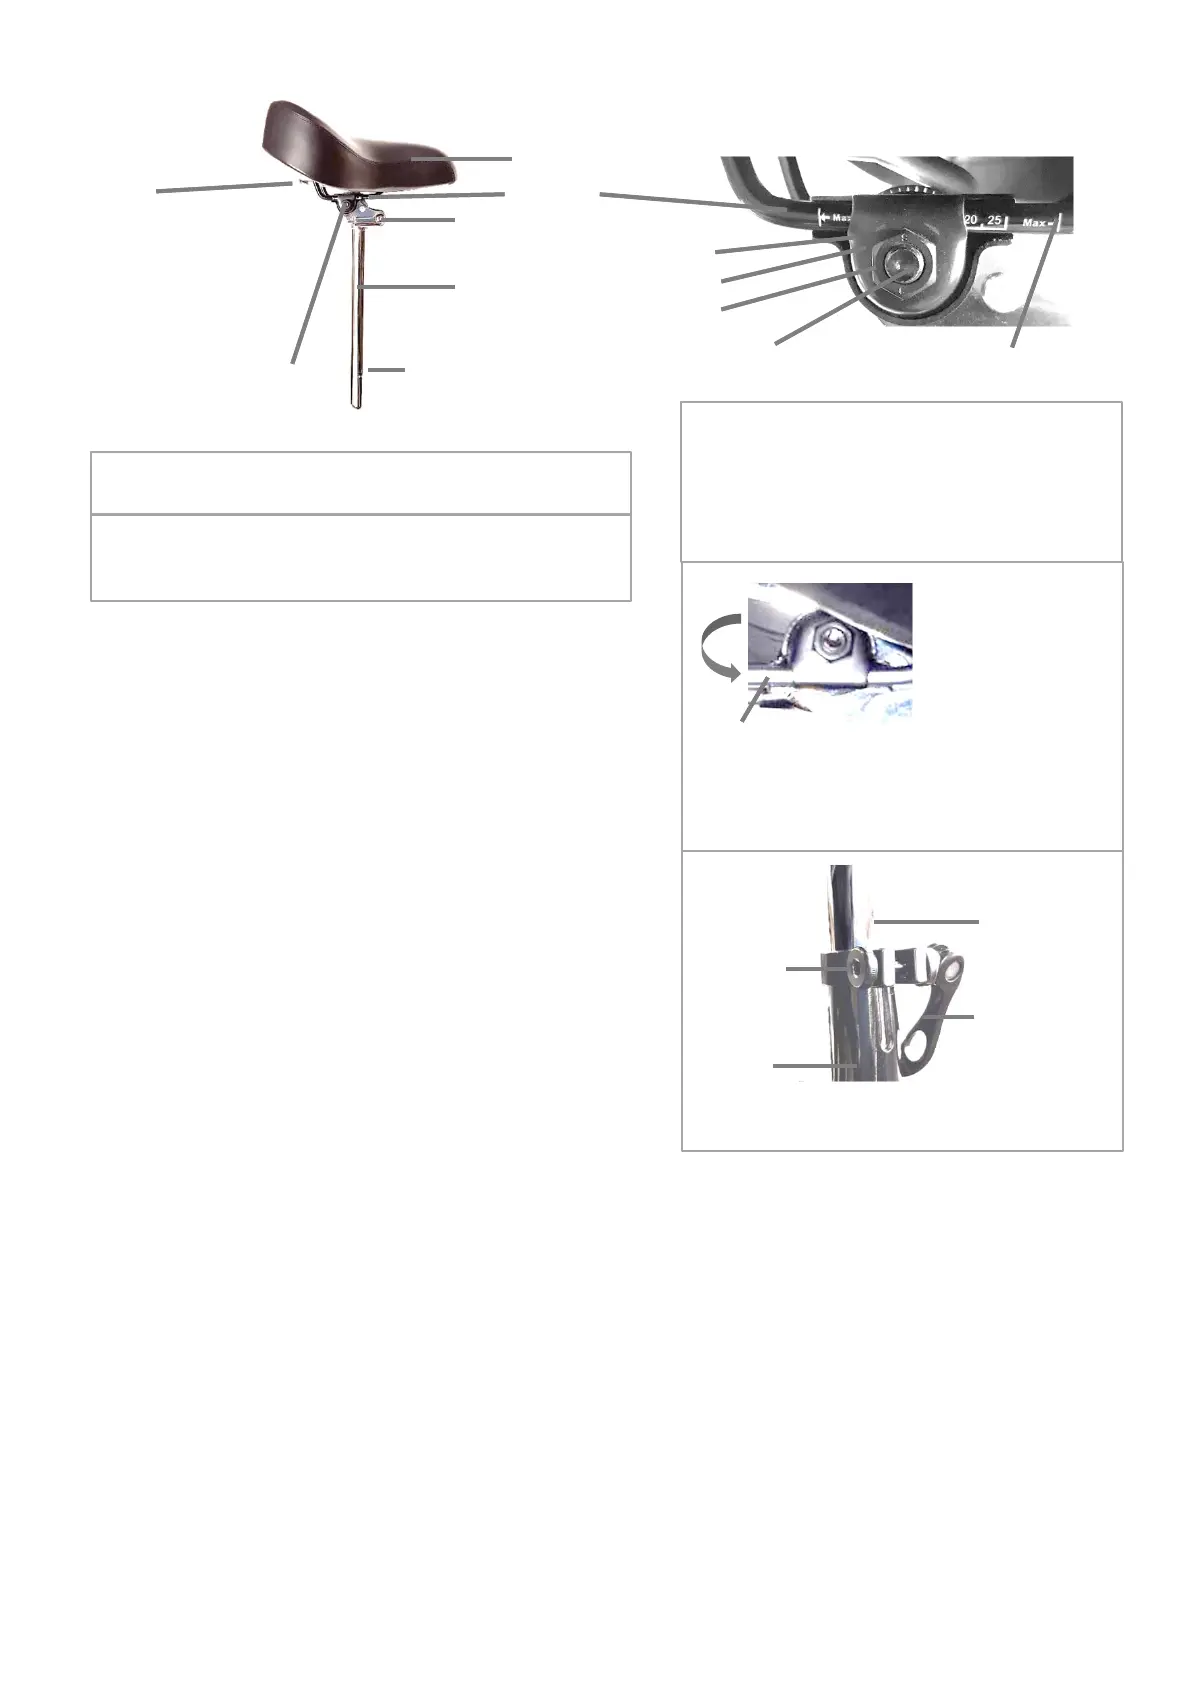
Seat(saddle)
Seatrail
Seatfoldinghinge
Seatpost
Minimuminsertionmark.
Mustnotbevisiblewhenseat
isinsertedintoframe.
Insertseatatleast4.7inches
(12cm)intoframe.
Seatfolding
lever.PushUP
Seatfolding
lever
tofoldseatUP
tomakebattery
removaleasier.
Toreturnto
ridingposition,
pushseatback
downuntilit
clicksinto
position.
Seat
attachment
mechanism
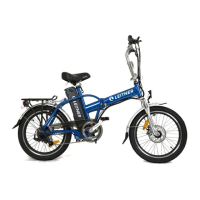
FigureS1:Magnificationofseatattachment
mechanism
Innerbracket
Outerbracket
SeatRailClampNut
Bolt
Seatrailmaximummark
To adjust seat tilt and position on rail loosen the
seat rail clamp nut. Stay between rail maximum
marks. Tighten to 22 Nm. Right hand side of seat
shown. Analog setup on Left hand side of seat.
WARNING! Stay within maximum marks or the rail
may brake.
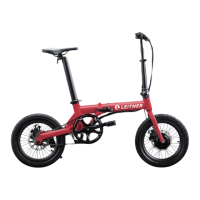
Seatpost
Quick
release
nut
Quickrelease
lever(15Nm)
Frame
Caution! When folding seat and returning seat in to riding
position, stay clear of seat folding hinge area as it is a pinching
hazard and may cause injury, e.g. to your hand.
Seat(saddle)andseatpost
Recommended seat position: To check for the correct seat
height, sit on the seat, put one heel on the pedal in the down
position while the crank arm is parallel to the seat tube. Adjust
seat height until your leg is straight. If the knee is bent, raise
the seat. If your hips rock for the heel to reach the pedal, lower
the seat. For people of short stature the seat should be
adjusted to a height so that the feet of a seated rider can reach
the ground. WARNING! Adjust height, position on rail and tilt of
seat to a comfortable position. Do not continue to ride if you
feel pain, discomfort or numbness while riding. WARNING! If
seat post is too high and not inserted at least 12cm (4.7 inch)
into frame, the frame or post may break and cause injury. The
minimum insertion mark must not be visible when seat is
inserted into frame. The minimum insertion mark is printed or
engraved on the seat post. You may have to look closely to
identify it. WARNING! If nuts, bolts and quick‐releases are not
tightened safely the seat position may change unexpectedly
during ride and cause injury. Caution! When you open the
quick‐release the seat may drop down and present a squeezing
hazard. Always hold the seat with one hand to prevent it from
dropping and operate quick‐release lever with other hand.
WARNING! Cover any coil springs under the saddle if a child‐
seat is fitted to prevent trapping of fingers;
Headset
The headset is the system of bearings which sits around the
handlebar and fork it needs to be checked every 30 days by
applying the front brake while moving the bicycle back and
forth. To check if steering is smooth, lift front wheel off the
ground and steer left and right. If there is excessive movement
or if steering is not smooth, the headset needs to be adjusted
by a bicycle professional.
Chain
Check chain tension every month. If it is too lose use derailleur
to adjust tension. Check all links of the chain. If there are any
stiff links, apply chain lubricant and try to move them carefully
by hand or have them replaced at a bike shop.
For bicycles with rear suspension, point the nose
of the saddle down slightly. When you sit on the
seat, the rear shock will compress and the seat will
be level.
Inspection: Before each ride make sure all nuts, bolts and quick
releases are safely installed. Use both hands and move seat left
and right or up and down. If seat moves easily, tighten bolts.
Make sure the seat folding hinge is closed. Inspect seat‐post
every 30 days to make sure it is straight. If it is bent, contact
customer service.
13
Figure S2: Seat post is attached to frame with
quick‐release mechanism.
The model SuperT does NOT have a folding seat post. The seat
needs to be twisted to remove the battery.
Bikestand(Kick‐stand)
Make sure the stand is fully retracted before riding
the bike. The stand is designed to only carry the
weight of the bike. When you are on the bike, do
not lean against the stand. Do not use the stand if
there is any luggage on the bike. Do not use the
stand if there is a person on the bike. Make sure
that the stand does not hit obstacles while riding. If
your stand hits obstacles while riding, adjust riding
style or remove stand. Every 30 days check if the
stand is attached safely to the bike. Tighten stand
attachment if needed. WARNING! Always hold onto
bike when loading bike to prevent falling. Do not
assume that the stand alone supports the bike.
Figure S3: To lower
the minimum seat
height by approx. 2
cm, loosen seat rail
clamp nut, remove
inner and outer
bracket and bolt
(Figure S1).
Turn inner and outer brackets on both sides of the
seat upside down (180 degrees) and re‐assemble .
Make sure seat is installed safely before riding.
Seatrail
©LeitnerPtyLtd2020