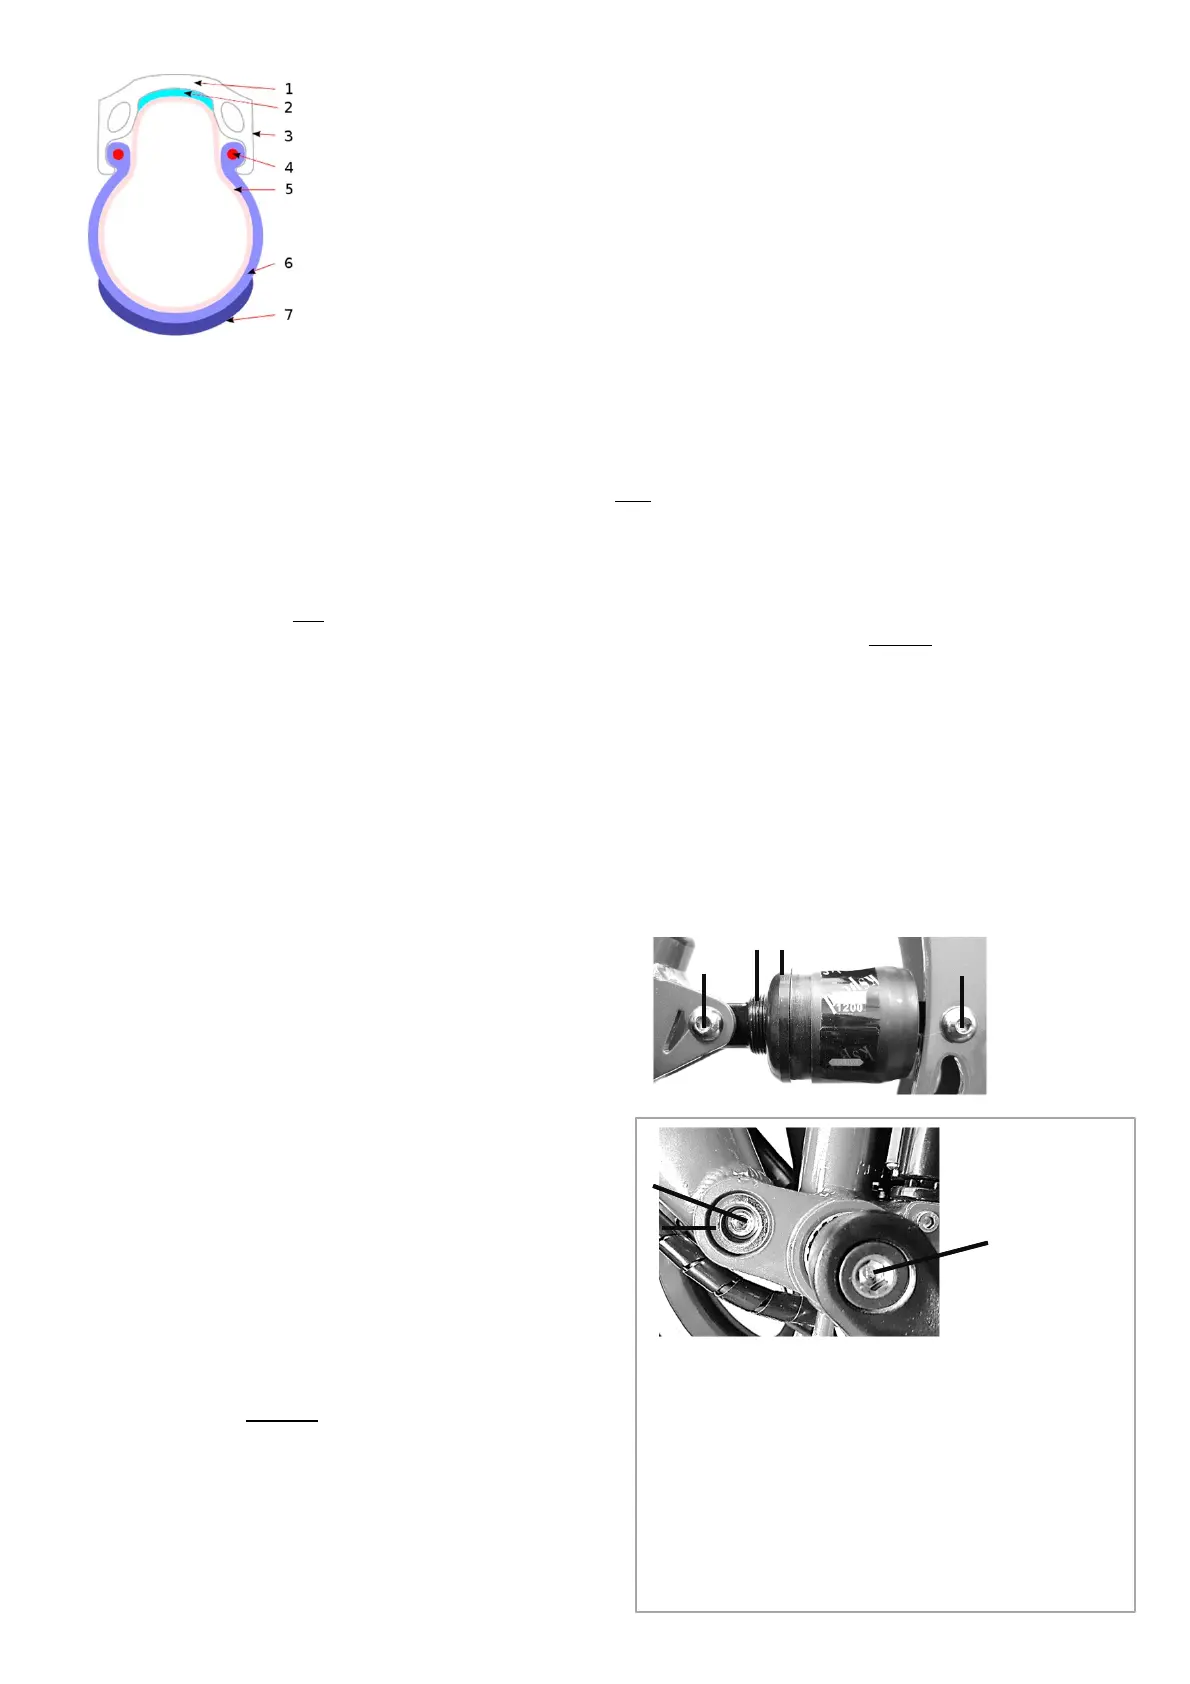
FigureT1:Cross‐sectionoftyreandrim:1:rim,2:rimstrip,3:rimbrakingsurface,4:beadcore,5:
innertube,6:casing,7:tread.Imagesource:Wikipedia,AuthorDeerwood.
Wheels: When changing a tyre or tube make sure that a rim strip is installed covering all spoke
holes and nipples to protect the tube from puncture. Inspect the spokes and make sure the
wheel is not wobbly. Clean rims every month with a moist rag and water to allowrimbrakesto
perform well. Check the rim for wear every month. Replace rim if it is worn or has signs of
damage. To check wheel hub bearings lift wheel off ground and spin it by hand. There should be
no unusual noise. Try to move wheel left and right. The bearings shouldn't be loose. If there are
issues have wheel replaced or repaired by a professional.
WARNING! A worn rim may cause the wheel to malfunction while riding causing you to fall. If
the rim forms part of a braking system, rim wear may cause brake failure.
The tyre size can be found on the tyre side wall. Replacing tyres: Standard tyres consist of an outer tyre and a separate inner
tube (Figure T1). If the tube is punctured it needs to be replaced or patched. Make sure replacement tube and tire are the
same size as marked on the old tire/tube. To remove tyres use your hands or a suitable tyre lever available at bike shops. Do
not use sharp objects like a screwdriver as they may damage the rim, tyre and tube. To remove a wheel follow the instructions
in this manual. Rim brakes need to be released first to allow wheel to be removed. To remove tyre and tube, fully deflate inner
tube and move tyre bead to centre of rim. Use tyre levers to lift one bead core across the rim. Start opposite the valve as the
valvewillbeinyourway.Youmayhavetousethreelevers.Takecarenottodamage tyre or tube. Do this around the whole
wheel until one bead is completely outside the rim. Remove tube, then remove second bead from rim.
To install tyres and new tube, first carefully check the rim for any damage, cracks or sharp objects. Make sure rim strip is
installed correctly. Inflate tube until it takes shape, however don’t fully inflate it. Place it inside tyre, insert valve stem through
opening in rim and insert one bead using your hands into the rim around the wholewheel.Takecarenottodamagethetube.
Then, using your hands push the tube into the centre of the rim around the whole wheel. Insert second bead into rim by hand.
If it is too difficult, carefully use tyre lever without pinching the tube. Push stem of valve through opening in rim and inflate tyre
to half pressure. Check around wheel if tube is correctly on inside and tyre on outside. Adjust if necessary. Deflate tube again to
prevent pinching. Finally inflate to pressure recommended on tyre wall (e.g. Minimum 40psi, Maximum 65psi) using a hand
bicycle pump. See conversion table psi/kPa in this manual.
Theframeset(frameandfork)
• The frame is an important part of the bike to which many
parts such as the rear wheel, fork and seatpost attach. It is
critical to make sure that the frame is in good condition.
• If suspension is installed into the frame refer to the respective
section of this manual for suspension maintenance.
• If your fork has knobs to adjust the stiffness, turn the knob in
the direction of the arrows shown towards the “+” symbol for
stiffness, towards “‐” for softness. The fork must not compress
fully while riding.
• Do not expose frame to heat over 158° Fahrenheit (70°
Celcius).
• Only clean with damp, soft rag, mild detergent and water.
Only use small amounts of water to make rag damp.
• Avoid water intrusion into electrical components. Do not spray
the bike with water, high pressure cleaners or immerse into
water.
• Do not use corrosive or harsh chemicals. After cleaning wipe
damp parts with dry, clean rag.
• Only use original seatposts with correct diameter, length and
correct minimum insertion marks. Installation of seatpost with
incorrect diameters, excessive length or too short minimum
insertion marks can damage the frame.
• When installing parts into threads on the frame make sure the
correct parts are used and that the threads on the frame are
not damaged, e.g. by over‐ or under‐tightening. Clean all
threads before installation, and insert components at correct
angle carefully by hand. If there is too much resistance
installing a part it may indicate cross‐threading. Un‐screw part,
re‐align and then re‐insert. Only use tools to tighten part after
it has been fully inserted into thread by hand.
• Do not try to adjust frame by bending. Damaged frames and
forks should be reported and need to be replaced or repaired.
Inspection: Check of the frame and fork before each ride for
scratches, deformation, chips or any other signs of damage.
Inspect fork in detail every year during headset service. This
should be done by a bike professional.
19
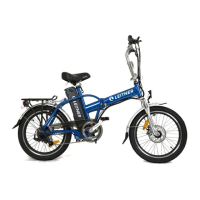
Rim,TyresandTubes
Figure FR1. SuperT and CrossX ebike only. LEFT side of
bike. The left pedal arm (8) is attached to the bottom
bracket. A few cm towards the front of bike there is the
bushing bolt (9). If there is a black rubber cover remove
the cover gently for example using the flat end of a
screwdriver. Make sure that the bushing bolt (9) is tight
using an Allen key. Tighten to 20Nm. The bushing bolt
secures the left and right bushing at the pivot hinge of
the suspension frame. Ensure that the bushings (10) are
installed safely and that the frame is not loose. Inspect
every 30 days.
9
8
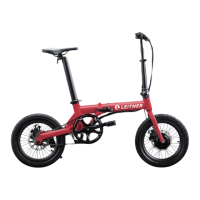
Suspension
Check the tightness of bolts, all suspension parts and
pivots every 30 days including bolts (11). The suspension
should not be able to be fully compressed as that may
cause the movement to stop suddenly and may cause the
rider to fall. To stiffen the suspension turn the metal ring
(13) so that more thread (12) will become visible.
10
©LeitnerPtyLtd2020
11
11
12 13
Figure FR2.
SuperT and
CrossX
Suspension.