10
Operation
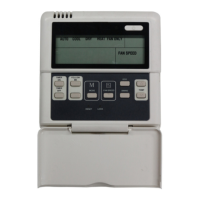
Start/stop operation
Press the LED power button.
• Controller ON: Power button LED lit
brightly.
• Controller OFF: Power button LED
not lit.
Select Fahrenheit or Celsius Display
Press and Up and Down buttons at the
same time, and hold for three seconds to
toggle between Fahrenheit and Celsius.
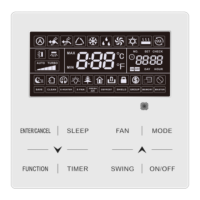
To set the operation mode
Press the Mode button to scroll through
the mode selections.
• Auto – System operates in cooling or
heating mode as determined by the
setpoint and the room temperature.
NOTE: The use of Auto mode for
multi-zone units is not recom-
mend. All zones should be in the
same mode of operation to ensure
there is not a conict error mode.
• Cool – System operates in cooling
mode.
• Dry – System removes humidity ac-
cording to preset conditions (fan
speed and setpoint temperature, not
a humidistat sensor). Cannot adjust
fan speed.
• Heat – System operates in heating
mode.
• Fan – Fan only, no heating or cooling.
To set (or change) the room tempera-
ture setting (setpoint)
Press the up arrow & down arrow but-
tons to adjust the setpoint.
Dry mode
1. Press the Power button, an LED light
on the indoor unit displays.
2. Press the Mode button to select Dry.
3. Adjust the temperature setpoint using
up and down arrow buttons.
NOTE – Fan speed is not adjustable.
Timer operation
Timer ON and Timer OFF are used to
turn on and turn off the indoor unit at se-
lected intervals.
Timer ON operation
1. Press the Timer ON button. The Timer
on icon, the last auto-on time, and “h”
will display.
2. Press the Timer ON button again
to set the amount of time before the
indoor unit begins operation. Each