
J
James NealAug 17, 2025
What to do if my Lennox Controller shows low refrigerant?
- EErik DuncanAug 17, 2025
If your Lennox Controller displays a 'Low Refrigerant' error, the suggested solution is to recharge the refrigerant.
What to do if my Lennox Controller shows low refrigerant?
If your Lennox Controller displays a 'Low Refrigerant' error, the suggested solution is to recharge the refrigerant.
What to do if my Lennox Controller displays a high water level alarm?
If your Lennox Controller is showing a 'High Water Level Alarm', you should check the water level and the drain line.
What to do if my Lennox Wired displays high or low voltage protection error?
If your Lennox Controller displays a 'High or low voltage protection' error, ensure proper voltage supply.
How to fix communication error between indoor and outdoor unit on Lennox Wired Controller?
If your Lennox Controller displays a 'Communication error between indoor unit and outdoor unit', verify the communication wiring.
What should I do if my Lennox Wired shows an outdoor unit fan speed error?
If your Lennox Controller displays an 'Outdoor unit fan speed error', check the outdoor unit fan motor.
What should I check if my Lennox Wired Controller reports an indoor coil temperature sensor error?
If your Lennox Controller displays an 'Indoor coil temperature sensor error', check the indoor coil temperature sensor connections.
What steps should I take if my Lennox Wired shows an outdoor coil temperature sensor error?
If your Lennox Controller displays an 'Outdoor coil temperature sensor error', check the outdoor coil temperature sensor connections.
What should I do if my Lennox Controller displays an indoor return air temperature sensor error?
If your Lennox Controller displays an 'Indoor return air temperature sensor error', replace the indoor return air temperature sensor.
What should I do if my Lennox Wired displays an outdoor ambient temperature sensor error?
If your Lennox Controller displays an 'Outdoor ambient temperature sensor error', replace the outdoor ambient temperature sensor.
What should I do if my Lennox Controller shows a compressor discharge temperature sensor error?
If your Lennox Controller displays a 'Compressor discharge temperature sensor error', inspect the wiring to the compressor discharge temperature sensor.
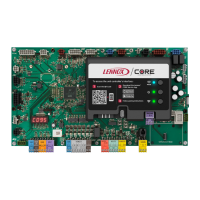
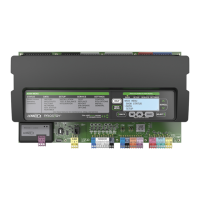
Details specific to the Lennox Mini-Split Systems Wired Indoor Unit Controller.
Lists controller model number (507561-03) and revision date (5/2017).
Emphasizes that improper installation can cause damage, injury, or death.
Advises allowing one minute between mode changes for system stabilization.
Describes the MOSTAT61Q-1 as a wired local controller for Lennox mini-split indoor units.
Requires turning off power, using only as described, and avoiding specific installation locations.
Includes warnings about power supply and operating with wet hands.
Specifies using provided cables, not forcing connections, grounding, and avoiding megger testing.
Instructions on how to remove the controller cover from the wall plate using a screwdriver.
Details on mounting the wall plate appropriately, allowing wiring slack.
Illustrates the process of reattaching the controller cover to the mounted wall plate.
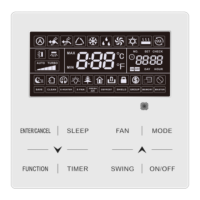
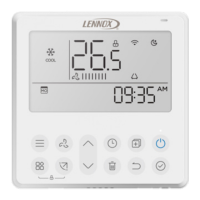
Describes icons for Auto, Cool, Dry, Heat, and Fan modes.
Explains icons indicating timed auto-start or auto-stop settings.
Details the icon for using the controller's sensor versus the indoor unit's sensor.
Describes the icon indicating when the indoor unit is turned on.
Explains the display of the current fan speed.
Describes the icon indicating when the controller is locked.
Explains the display of the setpoint temperature.
Used to turn the indoor unit on or off.
Buttons used to increase or decrease the temperature setpoint or scroll through options.
Initiates or stops louver oscillation.
Indicates this button is not used in the system.
Used to scroll through available fan speed settings.
Locks or unlocks the current settings on the controller.
Used to scroll through different operating modes: Auto, Cool, Dry, Heat, Fan.
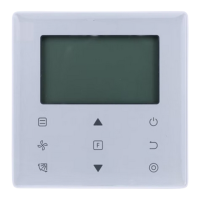
Sets the time delay for the indoor unit to start operation.
Sets the time delay for the indoor unit to stop operation.
Activates the controller's temperature sensor, disabling the indoor unit's sensor.
Resets the controller to factory settings using a paper clip.
Press to scroll through operation modes: Auto, Cool, Dry, Heat, Fan.
Sets the number of hours of delay before the indoor unit begins operation.
Sets the number of hours of delay before the indoor unit stops operation.
Activates controller's sensor, transferring sensing function from indoor unit.
Resets controller to factory settings using a paper clip.
Press to turn the indoor unit on or off.
Increase/decrease temperature setpoint or scroll through settings options.
Initiates or stops louver left & right oscillation.
Indicates this button is not used in the system.
Scroll through fan speeds: Auto, Low, Med, High.
Locks or unlocks the current setting using a paper clip.
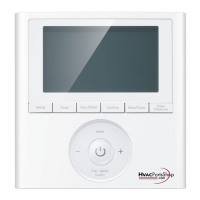
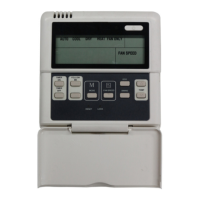
Instructions on using the LED power button to start or stop the unit.
How to toggle between Fahrenheit and Celsius display modes.
Guide to scrolling through and selecting operational modes like Auto, Cool, Dry, Heat, Fan.
Instructions for adjusting the temperature setpoint using the up/down buttons.
Specific steps for operating the unit in Dry mode, noting fan speed is not adjustable.
Steps for setting the Timer ON function to control unit start time.
Steps for setting the Timer OFF function to control unit stop time.
Instructions on how to modify existing Timer ON or OFF settings.
Lists error codes (E0, E1, E3-E5, EC, EE) related to the indoor unit.
Lists error codes (F0-F5, P0-P1, P3-P4, P6) related to the outdoor unit.
Lists general fault codes such as low refrigerant or mode conflict.
| Category | Controller |
|---|---|
| Type | Wired |
| Compatibility | Lennox HVAC Systems |
| Connection Type | Wired |
| Programmable | Yes |
| Backlight | Yes |
| Control Interface | Buttons |
| Power Source | 24V AC |
| Display Type | LCD |
| Humidity Control | Yes |