EasyManuals Logo

Lewmar V1 Owners Installation, Operation & Basic Servicing Manual

Lewmar V1
9 pages
To Next Page IconTo Next Page
To Previous Page IconTo Previous Page
Page #6 background imageLoading...
Page #6 background image
1
0
V
1 Windlas
s
11
V
1
Windlass
GB
4. Ma
i
ntenanc
e
4
.1 General recommendation
s
After the rst two or three anchor recoveries
,
check the
m
ounting nuts to ensure t
h
at t
h
e win
dl
ass is sti
ll
fastene
d
t
ig
h
t
l
y to your
d
ec
k
, as it s
h
ou
ld
now
b
e
b
e
dd
e
d
-in.
Regu
l
ar
l
y was
h
d
own t
h
e ext er ior of you r w in
dl
ass wit
h
fres
h
w
a
t
er.
Examine all electrical connections for
p
ossible corrosion,
clean and lightl
y
grease as necessar
y.
A nchor ro de spl ice s hould b e chec ked reg ul arl
y
and remade
if there is an
y
evidence of wear
.
• T
h
e gypsy s
h
ou
ld
b
e examine
d
on a regu
l
ar
b
asis,
b
ecause it
is a
h
ig
h
wear item. T
h
e gypsy is
d
esigne
d
for s
h
ort scopes
of c
h
ain an
d
wi
ll
l
ast
l
onger if proper
l
y use
d
.
• At
l
east every six mont
h
s - C
h
ec
k
mounting stu
d
s an
d
nuts
f
or con
d
ition an
d
tig
h
tness.
• T
h
e
b
earing is se
l
f
l
u
b
ricating an
d
s
h
ou
ld
not require
s
ervicin
g.
5
. Dismantling procedure
s
Isolate the windlass electrically, before carryin
g
out any
maintenance work and tie rode o
ff
to a suitable secure
p
oint
.
Isolate the windlass electrically, before carryin
g
out any
m
a
int
e
n
a
n
ce
w
o
rk
.
5.1 Gypsy replacemen
t
R
emove the two socket head ca
p
screws (34) that retain the chain
p
ipe cover (11) using a 5 mm Allen ke
y
and lift the chain pipe
c
over off. Remove the rode from the g
y
ps
y
. Remove the g
y
ps
y
d
rive ca
p
(22) anti-clockwise usin
g
the winch handle
.
R
emove t
h
e was
h
er
(
5
)
an
d
top cone
(
15
)
. Pu
ll
t
h
e contro
l
arm
(
23
)
b
ac
k
to c
l
ear t
h
e gypsy
(
31
)
an
d
remove t
h
e gypsy assem
bl
y
f
rom t
h
e unit. To rep
l
ace t
h
e gypsy assem
bl
y, reverse t
h
e a
b
ove
p
roce
d
ure. Grease t
h
e t
h
rea
d
s of t
h
e c
h
ain pipe cover an
d
stripper
s
crew prior to re-assem
bl
y.
5.2 Manua
l
recovery
g
ypsy rep
l
acement
R
emove the two socket head ca
p
screws (34) that retain the
c
hain pipe cover (11) using a 5 mm Allen ke
y
and lift the chain
p
ipe cover off. Remove t
h
e ro
d
e from t
h
e g
y
ps
y
. Remove t
h
e
m
anua
l
recovery top nut
(
24
)
, anti-c
l
oc
k
wise using t
h
e winc
h
h
an
dl
e. Remove t
h
e manua
l
recovery gypsy cap
(
25
)
an
d
was
h
er
(
4
)
toget
h
er.
R
emove t
h
e was
h
er
(
5
)
an
d
top cone
(
15
)
. Pu
ll
t
h
e contro
l
arm
(
23) back to clear the gypsy (31) and remove the gypsy assembly
f
rom the unit. To replace the g
y
ps
y
assembl
y
, reverse the above
p
rocedure. Grease the threads of the chain
p
i
p
e cover and stri
pp
er
s
crew prior to re-assembl
y
5.3
C
ontro
l
arm re
pl
acement
Th
is s
h
ou
ld
b
e carrie
d
out wit
h
t
h
e gypsy
(
31
)
remove
d
as
d
etai
l
e
d
a
b
ove. To remove t
h
e contro
l
arm
(
23
)
. Unscrew t
h
e
As a pru
d
ent act of seamans
h
ip, anc
h
or recovery operations
require t
h
e un
d
ivi
d
e
d
attention of s
k
ipper an
d
crew to preven
t
personal injury or damage to the vessel.
In a t
y
pical anchor recover
y
situation, the windlass will pass
throu
g
h a number of o
p
erational
p
hases.
3.1 Safet
y
rs
t
To avoi
d
persona
l
injuries ensure t
h
at
l
im
b
s, fi ngers an
d
c
l
ot
h
ing
are
k
ept c
l
ear of t
h
e anc
h
or ro
d
e an
d
win
dl
ass
d
uring operation.
A
l
ways ensure t
h
at t
h
ere are no swimmers or
d
ivers near
b
y w
h
en
d
ropping your anc
h
or
.
NOTE: Electric motors can get hot during
(
and for
some time after
)
use - DO NOT touch the motor
g
earbox
!
3.2 Use o
f
c
l
utc
h
To tig
h
ten t
h
e c
l
utc
h
- using t
h
e winc
h
h
an
dl
e supp
l
ie
d
, rotate t
h
e
gypsy
d
rive cap
(
22
)
c
l
oc
k
wise, t
h
is wi
ll
grip t
h
e gypsy, ef fective
ly
l
oc
k
ing it to t
h
e win
dl
ass geartrain
.
To s
l
ac
k
en t
h
e c
l
utc
h
- turn t
h
e gypsy
d
rive cap anti-c
l
oc
k
wise,
t
h
is wi
ll
free t
h
e gypsy a
ll
owing it to turn in
d
epen
d
ent
l
y of t
h
e
win
dl
ass geartrain
.
3.3 Lett
i
ng go un
d
er grav
i
t
y
Insert the winch handle into the g
y
ps
y
drive cap (22) (top cap
lock nut (24), manual recover
y
version) and turn it clockwise to
ensure that the clutch is tight. Release an
y
independent anchor
locks. If it is safe to do so,
p
ull back on the clutch lever until the
anchor and rode begin to pa
y
out. Control the rate of decent of
t
h
e anc
h
or
b
y pus
h
ing t
h
e c
l
utc
h
l
ever forwar
d
s. W
h
en suffi cien
t
ro
d
e
h
as
b
een pai
d
out, fu
ll
y tig
h
ten t
h
e gypsy
d
rive cap once
aga
i
n
.
3.4 Lettin
g
g
o under power
Release an
y
independent anchor locks.
If it is safe to do so, let go under power b
y
operating a ‘Down’
control. Release the control when suffi cient rode has been
p
aid
out.
3.5 Lying to anchor safel
y
Vesse
l
s at anc
h
or wi
ll
snu
b
on t
h
e ro
d
e an
d
t
h
is can cause s
l
ippage or
app
l
y excessive
l
oa
d
s to t
h
e win
dl
ass.
3.6 Hau
li
n
g
i
n
Untie the bridle or replace the rode in the g
y
ps
y.
If it is safe to do so, o
p
erate an ‘U
p
’ control
.
The fallsafe
p
awl (12) does not need to be disen
g
a
g
ed durin
g
retrieva
l
as it wi
ll
act as a ratc
h
et. W
h
en t
h
e anc
h
or
h
as
b
een
retrieve
d
an
d
is stowe
d
in t
h
e
b
ow ro
ll
er, t
h
e fa
ll
safe paw
l
s
h
ou
ld
b
e
l
eft engage
d
in t
h
e gypsy to prevent acci
d
enta
l
d
ep
l
oyment of
t
h
e anc
h
or w
h
i
l
st un
d
erway
.
R
EMEMBER - The fall safe
p
awl DOES need to be
d
isen
g
a
g
ed from the
g
ypsy before the anchor can be let
g
o aga
i
n.
H
aving retrieve
d
t
h
e anc
h
or, ensure it is in
d
epen
d
ent
l
y secure
d
t
o prevent its acci
d
enta
l
re
l
ease.
3
.7 Manual recovery
T
urn the
p
ower off at circuit breaker. En
g
a
g
e fall safe
p
awl
(
12), in the g
y
ps
y
. Undo the manual recover
y
top nut (24) b
y
a
pproximatel
y
half a turn using the winch handle. Place the winch
h
andle into the bi-square in the g
y
ps
y
cap (25) and wind clockwise
t
o
h
au
l
in ro
d
e. W
h
en t
h
e ro
d
e is fu
ll
y
h
au
l
e
d
in it s
h
ou
ld
b
e ma
d
e
f
ast
d
irect
l
y to a
b
o
ll
ar
d
, Sampson post or c
l
eat.
3
.8 Operatin
g
tips
W
hen anchorin
g
, it is best to
p
ower the rode out, allowin
g
the
v
essel to take up stern wa
y
before full scope is let out. This helps
p
revent the rode from becoming tangled on top of
y
our anchor
o
n
t
h
e
seabed.
T
o ai
d
anc
h
or recover
y
, we recommen
d
t
h
at t
h
e vesse
l
’s engine
b
e use
d
to assist
b
y moving t
h
e vesse
l
towar
d
s t
h
e anc
h
or. We
d
o
n
ot recommen
d
t
h
at t
h
e vesse
l
b
e motore
d
over an
d
b
eyon
d
t
h
e
a
nc
h
or, as t
h
is can cause t
h
e ro
d
e to
d
amage your topsi
d
es.
A
s t
h
e anc
h
or approac
h
es t
h
e stem
h
ea
d
, t
h
e
l
ast few feet of ro
d
e
sh
ou
ld
b
e inc
h
e
d
in
b
y ju
d
icious use of contro
l
s to avoi
d
d
amage
to
t
h
e
v
esse
l
.
H
avin
g
retrieved the anchor, ensure the fall safe
p
awl is en
g
a
g
ed
i
n the g
y
ps
y
to lock it and prevent accidental deplo
y
ment of the
a
nchor whilst underwa
y
.
W
hen mooring stern to, at a suitable distance from the
j
ett
y
,
d
ep
l
oy t
h
e anc
h
or to prevent t
h
e
b
ow from swinging. Gent
l
y pay
o
ut t
h
e ro
d
e un
d
er t
h
e infl uence of t
h
e stern way of t
h
e vesse
l
a
s it approac
h
es t
h
e jetty. Ma
k
e fast your vesse
l
wit
h
warps from
th
e stern.
g
. 3.9-
1
3
. Operating
y
our windlass
Always remove the handle a
f
ter use
.
F
or maximum safety and to prevent damage, the fallsafe pawl MU
S
T N
O
T
be le
f
t to take the entire
f
orce
f
rom the anchor rode while at anchor. The
rode should be made
f
ast directly to a bollard, sampson post or cleat
.
Always check the fallsafe pawl
(
32
)
is disengaged from the gypsy
a
nd held clear of it by the fallsafe lever (34)
.
Alwa
y
s remove the handle after use
.
control arm shoulder screw (8) usin
g
a 4 mm Allen wrench and
remove screw. Remove the control arm (23) and torsion s
p
rin
g
(7) from the base
p
late. To re
p
lace the control arm, reverse the
a
b
ove proce
d
ure
.
5
.4 Motor
g
earbox maintenance
Regu
l
ar visua
l
inspection of t
h
e unit, e
l
ectrica
l
connections an
d
ca
bl
es is require
d
. Repair
/
renew ca
bl
es if
d
amage is evi
d
ent.
Re-
g
rease the terminals as re
q
uired
.
If corrosion is evident on the motor or
g
earbox, clean and re
p
aint
with a suitable marine
g
rade oil based enamel
p
aint.
Annual
y
- Remove motor and cover and blow (use face mask) dust
awa
y
using foot pump or similar
.
5
.5 Fall safe
p
awl re
p
lacemen
t
T
h
is s
h
ou
ld
b
e carrie
d
out wit
h
t
h
e Gypsy
(
31
)
remove
d
as
d
etai
l
e
d
a
b
ove. Turn t
h
e fa
ll
safe
l
ever
(
18
)
so it is
h
orizonta
l
.
Remove fa
ll
safe s
h
ou
ld
er screw
(
28
)
usin
g
a
ll
en wrenc
h
. Lift
off fall safe
p
awl (12). Remove fall safe s
p
rin
g
(29). Re
p
lace new
parts b
y
reversing the above procedure.
5
.6 Fa
ll
sa
f
e
l
ever re
pl
acemen
t
Turn fa
ll
safe
l
ever
(
18
)
so it is
h
orizonta
l
. Remove soc
k
et screw
(
33
)
using a
ll
en wrenc
h
. Remove fa
ll
safe
l
ever
(
18
)
& spacer
(
19
)
.
Rep
l
ace new parts
b
y reversing t
h
e a
b
ove proce
d
ure.
3
.9 Joining rope to chai
n
Wh
en sp
l
icing rope to c
h
ain, se
l
ect a
l
engt
h
of c
h
ain t
h
at wi
ll
a
voi
d
h
aving t
h
e sp
l
ice positione
d
in t
h
e gypsy w
h
en t
h
e anc
h
or
c
omes over t
h
e stem
h
ea
d
. Furt
h
ermore, ensure t
h
at t
h
e sp
l
ice
i
s no ti
g
hter than the ro
p
e. A hard s
p
lice is not desired.
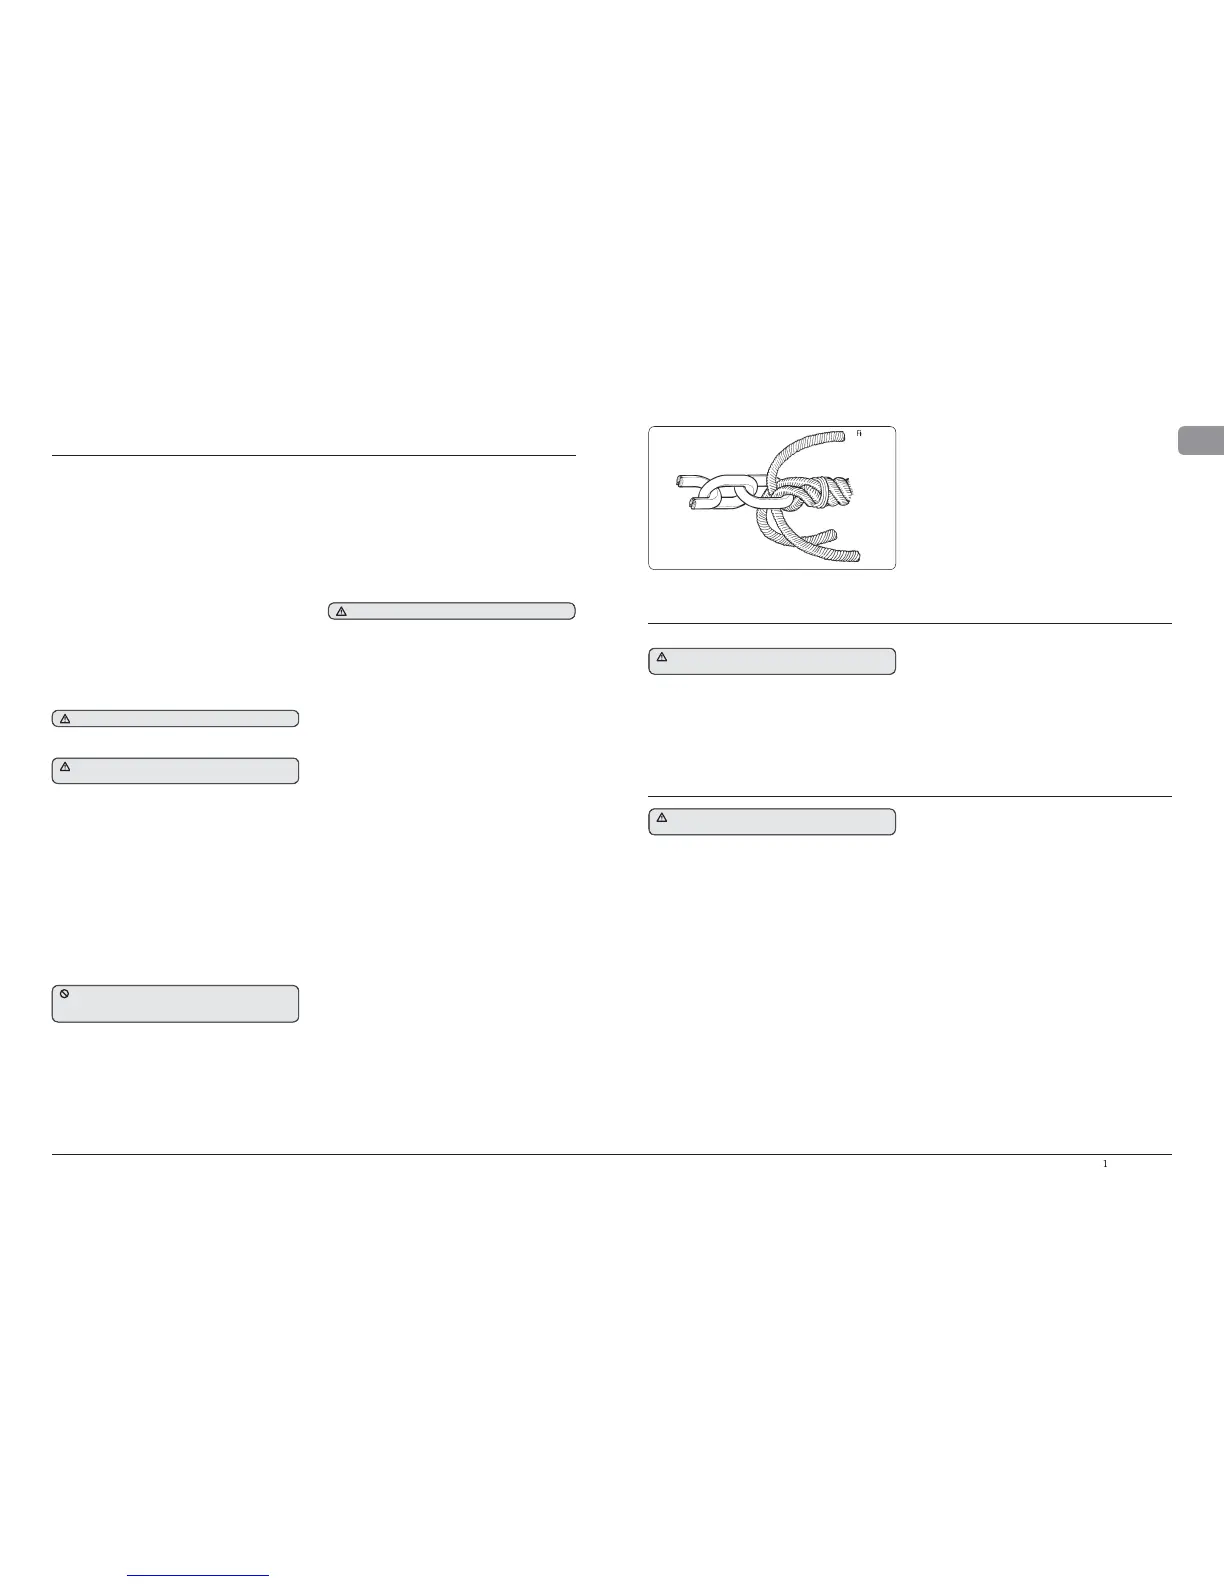
W it h wh ippi ng t win e or si mi la r, s eize
y
our rope 200 mm (8)
f
rom the rope’s end and unla
y
the strands.
Pass one strand throu
g
h the chain link from one side and the
o
ther two strands from the o
pp
osite side. Remove seizin
g
a
n
d
comp
l
ete a
b
ac
k
sp
l
ice in t
h
e norma
l
manner for four
f
u
ll
tuc
k
s.
Wit
h
a
h
ot
k
nife pare
d
own t
h
e t
h
ree stran
d
s
b
y one
h
a
l
f of
th
eir
d
iameter an
d
continue wit
h
two furt
h
er tuc
k
s
.
Wit
h
a
h
ot
k
nife, carefu
ll
y me
l
t t
h
e en
d
s
b
ac
k
into t
h
e
l
ine.
B
ecause of wide variations in rope t
y
pe and construction
s
ome experimentation ma
y
be required
.
Whi
p
the line with
p
ermanent whi
pp
in
g
at the be
g
innin
g
of
t
he ta
p
er
.
The above method of
j
oining is designed to minimize chafe
b
etween the ro
p
e and chain but as a matter of
p
rudent
s
eamans
h
ip t
h
e sp
l
ice s
h
ou
ld
b
e c
h
ec
k
e
d
regu
l
ar
l
y an
d
r
ema
d
e if t
h
ere is any evi
d
ence of wear.

Other manuals for Lewmar V1

Questions and Answers:

Question and Answer IconNeed help?

Do you have a question about the Lewmar V1 and is the answer not in the manual?

Lewmar V1 Specifications

General IconGeneral
BrandLewmar
ModelV1
CategoryMarine Equipment
LanguageEnglish

Related product manuals