This document describes the LFF Digital Atomic Wall Clock with Jumbo Display (Ref.: LWC215) and its accompanying outdoor temperature sensor.
Function Description
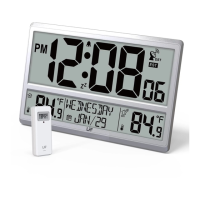
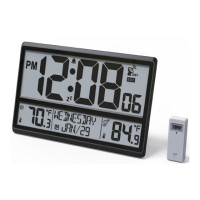
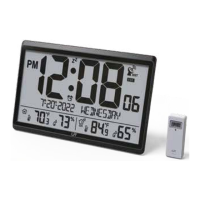
The LFF Digital Atomic Wall Clock is a self-setting atomic time function clock with a jumbo LCD display. It displays the time (hour, minute, second), calendar (month, date, weekday in full English letters), indoor and outdoor temperature, and features an alarm with snooze function. The clock supports up to 3 optional wireless sensors for outdoor temperature readings.
The outdoor temperature sensor measures temperature and transmits it wirelessly to the main unit.
Important Technical Specifications
Wall Clock (Main Unit):
- Power: 4 x AA 1.5V alkaline batteries
- Temperature Range (Indoor): 14.1°F to 122.0°F (-9.9°C to 50.0°C)
- Dimensions: 14.25 x 9.29 x 1.12 inches
- Time Zones: EST, CST, MST, PST, AKT, HST
- Atomic Clock Reception: WWVB signal, updates daily at 1:00am, 2:00am, 3:00am, 4:00am, 5:00am. Manual reception also possible.
Outdoor Temperature Sensor:
- Power: 2 x AAA 1.5V alkaline batteries (Lithium batteries required for temperatures below -4°F)
- Temperature Range (Outdoor): -58.0°F to 158.0°F (-50.0°C to 70.0°C)
- Transmission Frequency: 433MHz
- Transmission Distance: 330ft (100m) in open air
- Dimensions: 1.57 x 4.09 x 1.02 inches
- Channels: Supports up to 3 sensors with different channels (1/2/3)
Safety Instructions:
- Do not expose the unit to rain or moist environments.
- Avoid water drops or splashes on the machine; do not place liquid-filled objects on it.
- The adaptor must remain easily accessible for emergency disconnection.
- Risk of electric shock: Do not open the cover or back. No user-serviceable parts inside. Refer servicing to qualified personnel.
Usage Features
First Time Use / Pairing the Outdoor Remote Sensor:
- Insert 4 new AA batteries into the wall clock. The screen will turn on and begin searching for the sensor. The signal strength indicator will animate for up to 3 minutes during pairing.
- Slide the channel switch on the outdoor sensor to CH1 and insert 2 new AAA batteries. The sensor will transmit a signal, and its LED will flash.
- Keep the outdoor sensor 5-10 feet from the wall clock during initial setup.
- Once the RF connection is established, temperature readings will appear on the clock.
- After 3 minutes of sensor pairing, the wall clock will automatically receive the atomic clock signal, indicated by a flashing tower icon.
- When the atomic clock signal is detected, the signal strength indicator will animate.
- Place the wall clock away from electronic interference (TV, computer, microwave, radio, etc.).
- Upon successful atomic clock signal reception, the time and date will update, and the Atomic Time tower icon will become solid.
- Allow the outdoor sensor and wall clock to sit together for 15 minutes to establish a strong connection. Do not press any buttons during this time.
- After 15 minutes, place the sensor in a shaded outdoor location.
Atomic Clock Reception (RCC):
- The wall clock automatically searches for the WWVB signal and updates the time daily at 1:00am, 2:00am, 3:00am, 4:00am, and 5:00am.
- The Atomic Time tower icon flashes during search and becomes solid upon connection.
- Manual RCC Reception: In normal display, press and hold the ▼/RCC button for over 3 seconds to manually initiate atomic clock signal reception. The tower icon will flash, and the time and date will update upon successful reception. To exit manual reception, press and release the ▼/RCC key for over 3 seconds.
Setting Menu:
- Press and hold the SET button for over 3 seconds to enter setting mode.
- Use the ▲ and ▼ buttons to adjust values (hold for quick adjustment).
- Press SET to confirm and move to the next item.
- Setting Order: RCC ON/OFF, Time Zone, DST ON/OFF, Year, Month, Day, 12H/24H, Hour, Minute.
- If RCC OFF is selected, Time Zone and DST settings will be skipped.
- Time Zone: Select from EST (Eastern), CST (Central), MST (Mountain), PST (Pacific), AKT (Alaska), HST (Hawaii).
- 12H/24H Format: Select between 12-hour or 24-hour time format.
- Press SET after adjusting minutes to save all settings and exit.
Set Alarm Time:
- Press and hold the ALARM button for over 3 seconds to enter alarm setting.
- The alarm hour will flash; use ▲ or ▼ to adjust. Press ALARM to select the alarm minute.
- The alarm minute will flash; use ▲ or ▼ to adjust. Press ALARM to exit alarm setting.
- The alarm indicator (bell icon) will show on the display when the alarm is ON.
- To view the set alarm time, press the ALARM button (displays for 2 seconds).
- The alarm will sound for 2 minutes at the programmed time.
Deactivate/Activate Alarm:
- Press the ALARM button and use the ▲ button to select Alarm ON or OFF.
- The bell indicator shows when the alarm is ON and disappears when OFF.
Snooze Function:
- When the alarm rings, press the SET button to pause the alarm for 5 minutes. The snooze indicator (ZZ icon) will flash.
- Press any button except SET to stop the alarm for 24 hours.
Switch Temperature Unit:
- In normal display, press and release the ▼ button to switch between Celsius (°C) and Fahrenheit (°F).
Switch Reading Display for Outdoor Temperature Sensors:
- In normal display, press and release the CHANNEL button to cycle through outdoor temperature sensor readings (CH1, CH2, CH3) or enter cycle display mode.
- In cycle display mode, the outdoor temperature reading will switch every 3 seconds.
Using the Wall Mount:
- Both the wall clock and outdoor transmitter have table-top and wall-mounting structures.
- Wall Clock: Use the recessed hole(s) on the back to hang it, or pull out the back-stand for table-top use.
- Transmitter: Use the hang hole or place the unit in an area protected from direct rain.
Important Placement Guidelines:
- Mount the remote sensor under an eave or deck rail.
- Mount the sensor on the North side to prevent direct sun exposure and incorrect readings.
- Mount the outdoor sensor vertically to drain moisture.
- Mount at least 6 feet in the air for a strong RF signal.
- Place units at least 3 ft (.9 m) away from electronic devices (TV, computer, microwave, radio, etc.) to prevent wireless interference.
- To maximize atomic signal reception, place the sensor away from large metallic items, thick walls, metal surfaces, or other objects that may limit radio communication.
Maintenance Features
Low Battery Indication:
- A battery indicator next to the outdoor temperature reading signifies low battery in the outdoor sensor; replace batteries.
- A battery indicator next to the atomic tower icon signifies low battery in the wall clock; replace batteries.
Search for Outdoor Sensor:
- In normal display, press and hold the CHANNEL button for over 3 seconds to search for the outdoor temperature sensor.
- The wall clock supports up to 3 sensors with different channels (1/2/3).
- The signal strength icon will animate until the sensor signal is received or for 5 minutes if no signal is available.
FCC Information:
- This device complies with Part 15 of FCC rules, ensuring it does not cause harmful interference and accepts any interference received.
- Warning: Unauthorized changes or modifications to the unit may void the user's authority to operate the equipment.
- Note: If the equipment causes harmful interference, users are encouraged to try corrective measures such as reorienting the antenna, increasing separation between equipment and receiver, or connecting the equipment to a different circuit.
- The manufacturer is not responsible for radio or TV interference caused by unauthorized modifications.
- This device complies with Industry Canada licence-exempt RSS standard(s).