Edit
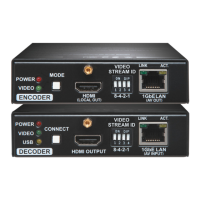
HDCP Operations
Enable HDCP
1. Turn the rotary switches to memory address #01.
Avoid the use of keys, coins, knives and other sharp objects.
2. Check the status of the device (STATUS LED):
GREEN: valid EDID data is present at input, HDCP pass-through enabled.
ORANGE: valid EDID data is present at input, HDCP pass-through disabled.
3. Press and hold the LEARN button for approximately 3 seconds to change HDCP status.
4. The STATUS LED changes color according to the new HDCP pass-through state.
5. To emulate an EDID turn the rotary switches to the desired position.
HDCP Management
HDCP capable and non-capable sink devices in the same system can lead to improper setup;
there can be monitors/projectors, which will not display the signal from the source. To force
the signal sources to output non-encrypted signal, HDCP pass-through can be disabled in
the EDID Manager V4. If the content is not copyrighted the source will output proper, non-
encrypted signal.
0
1
2
3
4
5
6
7
8
9
0
1
2
3
4
5
6
7
8
9
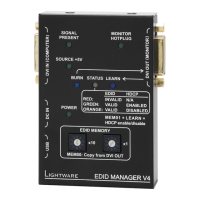
EDID Operations
Selecting an EDID
1. Turn the rotary switches to the desired memory address. Use a
at head screwdriver to change the address. The left switch sets
the tens value, the right switch gives the ones value of the EDID.
Avoid the use of keys, coins, knives and other sharp objects.
2. The Status LED will turn red/green/orange:
RED: an empty memory or invalid EDID data was selected.
GREEN: valid EDID data is present at input, HDCP is enabled.
ORANGE: valid EDID data is present at input, HDCP is disabled.
3. Now the selected EDID is emulated at DVI INPUT.
Learning an EDID
1. Turn the rotary switches to the desired memory address where you want to store the
attached display’s EDID (between user addresses #51..#79).
2. Connect the display device to the EDID Manager’s DVI OUT.
3. If the Status LED blinks in red, EDID is cannot be read from the display device and the
learning procedure will be unsuccessful. In this case the last successfully read EDID is
written in the desired user memory address.
4. Press and hold the LEARN button for approximately 3 seconds.
5. The STATUS LED will ash red or green:
GREEN: the learn process was successful,
RED: the learn process failed.
0
1
2
3
4
5
6
7
8
9
0
1
2
3
4
5
6
7
8
9
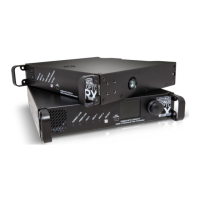
EDID Management
Enabled HDCP - Example Disabled HDCP - Example
EDID Memory Structure
Lightware factory preloaded EDIDs (except the Universal EDID) are specially provided to force
the sources to output only the exact pixel resolution and refresh rate.
Universal EDID (address 49#) allows multiple resolutions including all common VESA
dened resolutions. In addition, it also features audio support. The use of a universal EDID is
advised for fast and easy system setup.
EDID manager V4 contains a 79 block non-volatile memory bank. EDID memory is structured
as follows:
Description Rotary switch state Memory bank number in LDC
Factory Preset EDID list 01# - 49# F01# - F49#
User programmable slots 51# - 79# U1# - U29#
Last attached monitor’s EDID 00# D01
Factory Preset EDID List
ID Resolution ID Resolution
01 640 x 480 @ 60.00 Hz 26 1600 x 1200 @ 50.00 Hz
02 640 x 480 @ 75.00 Hz 27 1600 x 1200 @ 60.00 Hz
03 848 x 480 @ 50.00 Hz 28 1920 x 1200 @ 59.55 Hz
04 800 x 600 @ 50.00 Hz 29 1920 x 1200 @ 50.00 Hz
05 800 x 600 @ 60.30 Hz 30 1440 x 240 @ 60.30 Hz
06 800 x 600 @ 74.99 Hz 31 640 x 480 @ 59.94 Hz
07 1024 x 768 @ 49.98 Hz 32 720 x 480 @ 59.92 Hz
08 1024 x 768 @ 60.00 Hz 33 1440 x 288 @ 50.60 Hz
09 1024 x 768 @ 75.20 Hz 34 720 x 576 @ 50.00 Hz
10 1152 x 864 @ 75.00 Hz 35 1280 x 720 @ 50.00 Hz
11 1280 x 768 @ 50.00 Hz 36 1280 x 720 @ 60.00 Hz
12 1280 x 768 @ 59.92 Hz 37 1920 x 540 @ 50.30 Hz
13 1280 x 768 @ 75.00 Hz 38 1920 x 540 @ 50.00 Hz
14 1360 x 768 @ 60.10 Hz 39 1920 x 540 @ 60.50 Hz
15 1364 x 768 @ 50.00 Hz 40 1920 x 1080 @ 24.00 Hz
16 1364 x 768 @ 59.93 Hz 41 1920 x 1080 @ 24.99 Hz
17 1364 x 768 @ 74.98 Hz 42 1920 x 1080 @ 30.00 Hz
18 1280 x 1024 @ 50.00 Hz 43 1920 x 1080 @ 50.00 Hz
19 1280 x 1024 @ 60.10 Hz 44 1920 x 1080 @ 49.99 Hz
20 1280 x 1024 @ 75.10 Hz 45 1920 x 1080 @ 60.00 Hz
21 1366 x 1024 @ 59.99 Hz 46 2048 x 1080 @ 49.99 Hz
22 1400 x 1050 @ 49.99 Hz 47 2048 x 1080 @ 50.00 Hz
23 1400 x 1050 @ 59.99 Hz 48 2048 x 1080 @ 59.99 Hz
24 1400 x 1050 @ 75.00 Hz 49 1920 x 1080 @ 60.00 Hz
25 1680 x 1050 @ 59.99 Hz 50 Reserved
The Factory Preset EDID list cannot be modied. These are the most commonly used
resolutions.
Firmware Upgrade
The Lightware Bootloader software can be used to upgrade your device. Install the software
to your computer and get the latest rmware from Lightware Support (support@lightware.eu).
Please check the details about upgrade procedure in the user’s manual of the LW Bootloader
software.
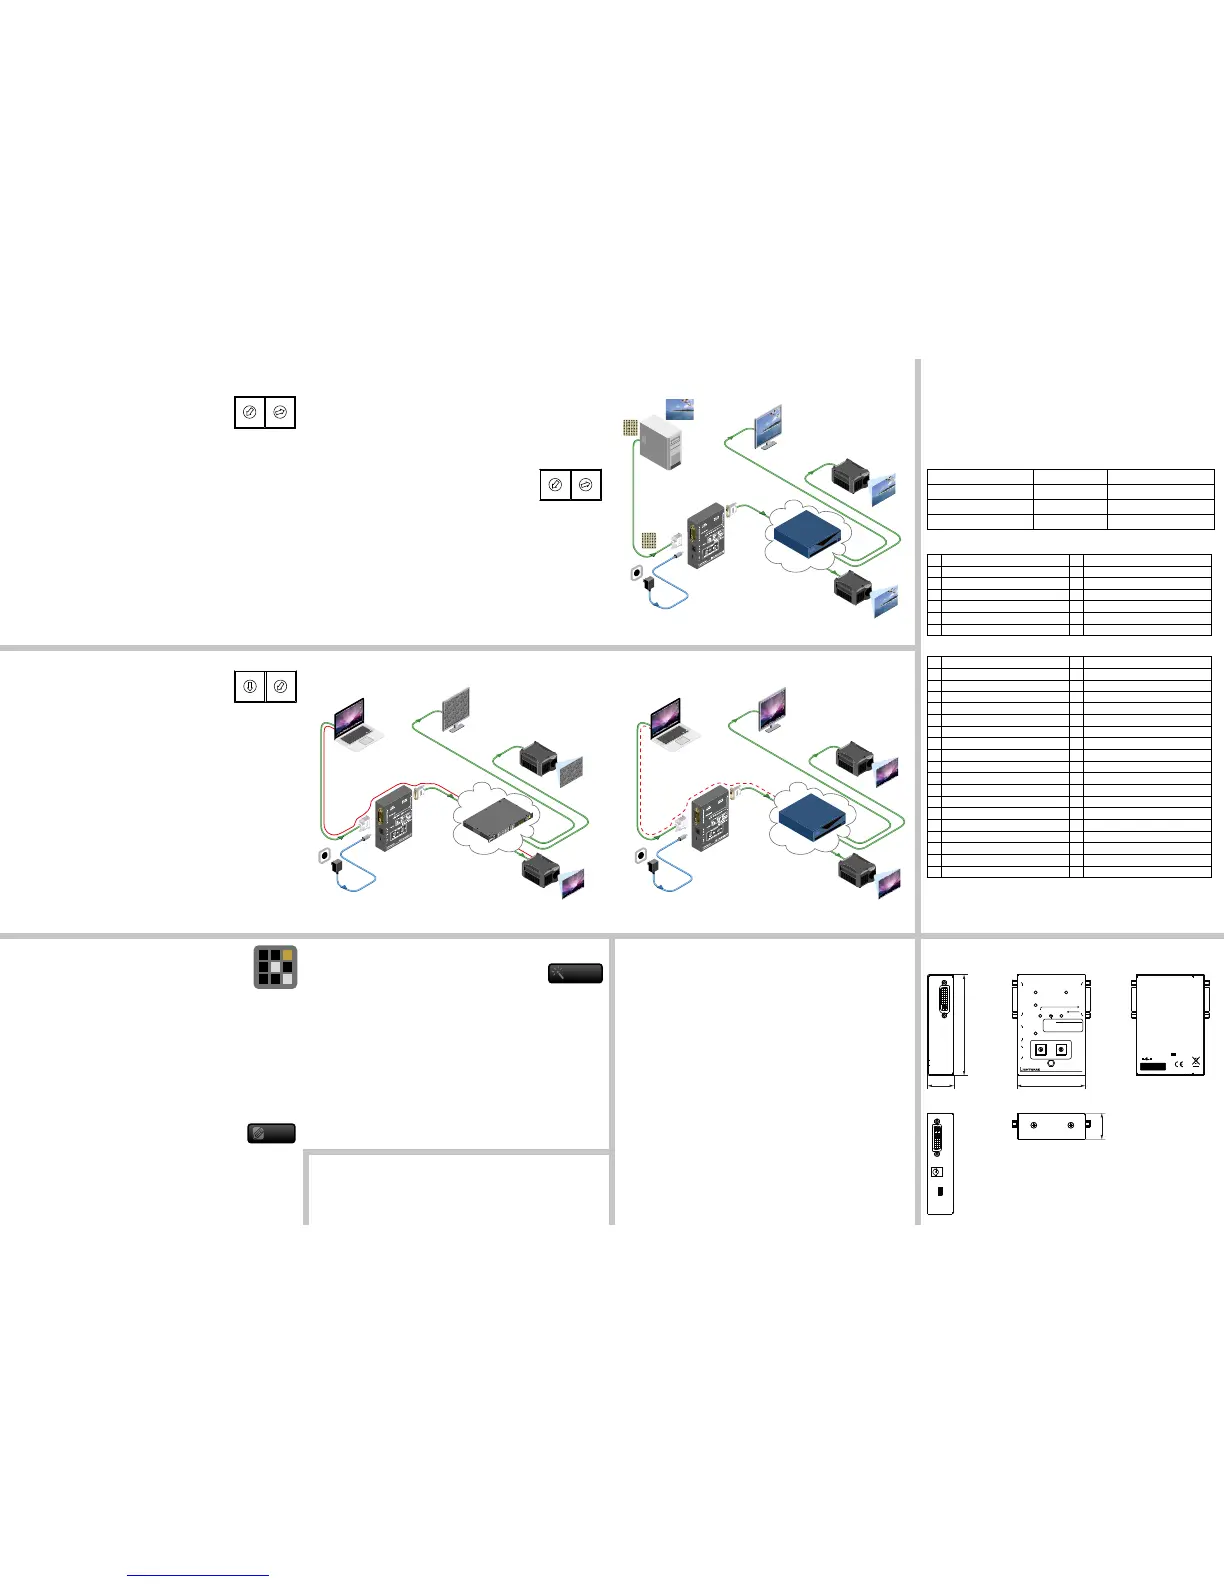
Mechanical DrawingsTroubleshooting
General Problems
Check the device - Check whether the EDID Manager V4 is properly powered and the Power
LED is green. Try performing a reset by unplugging and reconnecting the power adaptor.
Picture is not Displayed or Distorted
Check the cables - DVI connectors have to be locked with screws, no tensions or breaches
are allowed. If your source or display has more connectors then make sure that the proper
interface is selected. Although the device is equipped with DVI-I connectors, analog signals
are not supported. You cannot use VGA cables with DVI-VGA adapter plugs.
Check EDID related problems - Maybe your display device is not capable of receiving
the sent video format. Try emulating your display device’s EDID to the source by selecting
00# on the front panel Rotary switch.
Check the source - Check whether your source is powered on and congured properly.
The HDMI output can be turned off on most DVD players. If the source is a computer, then
verify that the OUTPUT is selected and active. Try restarting your computer; if you get a
picture during the booting process, you have to review the driver settings.
HDCP Issues
Non HDCP compliant display - Some video sources send HDCP protected signal if
they detect that the sink is HDCP capable – even if the content is not copyrighted. This
can cause trouble if a HDCP capable device (e.g. HDMI matrix) is connected between
the source and the display. In this case the content can’t be viewed on non-DCP capable
displays. Disable HDCP on the device by switching the rotary switches to address 01#
and holding the Learn button.
Creating an EDID - Easy EDID Creator
Since Advanced EDID Editor needs more complex knowledge about
EDID, Lightware introduced a wizard-like interface for fast and easy EDID
creation. With Easy EDID Creator it is possible to create custom EDIDs
in four simple steps. By clicking on the Create button below Source panel, Easy EDID Creator
is opened in a new window. For more details about EDID Creator please visit our website
(www.lightware.eu) and download EDID Editor user’s manual.
Settings Menu
Device Information: the most important information (serial number, rmware and
hardware versions, etc.) about the device.
Log: LDC is able to collect information from the device and save it to a report le. This
information package can be sent to Lightware Support when a problem may arise with
the device.
Create
Burning the EDID
Sink devices store their EDID information in a non-volatile memory (EEPROM). Normally this
memory is write-protected in monitors and projectors, thus it cannot be modied by the Burn
EDID function of the EDID Manager V4. Some of them however are not write protected, so
users must be very careful when using this function.
Burning a wrong EDID can damage the display!
Users can burn EDID in the inputs of any DVI Matrix Switcher that doesn’t have built-in EDID
management function as long as its EEPROMs are not write protected.
1. After connecting the sink device to DVI OUT of the unit, use a
screwdriver to select the memory address of the EDID to be
burnt. If the Status LED lights green or orange, the memory slot
contains a valid EDID and it is ready to be burnt.
Avoid the use of keys, coins, knives and other sharp objects.
2. Push the BURN button and hold it down for approximately 10 seconds. Once the button
is pushed the Status LED goes dark. After the 10 seconds, the Status LED becomes
orange. Once the LED becomes orange, push and release the Burn button 3 times within
5 seconds. Now the burn process starts. If the Status LED blinks green, then the burn
process was successful. If it blinks red, then the burn process failed.
Factory Preset EDID list
The EDID list is on the back side of the device. The #30..#45 memory range contains EDIDs
supporting various embedded audio formats for HDMI audio and also #49 which is the
Universal EDID with HDMI.
0
1
2
3
4
5
6
7
8
9
0
1
2
3
4
5
6
7
8
9
 Loading...