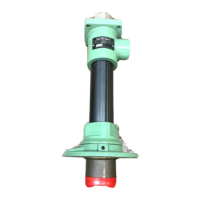
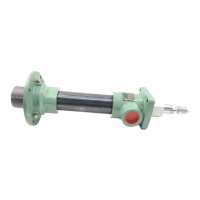
This document describes the Lincoln Models 84918 and 84919 POWER-MASTER III TRANSFER PUMPS with Shovel Type Foot Valve. These are positive displacement reciprocating pumps designed for material transfer applications.
Function Description
The POWER-MASTER III TRANSFER PUMPS are double-acting pumps, meaning they pump material on both the "up" and "down" strokes. They are designed to intake material on the "up" stroke. The shovel type foot valve is an integral part of the pump's intake mechanism. The pumps are intended for transferring various materials, and their operation requires careful attention to fluid compatibility and system pressure.
Important Technical Specifications
General Pump Tube Specifications:
- Pump Stroke: 6 inches (152 mm)
- Output per cycle: 10.9 cubic inches (179 cc)
- Max. recommended speed (continuous): 75 cycles/min.
- Approx. cycles per gallon (liter): 21 (5.5)
- Output at 75 cycles/min.: 3.5 gpm (13.2 liter/min.)
- Wetted part materials: Steel, Brass, Copper, Polyurethane, Nitrile
Model-Specific Specifications (from Model Chart):
Model 84918 (Pump Tube):
- Pump Models: 2030, 2028
- Airmotor Ratios:
- 84806: 24:1
- 84804: 12:1
- 84803: 6:1
- Maximum Delivery Pressure psi (bar):
- 24:1 ratio: 2400 (168)
- 12:1 ratio: 2400 (168)
- 6:1 ratio: 1200 (84)
- Maximum Air Pressure psi (bar):
- 24:1 ratio: 100 (7)
- 12:1 ratio: 200 (14)
- 6:1 ratio: 200 (14)
- Dimension "A" (in cm): 17-1/4 (44)
- Dimension "B" (in cm): 45-3/8 (115)
Model 84919 (Pump Tube):
- Pump Models: 2031, 2029
- Airmotor Ratios:
- 84806: 24:1
- 84804: 12:1
- 84803: 6:1
- Maximum Delivery Pressure psi (bar):
- 24:1 ratio: 2400 (168)
- 12:1 ratio: 2400 (168)
- 6:1 ratio: 1200 (84)
- Maximum Air Pressure psi (bar):
- 24:1 ratio: 100 (7)
- 12:1 ratio: 200 (14)
- 6:1 ratio: 200 (14)
- Dimension "A" (in cm): 34 (86)
- Dimension "B" (in cm): 62-1/8 (158)
Torque Specifications for Assembly:
- Item 1 (Bolt Connector): 65 - 75 Ft. Lbs.
- Item 3 (Gland Nut): 100 - 110 Ft. Lbs.
- Item 23 (Piston Check for Model 84918, or Piston Check for Model 84919): 55 - 60 Ft. Lbs.
- Item 35 (Cotter Pin for Model 84918, or Priming Tube for Model 84919): 200 - 220 Ft. Lbs.
Usage Features
Owner/Operator Responsibility:
The owner/operator is responsible for proper use and maintenance, reading and understanding the manual, maintaining legibility of warning labels, and retaining the manual for future reference.
Attaching Airmotor to Pumptube:
- Tightly attach tie rods to the airmotor (using short threaded end).
- Mount airmotor on top of the pump tube outlet and tightly connect Coupling Nut (Item 2) to the airmotor piston rod.
- Hand tighten tie rods to the pumptube with four nuts.
- Slowly cycle the pump several times with just enough air pressure to operate without stalling.
- Stop the pump on an "up" stroke and tighten the four nuts to securely fasten the airmotor to the pumptube.
Operating Precautions (WARNING):
- DO NOT operate these pumps with 10" or 8" airmotor.
- DO NOT exceed the stated maximum working pressure of the airmotor or the lowest rated component in the system.
- DO NOT alter or modify any part of this equipment.
- DO NOT operate this equipment with combustible gas.
- DO NOT attempt to repair or disassemble the equipment while the system is pressurized.
- TIGHTEN all fluid connections securely before using.
- ALWAYS read and follow fluid manufacturer's recommendations regarding fluid compatibility, and the use of protective clothing and equipment.
- CHECK all equipment regularly and repair or replace worn or damaged parts immediately.
- THESE PUMPS ARE FOR MATERIAL TRANSFER APPLICATIONS ONLY!
- Failure to heed warnings (misuse, over pressurizing, modifying parts, incompatible chemicals/fluids, worn/damaged parts) may result in equipment damage, personal injury, fire, explosion, or property damage.
- Use Lincoln replacement parts to assure compatible pressure rating.
- Be sure material hoses and other components can withstand developed fluid pressures.
- Do not operate pump continuously at speeds exceeding 75 cycles per minute.
- Disconnect air line from pump air motor when system sits idle for long periods.
- SERVICING: Before servicing, cleaning, or removing fluid hose/gun, disconnect air lines and bleed pressure off the system.
- PREVENT STATIC SPARKING: Ground pump, dispensing valve, and containers when handling flammable fluids. Check continuity with an ohmmeter.
- PREVENT FIRES: Ventilate area when pumping volatile solvents. Keep solvents away from heat, sparks, and open flames. Keep containers closed.
- CAUTION: DO NOT allow pump to operate when out of material.
Pump Priming:
To begin operation, the pump must be primed with the pumped material. Open the output line (material valve) and slowly open the air supply valve until the pump starts. Allow the pump to cycle very slowly until all air is pushed out of lines and material fills the pump and lines. Close the output line (material shut-off valve) – the pump should stall against pressure.
- Note: Pumps are factory tested with light oil for protection during storage and transportation. Flush the pump before use to prevent contamination.
Maintenance Features
Disassembly Procedures (Models 84918 and 84919):
The manual provides detailed step-by-step disassembly instructions for both models. The procedures involve removing various components such as the priming tube, cotter pin, priming shovel, check seat, check, retainer, bushing, plunger, retaining ring, guide washer, check stop insert, bushing tube, O-rings, bolt connector, coupling nut, piston, plunger rod, piston rod, gland nut, pipe plug, outlet body, ball, gaskets, packing washer, and connecting rod.
- Tools Required: 2-1/8" Dia. Strap Wrench, Retaining Ring Pliers (External and Internal), various Hex Allen Wrenches (1/4", 7/16", 7/8", 1", 1-3/8", 2-1/4"), and Pliers.
- To re-assemble, reverse the disassembly procedure, referring to illustrations for torque specifications.
Troubleshooting Guide:
The manual includes a troubleshooting table to address common operational issues:
- Pump does not operate: Possible causes include restricted/inadequate air supply or obstructed material output. Solutions involve checking air supply pressure/hose diameter, output line restrictions, and priming the pump.
- Erratic or accelerated operation: Possible causes include insufficient material supply or material being too heavy for priming. Solutions involve refilling material, lowering output with material valve, increasing pressure to pressure primer, and checking for inlet restrictions.
- Pump operates on "down" stroke only (missing "up" stroke): Possible cause is worn/damaged Piston O-rings (Item 21) or Piston Check (Items 22 & 23). Solution is to check and replace if needed.
- Pump operates on "up" stroke only (missing "down" stroke): Possible causes include worn/damaged Inlet Check (Items 32 & 33) or insufficient material supply. Solutions involve checking and replacing inlet check, checking inlet for restrictions, and lowering output with material valve.
- Pump is operating but not dispensing material: Possible cause is Inlet Check (Items 32 & 33) not seating or being damaged. Solution is to check and replace if needed.
Parts List:
A comprehensive parts list is provided for both Models 84918 and 84919, detailing item number, description, quantity, and part number for each component. Items marked with an asterisk (*) are included in the 86269 Pump Repair Kit.
Accessories and Kits:
- 86269 Pump Repair Kit: Includes soft parts needed to rebuild the pump tube.
- 86268 Camlock Adapter Kit: For mounting the pump with camlock coupling.
- 86214 Gland Protection Sleeve: To increase the life of the gland seal.
- 86213 Lube Cup: For solvent, to prevent material from drying on the pump rod.
- 84502 Teflon Packing Kit: For gland and piston seals.
- 84112 Pump Piston Replacement: With leather v-packings.
Warranty Information:
Lincoln offers a Standard Limited Warranty of one (1) year from the date of purchase, covering defects in material and workmanship. This warranty is conditioned on determination by an authorized Lincoln representative and requires shipping the equipment prepaid with proof of purchase. It is extended to the original retail purchaser only and does not cover damage from accident, overload, abuse, misuse, negligence, faulty installation, abrasive/corrosive material, altered equipment, or unauthorized repairs. The warranty is exclusive and in lieu of all other warranties, express or implied. Lincoln is not liable for incidental or consequential damages.
Special Limited Warranties:
- SL-V Series, Single Injectors (85772, 85782, 85771, 85781): Two (2) year warranty for defects in material and workmanship.
- Series 20, 25, 40 Bare Pumps, PMV Bare Pumps, Heavy Duty and 94000 Series Bare Reels: Five (5) year warranty for defects in material and workmanship. First year: repair/replacement at Lincoln's discretion. Years two and three: Lincoln pays for parts and labor. Years four and five: Lincoln pays for parts only.
- LFM Series Oil Meters, LFV (Lincoln Fluid Valves), AOD (Air-Operated Diaphragm Pumps): Five (5) year warranty for defects in material and workmanship.
Contact Information:
Customer Service: 314-679-4200
Website: lincolnindustrial.com
Regional contact details are provided for Americas, Europe/Africa, and Asia/Pacific.