
M
Ms. Angelica JacksonJul 29, 2025
Why Link 450 suspension will not maintain proper height?
- CChristina RobertsJul 29, 2025
The Link Control Unit suspension might not maintain the proper height due to an obstructed air line or a defective HCV.
Why Link 450 suspension will not maintain proper height?
The Link Control Unit suspension might not maintain the proper height due to an obstructed air line or a defective HCV.
What to do if Link 450 air springs deflate when parked?
If the air springs of your Link Control Unit deflate when parked, this may be caused by a leak in the air system. Check with soapy water to identify any leaks. Alternatively, it could be due to a defective HCV.
How to fix hard ride in Link 450?
If you are experiencing a hard ride with your Link Control Unit, the ride height may be out of adjustment. To resolve this, readjust the ride height according to the vehicle service manual.
What to do if Link Control Unit cab suspension overshoots center?
If the cab suspension of your Link Control Unit overshoots the center, try the following: * Replace the shocks. * Use a short delay H00450 HCV.
Wear appropriate safety gear including gloves, eyewear, and ear protection during handling.
Ensure proper fastener tightening for performance and safety, following all torque specifications.
Use eye protection as air lines are pressurized and may blow debris.
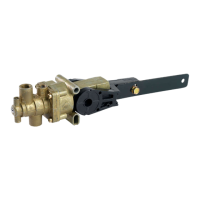
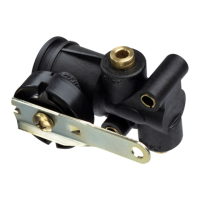
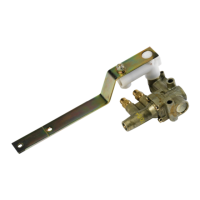
Procedure to disconnect and remove the existing valve from the vehicle.
Mounting instructions for the new valve, including lever orientation and alignment.
Attaching the lever and checking linkage for interference during suspension travel.
Connecting the air lines to the new HCV as per diagram (Figure 1).
Adjusting ride height using the HCV lever and centering pin for dead band.
Torque specification for tightening all nuts to 60-80 in-lbs.
Final step to remove the centering pin after ride height adjustment is complete.
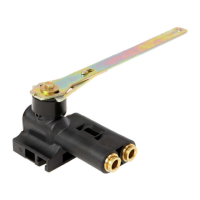
Testing air flow into air springs by rotating lever up 30-45 degrees.
Testing that air flow stops when lever is moved to the neutral position.
Testing air exhaust from air springs by rotating lever down 30-45 degrees.
Instruction to replace valve if it fails test criteria for air flow or shut-off.
Reason for replacement: valve failed the specific test procedure.
Reason for replacement: air leaks detected from the height control valve.
Reason for replacement: physical damage found on the height control valve.
| Brand | Link |
|---|---|
| Model | 450 Series |
| Category | Control Unit |
| Language | English |