EasyManua.ls Logo

Lippert Components Edge - User Manual

Lippert Components Edge
10 pages
Print Icon
To Next Page IconTo Next Page
Loading...
Edge
Awning
OEM INSTALLATION MANUAL
Question and Answer IconNeed help?

Do you have a question about the Lippert Components Edge and is the answer not in the manual?

Overview

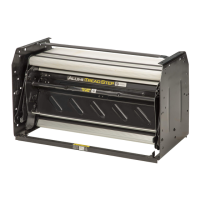
The provided manual describes the installation and features of the Lippert Components Edge™ Awning, an OEM (Original Equipment Manufacturer) product designed for recreational vehicles (RVs) or similar units.

Function Description:

The Edge™ Awning is an external motor-driven awning system that extends and retracts to provide shade and shelter. It is designed for OEM installation, meaning it's intended to be integrated into the manufacturing process of an RV or unit. The awning features an internal motor for smooth operation and can be equipped with optional Solera Serenity LED lights for added functionality and ambiance.

Important Technical Specifications:

  • Motor: Internal motor with a 6A auto-reset breaker. If the breaker trips, it will reset in approximately 30 seconds.
  • Wiring: LCI recommends wiring the awning with a 15A auto-reset circuit protector. If this protector trips, it will also reset in approximately 30 seconds. All wire used for power cable connection should be 14 AWG or higher to ensure a minimum of 11.5V at all times to the LCI-supplied power cable.
  • Power Source: The awning operates on a 12V DC battery, power source, or converter.
  • LED Lights (Optional Solera Serenity LED Lights):
    • Pre-installed on specifically-fitted support arms.
    • Requires proper fabric with an LED wire welded into the fabric at the base.
    • Requires a 3 amp fuse (meeting or exceeding RVIA standards) installed in-line to protect the LED lights wiring.
    • Wiring: Black wire connects to ground, red wire connects to a positive 12V DC power source.
  • Fasteners:
    • Awning rail: #10 x 3/4" screws.
    • Support arm assemblies: #14 x 1 1/4" screws (top), one screw at the bottom. Three rivets with a 3/16" grip range can be used for laminated walls in place of two middle and one lower screws.
    • Fabric securing: #6 x 1/2" hex head screws.
  • Awning Rail Placement:
    • Pitched awnings: Minimum of 6" above doors or windows.
    • Flat awnings: Minimum of 4" above doors or windows.
    • The awning rail MUST be level and parallel with the floor line of the unit.
  • Awning Width: Measured from centerline to centerline of the support arm assemblies.

Usage Features:

  • Motorized Operation: The awning extends and retracts via an internal motor, controlled by a switch.
  • Optional LED Lighting: The Solera Serenity LED Lights provide illumination, enhancing the outdoor living space. These lights are integrated into the support arms and fabric.
  • Safety Features: The motor includes an internal 6A auto-reset breaker to prevent damage from overcurrent. The manual emphasizes the importance of proper installation and wiring to ensure safe and correct operation.
  • User Control: A manual rocker switch is used to operate the awning. The wiring diagram illustrates how to connect the switch to the awning motor and power source. If the awning runs in reverse of the switch indication, the wires can be reversed.

Maintenance Features:

  • Installation Precautions:
    • All screws supporting the awning assembly must have a backer within the wall structure.
    • The awning rail channel should be spread open at the ends and any sharp edges or burrs filed to prevent fabric damage.
    • Silicone lubricant should be sprayed inside the awning rail channel to facilitate fabric installation.
    • The fabric should be secured in the awning rail no more than 1" inside the edge of the fabric on both ends using hex head screws.
    • The support arm assembly must be mounted tightly to the underside of the awning rail to ensure proper closing.
    • All fastener locations and wire penetrations must be sealed with silicone sealant to prevent water intrusion.
  • Troubleshooting (Breaker Trip): If the internal 6A auto-reset breaker or the recommended 15A auto-reset circuit protector trips, it will reset automatically after approximately 30 seconds.
  • Wiring Check: If the awning operates in reverse of the switch's indication, the wires should be reversed.
  • General Safety: The manual provides general safety warnings, including the importance of wearing eye protection, work gloves, and a full face shield during installation. It also warns against moving parts and emphasizes keeping clear and using caution. Failure to follow instructions can result in death, serious personal injury, severe product and/or property damage, and may void the component warranty. The unit MUST be supported per the manufacturer's recommendations before working underneath.

Lippert Components Edge Specifications

General IconGeneral
BrandLippert Components
ModelEdge
CategoryAutomobile Accessories
LanguageEnglish

Related product manuals