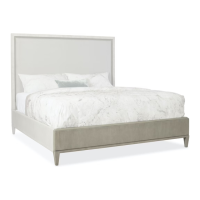
The Eloise Queen Bed is a stylish and functional piece of furniture designed for comfortable sleep and ease of assembly. This description outlines its key features, technical specifications, usage, and maintenance aspects based on the provided assembly instructions.
Function Description:
The Eloise Queen Bed serves as a primary sleeping platform, supporting a queen-sized mattress. Its design incorporates a headboard and footboard, side rails, and a curved slat support system to provide a stable and comfortable foundation for rest. The bed is designed for home use, offering a blend of aesthetic appeal and structural integrity.
Important Technical Specifications:
Hardware Components:
The assembly relies on a variety of fasteners and components, each with specific dimensions and functions:
- Bolts (B): These are crucial for connecting the side rails to the headboard and footboard. They are pre-fitted with washers (E) at the factory.
- Washers (E): Used in conjunction with bolts (B) to ensure a secure and stable connection, distributing the load and preventing damage to the wood.
- Nuts (Z): Used to secure the wooden legs to the angle brackets.
- Washers (L): Flat washers used with nuts (Z) for securing wooden legs.
- Spring Washers (A): Used with nuts (Z) and washers (L) to provide tension and prevent loosening of the wooden leg connections.
- Wrench (I): A tool provided for tightening bolts (B) and securing center support legs (J).
- Wrench (Y): A tool provided for tightening nuts (Z) when attaching wooden legs.
- Bolts (M): Used for attaching center support legs (J) to the center support rail (O).
- Washers (D): Used with bolts (M) for securing center support legs (J).
- Wooden Legs (F): These provide the primary support for the bed frame, elevating it from the floor.
- Center Support Rail (O): A crucial component that runs lengthwise under the bed, providing additional support for the slat system and mattress.
- Center Support Legs (J): Attached to the center support rail (O), these legs provide vertical support in the middle of the bed, preventing sagging.
- Curved Slats Support System (P): These flexible wooden slats are designed to provide ergonomic support for the mattress, adapting to body weight and promoting airflow.
- End Clips (Q): Factory-installed clips on the side rails that hold the ends of the curved slats.
- Center Clips (N): Factory-installed clips on the center support rail that hold the middle of the curved slats.
Dimensions of Hardware:
- Φ10 MM (A, L): Refers to washers with a 10mm diameter.
- Φ6 MM (D): Refers to washers with a 6mm diameter.
- H=20CM (F): Indicates the height of the wooden legs is 20cm.
- Φ8*70 MM (I): Refers to a wrench or bolt with an 8mm diameter and 70mm length (likely the wrench size).
- H=22.5CM (J): Indicates the height of the center support legs is 22.5cm.
- Φ10 MM (M): Refers to bolts with a 10mm diameter.
- Φ6*40 MM (P): Refers to the dimensions of the curved slats, likely 6mm thickness and 40mm width.
Quantity of Hardware:
- A: 4 PCS
- D: 3 PCS
- F: 4 PCS
- I: 1 PC
- J: 3 PCS
- L: 4 PCS
- M: 3 PCS
- N: 26 PCS
- O: 1 PC
- P: 26 PCS
- Q: 13 PCS
- Y: 1 PC
- Z: 4 PCS
Usage Features:
Step-by-Step Assembly Process:
The bed is designed for straightforward assembly, broken down into four main steps:
-
Connecting Side Rails:
- Locate the pre-fitted Bolts (B) and Washers (E) in the headboard and footboard edges.
- Align the side rail brackets over these bolts.
- Use Wrench (I) to re-tighten the bolts, securing the side rails to the headboard and footboard.
-
Attaching Wooden Legs:
- Attach the wooden legs (F) to the angle brackets located on the bed frame.
- Secure each leg using Nut (Z), Washer (L), and Spring Washer (A).
- Tighten Nut (Z) with Wrench (Y) until snug, ensuring the legs are firmly attached.
-
Installing Center Support System:
- Remove Bolts (B) and Washers (E) from the headboard and footboard where the center support rail will attach.
- Attach the center support rail (O) to the headboard and footboard using the removed Bolts (B) and Washers (E).
- Attach the center support legs (J) to the center support rail (O) using Bolts (M) and Washers (D).
- Use Wrench (I) to tighten these connections, ensuring the center support system is robust.
-
Placing Slats and Final Positioning:
- Move the assembled bed frame to its final desired position in the bedroom.
- Attach the curved slats support system (P) to the full-length steel side rail support cleats.
- Insert the ends of the slats into the factory-installed end clips (Q) first.
- Then, connect the middle of the slats with the factory-installed center clips (N).
- Verify that all slats are properly inserted into both the end clips (Q) and center clips (N) for even support.
- Ensure the center support legs (J) are perpendicular to the floor to provide full and stable support for the bed.
Maintenance Features:
Pre-Fitted Components:
- Bolts (B) and Washers (E) are factory-installed in the headboard and footboard, simplifying the initial assembly step and reducing the chance of missing parts.
- End Clips (Q) and Center Clips (N) are also factory-installed, streamlining the slat placement process.
Warning for Movement:
- A critical maintenance warning is provided: "do not move bed after final assembly as it may result in damages to floor and/or bed." This suggests that once assembled and placed, the bed should remain stationary to prevent structural stress or damage to the floor surface, indicating that the bed is designed for static placement rather than frequent repositioning.
General Care:
While not explicitly detailed, the use of wood for legs and slats, and metal for fasteners and rails, suggests standard furniture care practices would apply:
- Regular dusting and cleaning with appropriate furniture cleaners for wood and metal surfaces.
- Periodic checking of fasteners to ensure they remain tight, especially after initial use, to maintain structural integrity.
- Avoidance of excessive moisture or harsh chemicals that could damage materials.
The Eloise Queen Bed is designed for a user-friendly assembly experience and provides a sturdy foundation for a queen-sized mattress, emphasizing stability and ease of construction with clear, illustrated instructions.