Do you have a question about the Living Spaces Olivia Queen and is the answer not in the manual?
Attach bed feet (F) to the headboard using Wrench (I), Bolt (R), and Washer (E).
Attach bed feet (F) to the footboard using Wrench (I), Bolt (R), and Washer (E).
Attach side rails to headboard and footboard using Wrench (I), Bolt (B), and Washer (E).
Attach steel center support legs (J) to the Metal slat (G) using Wrench (I), Bolt (T), and Washer (D).
Attach steel slat support system to side support cleats and verify perpendicularity.
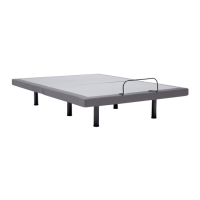
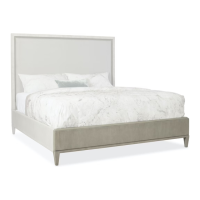
This document provides assembly instructions for the Olivia Queen bed, a furniture piece designed for sleeping. The manual details a step-by-step process for constructing the bed frame, along with a comprehensive hardware diagram.
The Olivia Queen bed serves as a sleeping platform, designed to support a mattress and provide a stable structure for rest. Its primary function is to offer a comfortable and secure foundation for a bed in a bedroom setting. The assembly process involves connecting various components such as the headboard, footboard, side rails, and a steel slat support system to form a complete bed frame.
The assembly requires a variety of bolts, washers, and specialized components, each with specific dimensions and quantities:
Φ6*15MM bolts: 8 pieces (labeled 'A')Φ8*30MM bolts: 8 pieces (labeled 'B')Φ6 MM bolts: 12 pieces (labeled 'D')Φ8 MM bolts: 8 pieces (labeled 'E')Φ8*70MM bolts: 4 pieces (labeled 'R')Φ6*20MM bolts: 4 pieces (labeled 'T')H=10 CM washers: 4 pieces (labeled 'F') - Note: The diagram labels 'F' as a washer, but its dimension 'H=10 CM' suggests it might be a spacer or a larger component. Given its use with bolts and its representation, it's likely a washer or a similar fastening component.The Olivia Queen bed is designed for standard bedroom use. Its assembly is intended to be straightforward, guided by the provided instructions and diagrams.
Assembly Process: The assembly is broken down into five distinct steps:
Support System: The bed utilizes a steel slat support system, which is designed to provide robust and even support for the mattress. The inclusion of center support legs further enhances the stability and longevity of the bed frame. The side support cleats are integral to holding the slat system in place.
The manual includes a crucial warning regarding the bed's maintenance and handling post-assembly:
In summary, the Olivia Queen bed is a self-assembly furniture item designed for sleeping, featuring a robust steel slat support system and requiring careful assembly using specific hardware. Its primary usage feature is its ease of assembly, while its main maintenance consideration is to avoid moving it after final construction to prevent damage.
| Brand | Living Spaces |
|---|---|
| Model | Olivia Queen |
| Category | Indoor Furnishing |
| Language | English |