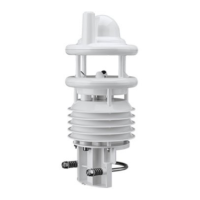
Operating Instructions Smart Weather Sensor
G. Lufft Mess- und Regeltechnik GmbH, Fellbach, Germany 79
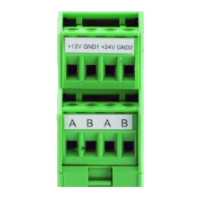
Figure. 41: Connecting
to a logger with
integrated power supply
Figure. 42: Connecting
to a logger and a
separate power supply
up to device version
41
Figure. 43: Connecting
to a logger and a
separate power supply
device version 42 and
newer
When operating the device in SDI-12 mode it is basically no more possible to access the
device with the UMB Config Tool, due to the different interface parameter settings. To enable
configuration access nevertheless the interface is operated in standard UMB mode (19200
8N1) for the first 5 seconds(*) after reset / power on. During this time the UMB device ID, if
unequal 1, is set to 200, so access will be possible even if the device ID is unknown. If a
valid UMB telegram is received within this 5 sec, the device will stay in UMB mode for the
configured time out (several minutes) so that the configuration can be modified.
Connect the PC to the Smart Weather Sensor through an RS-485 converter
Start the UMB Config Tool and create a WSxxx-UMB with the address (1 or 200) of
the actual device and activate at least one sensor. Start the measurement (will
report connection error at first)
Reset the device (Power off / on)
When measurement values are received the measurement can be terminated, the
interface is now open for configuration.
(*) Remark: The 5 seconds UMB communication are available from program start. Under
consideration of the operating system start, where no communication is possible, the device
will be ready for SDI12 requests after 7.0 – 7.5 seconds.
This timing only applies in case of cold start after power on or reset. This phase will not
occur after “wake up” in Power Saving Mode 2. In this case the device will respond within the
time defined by the SDI12 standard.
 Loading...