33
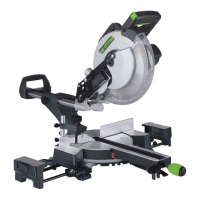
7.4. Setting the splitter (Fig. 12/13/14/15)
• Important! Pull out the power plug.
• Set the blade (4) to max. cutting depth, move to 0° position and
lock in place.
• Remove the saw blade guard (see 7.4).
• Take out the table insert (6) (see 7.6).
• Slacken the fixing screw (38).
7.4.1. Setting for maximum cuts (Fig. 15/16/17)
• Push up the splitter (5) until the gap between the saw table (1)
and the upper edge of the splitter (5) is at its maximum.
• The maximum distance between the saw blade (4) and the split-
ter (5) is 8mm.
• Re-tighten the nut (38) and mount the table insert (6).
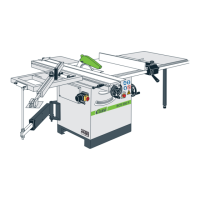
7.5 Dismantling the sliding table and opening the
chip box (Fig. 12, 13)
• To dismantle the sliding table (3), pull the sliding table (3) for-
ward until the latching hook (10) becomes visible.
• Press down on the locking hook (10) with one hand and at the
same time use the other hand to pull the sliding table (3) forward
and out of the guide (24)!
• To open the chip box (17), remove the two screws (b) and flip
open the chip box. Tip: You will find it easier to remove the scre-
ws (b) if you set an angle of approx. 45° (see 8.5)
• To assemble, proceed in reverse order.
7.6. Changing the saw blade (Abb. 16)
• Important! Pull out the power plug first.
• Set the saw blade (4) to max. cutting depth (see 8.2)
• Take off the saw blade guard (2) (see 7.3).
• Dismantle the saw table (see 7.5).
• Open the lower chip box (see 7.5)
• Place the counterholder (41) on the saw blade flange.
• Using the wrench (40), turn out the screw (42) in the running
direction of the saw blade.
• Remove the saw blade (4) from the inner flange and pull out in
an upwards direction.
• Clean the blade flange thoroughly before fitting the new blade.
• Mount and fasten the new saw blade in reverse order.
Important! Note the running direction. The cutting angle of
the teeth must point in running direction, i.e. forwards (see
the arrow on the chip box).
• Refit and set the splitter (5) and the saw blade guard (2) (see
7.4., 7.5.)
• Check to make sure that all safety devices are properly mounted
and in good working condition before you begin working with
the saw again.
8.0. USING THE SAW
8.1. ON/OFF switch (Fig. 10)
• To turn the saw on, press the green button .I. . Wait for the blade
to reach its maximum speed of rotation before commencing with
the cut.
• To turn the machine off again, press the red button “0”.
8.2. Cutting depth (Fig. 17)
• Turn the hand crank (8) to set the blade (4) to the required cut-
ting depth.
Turn anti-clockwise: larger cutting depth
Turn clockwise: smaller cutting depth
8.3. Parallel stop
8.3.1. Stop height (Fig. 19/20)
• The parallel stop (7) supplied with the benchtype circular saw
has two different guide faces.
• For thick material you must use the stop rail (23) as shown in
Fig. 22, for thin material you must use the stop rail as shown in
Fig.23.
8.3.2. Cutting width (Fig. 19/20)
• The parallel stop (7) has to be used when making longitudinal
cuts in wooden workpieces.
• The parallel stop (7) should be mounted on the right-hand side
of the saw blade (4).
• The parallel stop (7) must be pushed into the guide (17) from the
outside.
• Set the parallel stop (7) to the required dimension and fix it in
place with the eccentric lever (9).
8.3.3. Setting the stop length (Fig. 21)
• The stop rail (23) can be moved in longitudinal direction in order
to prevent the workpiece from becoming jammed.
• Rule of thumb: The rear end of the stop comes up against an ima-
ginary line that begins roughly at the center of the saw blade and
runs at an angle of 45° to the rear.
• Set the required cutting width
- Slacken the thumb screws (51) and push the stop rail (23) for-
ward until it touches the imaginary 45° line.
- Re-tighten the thumb screws (51).
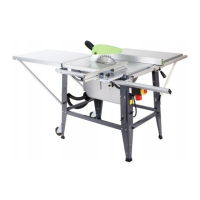
8.4. Cross stop and sliding table (Fig.28)
• Slide the cross stop (7) into the groove (a) of the sliding table.
• Slacken the clamping screw (12) and turn the cross stop (2) until
the arrow points to the angle required.
• Tighten the clamping screw (12).
• Clamp the cross stop (7) with the clamping screw (31) in the
required position on the sliding table.
Important!!
• Do not push the stop rail (7) too far toward the blade.
• The distance between the stop rail (43) and the blade (4) should
be approx. 2 cm.
8.5. Setting the angle (Fig. 17)
• Undo the fixing handle (9) for the angle setting.
• Turn the handle (9) to set the desired angle on the scale (b).
• Lock the fixing handle (9) again in the required angle position.
9.0. OPERATION
Important!!
• After every new adjustment we recommend you to make a trial
cut in order to check the new settings.
• After switching on the saw, wait for the blade to reach its maxi-
mum speed of rotation before commencing with the cut.
• Take extra care when starting the cut!
• Before use, the saw must be screwed securely to the metal angle
bracket supplied! To do this, the metal bracket (a) must be secu-
red to the feet (18) with the screws (b), as shown in Fig. 24.
9.1. Making longitudinal cuts (Figure 22)
Longitudinal cutting (also known as slitting) is when you use the
saw to cut along the grain of the wood. To make longitudinal cuts,
the sliding table has to be locked at the back of the machine with
the lock (19) (Fig. 18). Press one edge of the workpiece against the
parallel stop (6) while the flat side lies on the saw table (1).
The saw blade guard (2) must always lie on the workpiece.
When you make a longitudinal cut, never adopt a working position
that is in line with the cutting direction.
• Set the parallel stop (7) in accordance with the workpiece height
and the desired width. (See 8.3.)
• Switch on the saw.
 Loading...