Top View
8 in
(203 mm)
16-24 in
(406-610 mm)
16-24 in
(406-610 mm)
16 in
(406 mm)
16 in
(406 mm)
8 in
(203 mm)
Window/Wall Side
6 74 512 3
Top View
Unlocked Lock
1.2A
Page 2
Sivoia QS Drapery System Installation Guide
1.1 Mount the brackets:
IMPORTANT: The drapery track must be level to operate properly, so all brackets must be aligned along a level horizontal line.
Each wall-mount bracket must be installed into a wall stud or other structural member using appropriate fasteners. Ensure
brackets are mounted firmly enough to support the combined weight of the drapery track, EDU, and fabric.
If no appropriate structural member is available at the mounting location, it is the responsibility of the installer to add blocking
as necessary to safely support the operating load of the system, including tugging that may occur during manual or attempted
manual operation.
A. Bracket height: Mount the brackets at a height that will leave 1/2 in (13 mm) to 1 in (25 mm) clearance between the bottom of the
drapery panel and the floor. Refer to sections 5 and 6 for fabric installation information that will help determine the correct bracket
mounting height.
Bracket Spacing
B. Position a bracket within 8 in (203 mm) of each end of the track.
C. Position the next bracket a distance of 16 in (406 mm) inward from the brackets mounted in the previous step.
D. Space the remaining brackets evenly between, 16 in (406 mm) - 24 in (610 mm) apart.
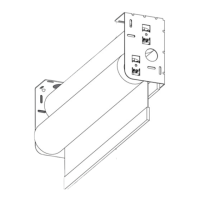
1.2 Attach the track to the brackets:
A. Move all the cam-locks to the unlocked position
B. Position the track under and against the cam-locks. Starting at the bracket nearest
the center of the track, rotate the cam-lock lever arm to the locked position.
C. Rotate the lever arm of the cam-locks on either side of the center one to the
locked position.
IMPORTANT: The drapery track must be fully supported by at least two people
until all of the cam-locks are securely engaged.
1
Wall-Mount
Top View
Window/Wall Side
Within Within
1.2D
1.2B
D. Continue working toward the ends of the track, alternating directions (see sequence
example above), until all the cam-locks are rotated to the locked position.
NOTE: Both tabs of all cam-locks must be fully engaged. If a cam-lock does not line up with
the track, loosen the bracket adjusting nut and adjust the position of the cam-lock to
properly engage it in the track. Re-tighten the bracket adjusting nut.
E. Proceed to section 4: Electronic Drive Unit (EDU) Installation.
Bracket
Adjusting Nut
8 in
(203 mm)
8 in
(203 mm)
16-24 in
(406-610 mm)
16-24 in
(406-610 mm)
16 in
(406 mm)
16 in
(406 mm)
 Loading...

