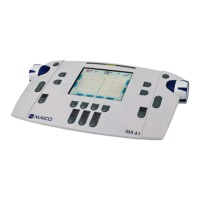
7. Quick Reference Guide
General Setup
7.1.1 Startup Settings
Air conduction on both channels
Pure tone on both channels
30 dB
HL
on right channel, 0 dB
HL
on left channel
Presenter mode
7.1.2 Transducer Selection
Select the transducer to be used, headphones (Phones) or insert phones
(Insert), by pressing the appropriate button.
Press either the right (10) or left (16) Transducer key to select the transducer
(Phones, Insert, Bone, Speaker). The display shows the selected transducer at
the top of the display screen below the presentation levels.
Note: Only those transducers calibrated to the device will be available for
selection.
It is not possible to select Bone on both channels simultaneously. After a new
selection the level will be reset to 30 dB
HL
.
7.1.3 Signal Selection
Press either the right (11) or left (15) Signal key to select the signal. The
display shows the selected signal on the bottom line of the display. The kind
of Noise signal depends on the signal of the opposite channel.
7.1.4 Masking
Selection of masking noise will be activated by either the right (11) or left (15)
Signal key (11) based on the non-test ear and the audiometer set-up.
For tone audiometry narrow band noise is used as the masking signal and for
speech audiometry, speech noise is used.
Tone and Speech Audiometry
7.2.1 How to Select Tone or Speech Audiometry Mode
There are two modes of audiometry, Tone and Speech.
Tone audiometry: shows level and frequency on the display.
Speech audiometry: shows level, correct and incorrect words, and speech
discrimination percentage on the display.
 Loading...