10 ENGLISH
Storage
CAUTION: -
Failure to do so may
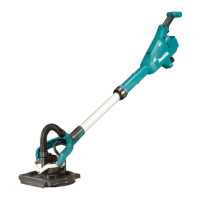
The arm can move through an angle of up to 160°. Fold
the arm up to save a storage space.
1. Loosen the lock lever by raising it. Pivot the arm at
an angle of 90°.
angle of the arm in the range "B" (90° to 160°) in
Fig.17: 1. Lock lever 2. Slider knob 3. Arm
Fig.18: 1. Lock lever 2.
NOTICE:
90°.
OPTIONAL
ACCESSORIES
CAUTION: These accessories or attachments
The use of any other
accessories or attachments might present a risk of
for its stated purpose.
If you need any assistance for more details regard-
ing these accessories, ask your local Makita Service
Center.
• Dust nozzle assembly
• Abrasive belts
• Dust cover complete
• Hose complete 28
• Makita genuine battery and charger
NOTE: Some items in the list may be included in the
tool package as standard accessories. They may
 Loading...