Do you have a question about the Makita DKP181 and is the answer not in the manual?
Lists compatible battery cartridges and chargers for the tool.
Explains the meaning of symbols used on the equipment.
Describes the primary purpose for which the tool is designed.
Details the noise emission levels of the tool according to standards.
Provides information on the vibration emission levels during operation.
Essential safety guidelines for operating any power tool.
Safety precautions related to the environment where the tool is used.
Critical safety measures concerning electrical connections and usage.
Step-by-step guide for fitting and removing the battery from the tool.
Explains the built-in systems that protect the tool and battery from damage.
Guidance on where to store the included box wrench to prevent loss.
Procedures for safely taking out and putting in the planer blades.
Step-by-step guide for performing the planing task.
Overview of the wireless activation feature and its capabilities.
How to clean the tool's chip discharge opening to ensure proper function.
Instructions on how to sharpen the planer blades for best performance.
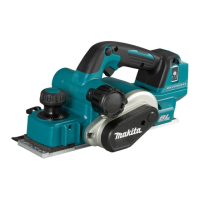
This document provides a comprehensive guide for the Makita Cordless Planer DKP181, covering its functional description, usage features, and maintenance procedures.
The Makita Cordless Planer DKP181 is designed for planing wood, offering both "high speed mode" and "high torque mode" to adapt to varying workloads. The tool automatically adjusts its operation mode; it runs in high speed mode for quicker cutting with low workload and switches to high torque mode for powerful cutting with high workload. A mode indicator lights up green in high torque mode and blinks green under excessive load, signaling the need to reduce the load.
The planer is equipped with a tool/battery protection system that automatically cuts off power to the motor to extend tool and battery life. This system activates under overload conditions (abnormally high current draw) and overdischarge conditions (low battery capacity). If the tool overheats, it automatically stops, and the battery indicator blinks for about 60 seconds, requiring the tool to cool down before restarting.
A key feature is the wireless activation function, which enables clean and comfortable operation by connecting a supported Makita vacuum cleaner. This allows the vacuum cleaner to run automatically in sync with the tool's switch operation. To use this function, a wireless unit (optional accessory) must be installed in the tool, and the tool must be registered with the vacuum cleaner. The wireless activation lamp on the tool indicates the status of this function, with different colors and blinking patterns signifying standby, tool registration readiness, successful registration, cancellation readiness, successful cancellation, and power supply status.
The DKP181 offers precise control over planing depth, which can be adjusted by turning a knob on the front of the tool. For safety, it is crucial to ensure the blades have stopped completely before making any depth adjustments.
The tool features a switch action with a lock-off button to prevent unintentional starting. To operate, the lock-off button must be depressed before pulling the switch trigger. Releasing the switch trigger stops the tool.
After a cutting operation, a foot automatically raises under the rear base to prevent the planer blades from being damaged by contacting the surface.
The planer can be used for various operations, including general planing, shiplapping (rabbeting), and chamfering. For general planing, the tool should be rested flat on the workpiece without blade contact, switched on, and allowed to reach full speed before moving it gently forward. Pressure should be applied to the front at the start and the back at the end of planing.
For shiplapping, an edge fence (guide rule) is used to make stepped cuts. The blade edge should protrude slightly (0.2 mm - 0.4 mm) for this operation. The edge fence can be extended with an extra piece of wood for longer workpieces.
Chamfering cuts are made by aligning one of three "V" grooves in the front base with the workpiece edge. An optional chamfering rule can be installed for increased tool stability during this process.
The chip discharge direction can be changed to the right or left by pulling out and refitting the stopper in one of the two openings on the opposite side of the chip discharge.
For cleaner operation, a dust bag (optional accessory) can be attached to the chip discharge opening. Alternatively, a Makita vacuum cleaner can be connected to the chip discharge opening for more efficient dust collection, especially when using the wireless activation function. An optional elbow accessory can also be used to change the chip discharge direction for cleaner work.
Regular maintenance is essential for the product's safety and reliability. Before any inspection or maintenance, the tool must be switched off, and the battery cartridge removed.
The chip discharge opening should be cleaned regularly, using compressed air if necessary, to prevent clogging.
For models with conventional planer blades, sharpening is recommended for optimal performance. A sharpening holder is used to remove nicks and produce a fine edge. The dressing stone should be immersed in water for 2-3 minutes before sharpening, and the holder should be held to ensure both blades contact the stone at the same angle for simultaneous sharpening.
When installing or removing planer blades, extreme care must be taken. Gloves or rags should be used to protect hands. Only the Makita wrench provided should be used to tighten installation bolts securely, as improper tightening can lead to injury or tool breakdown. All chips or foreign matter must be cleaned from the drum and blades before installation. Planer blades of the same dimensions and weight must be used to avoid drum oscillation/vibration, poor planing, and tool breakdown.
For tools with mini planer blades, removal involves loosening installation bolts with the box wrench and sliding the blade out from the belt side. Installation requires cleaning the drum and blade, sliding the new blade in, and tightening the installation bolts evenly and alternately. Calibration of the set plate and adjusting plate is also necessary, involving loosening screws, placing the mini planer blade on a blade gauge, aligning the set plate, pressing the heel flush, and tightening the screws.
The manual also includes a troubleshooting section for the wireless activation function, providing probable causes and remedies for issues such as the wireless activation lamp not lighting/blinking, failure to finish tool registration/cancellation, the vacuum cleaner not running with the tool, or the vacuum cleaner running when the tool's switch trigger is not pulled. These remedies often involve checking wireless unit installation, cleaning terminals, pressing the activation button, setting the stand-by switch to "AUTO," ensuring power supply, performing registration procedures correctly, and maintaining proximity between the tool and vacuum cleaner to avoid radio interference.
| Type | Cordless Planer |
|---|---|
| Voltage | 18V |
| Planing Width | 82 mm |
| Rebate Depth | 9 mm |
| Planing Depth | 0 - 2 mm |