Do you have a question about the Makita 2012NB and is the answer not in the manual?
Essential safety practices covering tool knowledge, guards, work area, environment, and child safety.
Covers apparel, securing work, tool care, accessory use, maintenance, and operational safety.
Rules for safe operation, including eye protection, blade handling, and workpiece preparation.
Procedure for setting the cutting depth based on workpiece width and using the depth gauge.
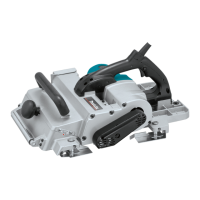
Detailed instructions and cautions for removing and replacing the planer's cutting blades.
Procedure for installing new planer blades using specific tools and ensuring proper alignment.
Guidelines for feeding workpieces, including handling narrow stock and long workpieces correctly.
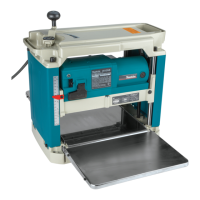
The Makita 2012NB Planer is a robust and versatile tool designed for precision woodworking, specifically for planing workpieces to desired thicknesses. This planer is equipped with features that ensure both safety and efficiency in operation, making it suitable for a range of users from hobbyists to industrial professionals.
The primary function of the Makita 2012NB Planer is to remove material from the surface of wood workpieces, achieving a uniform thickness and smooth finish. This is accomplished by feeding the workpiece through the machine, where rotating blades shave off thin layers of wood. The planer is designed with a main frame that can be adjusted vertically, allowing the user to precisely control the depth of cut and the final thickness of the workpiece.
A key operational aspect is the dimensional adjustment mechanism. The main frame is raised or lowered by turning a crank handle. This handle is connected to a scale and an indicator plate, which show the desired finished dimension. One full turn of the crank handle adjusts the main frame by 2 mm (3/32"), with both inch and metric graduations provided on the scale for flexibility.
The planer incorporates a depth adjusting gauge for more accurate predetermination of the depth of cut. This gauge allows users to plane a workpiece, measure the removed material, and then fine-tune the gauge to achieve the exact desired depth for subsequent passes. This is particularly useful when multiple passes are required to remove a significant amount of stock.
For repetitive tasks requiring consistent workpiece thickness, a stopper mechanism is integrated. Once the desired finished dimension is set using the crank handle and indicator plate, the stopper can be depressed and lowered until it contacts the table top. Fine adjustments to the stopper can be made using a stopper knob, ensuring that all workpieces are planed to the same thickness without constant re-measurement.
The tool features a switch action for starting and stopping operation. A key must be inserted, and the switch lever raised to start the tool. Lowering the switch lever stops it. A pilot lamp indicates when the tool is plugged into a power source. This key-operated switch enhances safety by preventing unauthorized use.
The Makita 2012NB Planer is designed for ease of use and safety during operation. When preparing to use the tool, it is crucial to position it in a well-lit and level area, ensuring good footing and balance. The planer can be bolted or screwed to a workbench or an optional planer stand for stability.
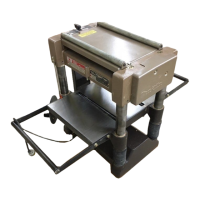
For transport, the sub-tables can be folded, and the tool can be grasped by its carrying handles. When moving the planer by vehicle, it should be secured to prevent tipping or movement.
Before starting any planing operation, the depth of cut must be determined. The maximum depth of cut varies based on the workpiece width. For narrower workpieces (less than 150 mm or 5-7/8"), a maximum depth of 3.0 mm (1/8") is allowed. For wider workpieces, the maximum depth decreases to 1.5 mm (1/16") or 1.0 mm (3/64"). If more material needs to be removed than the specified maximum, multiple shallower passes should be made. It is important to always place the workpiece flat on the table top when predetermining the depth of cut to ensure accuracy.
When operating, the tool should be switched on, and the blades allowed to reach full speed before the workpiece is inserted. The workpiece should not be in contact with the feed roller when the tool is started. For long or heavy workpieces, lifting the ends slightly at the start and end of the cut can prevent gouging or snipping.
The top of the tool can be used as an infeed table, facilitating the quick and effortless return of the workpiece, which is especially convenient when two operators are working together. However, caution must be exercised regarding workpiece dimensions; workpieces with dimensions that prevent them from being gripped by both feed rollers (i.e., less than 129 mm or 5-1/16" between rollers) cannot be fed into the tool. If a workpiece stalls during operation, the tool should be stopped immediately to prevent rapid wear of the feed rollers.
An optional hood set can be attached to the planer for efficient dust collection. This allows for connection to a vacuum cleaner, maintaining a cleaner work area.
Regular maintenance is essential to ensure the longevity, safety, and optimal performance of the Makita 2012NB Planer. Before performing any inspection, adjustment, or maintenance, the tool must always be switched off and unplugged from the power source.
Blade replacement is a critical maintenance task. The planer uses disposable-type blades with cutting edges on both sides. When one edge becomes dull, the blade can be flipped to use the other edge. These blades are razor-sharp and must be handled with extreme care to prevent injury. Before installing new blades, all chips, dust, pitch, or foreign matter must be cleaned from the drum and blade area. It is crucial to use blades of the same dimensions and weight to avoid drum oscillation or vibration, which can lead to poor cutting action and tool breakdown. Both blades should be replaced simultaneously.
To remove blades, the chip cover and right side cover must be loosened and removed. The pulley is then turned to lock the drum, exposing the blade installation bolts. Magnetic holders are used to lift the set plate and blade from the drum after the bolts are removed. For installation, the blade and set plate are placed on a flat wood block, ensuring the blade locating lug rests in the groove of the set plate. The set plate is adjusted so that the blade protrudes approximately 1 mm (3/64") beyond its ends. The magnetic holders are then used to position the set plate and blade into the drum groove, and the installation bolts are tightened evenly from the center outwards using the provided Makita socket wrench.
Lubrication is another important maintenance aspect. The chain, the four columns, and the screws for elevating the main frame should be periodically oiled with machine oil after removing the side cover.
Cleaning the tool regularly is also vital. Dirt, chips, and foreign matter adhering to the roller surfaces, motor vents, and drums should be brushed off to prevent buildup and ensure smooth operation. Chips should never be removed from the chip chute while the motor is running; always wait until the blades have come to a complete stop and use a stick or similar tool for cleaning.
Carbon brushes should be regularly checked and replaced when they wear down to the limit mark. Both carbon brushes must be replaced at the same time with identical carbon brushes. This involves removing the brush holder caps with a screwdriver, taking out the worn brushes, inserting new ones, and securing the caps.
For any repairs, or other maintenance or adjustments, it is recommended to use Makita Authorized or Factory Service Centers and always use genuine Makita replacement parts to maintain product safety and reliability.
| Power | 1650 W |
|---|---|
| Feed rate | 8.5 m/min |
| Idle speed | 8500 RPM |
| Planning width (max) | 304 mm |
| Depth | 771 mm |
|---|---|
| Width | 483 mm |
| Height | 401 mm |
| Weight | 28100 g |