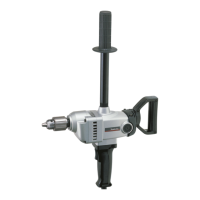
The Makita DS4000 is a drill designed for various drilling applications, including wood and metal. This instruction manual provides essential information on its safe operation, technical specifications, usage, and maintenance.
Function Description
The Makita DS4000 is a reversible drill, offering both clockwise and counterclockwise rotation, controlled by a switch trigger. This feature allows for versatile drilling and easy removal of stuck bits. The tool is equipped with a top grip (auxiliary handle) for enhanced control and stability during operation. Its primary function is to drill holes in different materials using appropriate drill bits.
Important Technical Specifications
The Makita DS4000 has the following key specifications:
- Model: DS4000
- Capacity:
- Steel: 13 mm (1/2")
- Wood: 38 mm (1-1/2")
- No load speed (RPM): 500/min.
- Overall length: 363 mm (14-1/4")
- Net weight: 4.0 kg (8.8 lbs)
- Voltage: 120 V
- Ampere Rating: Varies, typically between 0-16 A, influencing the required extension cord gauge.
- Frequency: Hertz (Hz)
- Rotation: Revolutions or reciprocation per minute (/min.)
The manufacturer reserves the right to change specifications without notice, and specifications may differ by country.
Usage Features
General Safety Rules:
Before operating the tool, users must read and understand all instructions to prevent electric shock, fire, and serious personal injury.
- Work Area Safety: Keep the work area clean, well-lit, and free from flammable liquids, gases, or dust. Ensure bystanders, children, and visitors are kept away.
- Electrical Safety: Grounded tools must be plugged into a properly installed and grounded outlet. Never remove the grounding prong or modify the plug. Avoid using adapter plugs if unsure about proper grounding. Avoid body contact with grounded surfaces like pipes and radiators. Do not expose power tools to rain or wet conditions. Use outdoor extension cords marked "W-A" or "W" when operating outside.
- Personal Safety: Stay alert, use common sense, and avoid operating the tool while tired or under the influence of drugs, alcohol, or medication. Dress properly, avoiding loose clothing or jewelry, and contain long hair. Ensure the switch is off before plugging in to prevent accidental starting. Remove adjusting keys or wrenches before turning the tool on. Maintain proper footing and balance. Always wear eye protection, and use a dust mask, non-skid safety shoes, hard hat, or hearing protection as appropriate.
- Tool Use and Care: Secure the workpiece with clamps or other practical means. Do not force the tool; use the correct tool for the application. Do not use the tool if the switch does not turn it on or off. Disconnect the plug from the power source before making adjustments, changing accessories, or storing the tool. Store idle tools out of reach of children. Maintain tools with care, keeping cutting tools sharp and clean. Check for misalignment, binding, or breakage of parts, and have damaged tools serviced before use. Use only manufacturer-recommended accessories.
Specific Safety Rules for Drills:
- Hold the tool by insulated gripping surfaces when performing operations where cutting tools may contact hidden wiring or the tool's own cord to prevent electric shock.
- Always ensure a firm footing, especially when using the tool in high locations.
- Hold the tool firmly and keep hands away from rotating parts.
- Operate the tool only when hand-held; do not leave it running unattended.
- Avoid touching the drill bit or workpiece immediately after operation, as they can be extremely hot and cause burns.
- Be aware that some materials contain toxic chemicals; take caution to prevent dust inhalation and skin contact. Follow material supplier safety data.
Assembly:
- Installing Top Grip (Auxiliary Handle): Screw the top grip onto the tool securely for improved handling.
- Installing or Removing Drill Bit: To install, place the bit into the chuck as far as it goes, then tighten the chuck by hand. Use the chuck key in each of the three holes, tightening clockwise and ensuring all three holes are evenly secured. To remove, turn the chuck key counterclockwise in one hole, then loosen the chuck by hand. Always return the chuck key to its original position after use.
Operation:
- Switch Action: The switch trigger controls both clockwise and counterclockwise rotation. Pull the lower part for clockwise rotation and the upper part for counterclockwise rotation. Release the trigger to stop. Change the direction of rotation only when the tool has come to a complete stop to prevent damage.
- Drilling in Wood: For best results, use wood drills equipped with a guide screw, which pulls the bit into the workpiece, making drilling easier.
- Drilling in Metal: To prevent slipping, make an indentation with a center-punch and hammer at the drilling point. Place the bit point in the indentation before starting. Use a cutting lubricant for most metals, except iron and brass, which should be drilled dry.
- Cautions during Drilling:
- Avoid excessive pressure, as it will not speed up drilling and can damage the bit, decrease performance, and shorten tool life.
- Be aware of the tremendous twisting force exerted on the tool/bit during hole breakthrough. Hold the tool firmly and exercise care.
- If a bit gets stuck, set the reversing switch to reverse rotation to back it out, but hold the tool firmly to prevent abrupt kickback.
- Always secure small workpieces in a vise or similar hold-down device.
- Avoid drilling into materials suspected of containing hidden nails or other objects that could cause the bit to bind or break.
Maintenance Features
- General Maintenance: Always ensure the tool is switched off and unplugged before performing any inspection or maintenance.
- Replacing Carbon Brushes: Regularly remove and check the carbon brushes. Replace them when they wear down to the limit mark. Keep brushes clean and free to slip in their holders. Both carbon brushes should be replaced simultaneously with identical carbon brushes. Use a screwdriver to remove the brush holder caps, take out the worn brushes, insert new ones, and secure the caps.
- Service and Repair: For product safety and reliability, all repairs, maintenance, or adjustments should be performed by Makita Authorized or Factory Service Centers, using only Makita replacement parts. Using unauthorized parts or failing to follow maintenance instructions can create a risk of electric shock or injury.
- Extension Cord Use: Use only three-wire extension cords with three-prong grounding-type plugs and receptacles. Ensure the cord is in good condition. Use a heavy enough gauge cord for the current draw to prevent voltage drop and overheating. Refer to the provided table for minimum gauge requirements based on ampere rating and cord length.
- Grounding Instructions: The tool must be grounded while in use to protect the operator from electric shock. It has a three-conductor cord and a three-prong grounding-type plug. The green (or green and yellow) conductor is the grounding wire and must never be connected to a live terminal. For 120-volt units, an adapter (Fig. B and C) can be used to connect the three-prong plug to a two-prong receptacle, provided the green-colored rigid ear, lug, etc., extending from the adapter is connected to a permanent ground, such as a properly grounded outlet box.
The manual also includes a customer record section for tracking purchase date, dealer information, model, and serial number, which is useful for service. A mail-in portion is provided for customer feedback.