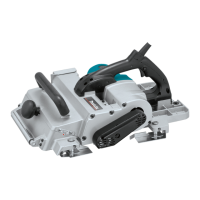
9 ENGLISH
For the correct planer blade setting
Yourplaningsurfacewillenduproughanduneven,unlessthebladeissetproperlyandsecurely.Theblademustbe
mountedsothatthecuttingedgeisabsolutelylevel,thatis,paralleltothesurfaceoftherearbase.
Refertosomeexamplesbelowforproperandimpropersettings.
(A)
(B)
(B)
(A)
(B)
(A)
(A) Front base (Movable shoe)
(B) Rear base (Stationary shoe)
Correct setting
Nicks in surface
Gouging at start
Gouging at end
Although this side view cannot
show it, the edges of the blades
run perfectly parallel to the rear
base surface.
Cause: One or both blades fails to
have edge parallel to rear
base line.
Cause: One or both blade edges
fails to protrude enough in
relation to rear base line.
Cause: One or both blade edges
protrudes too far in relation
to rear base line.
Dust bag (accessory)
►Fig.11: 1.Dustbag2. Nozzle
For tool without nozzle
Remove the chip cover and install the nozzle (optional
accessory).Attachthedustbagontothenozzle.The
nozzleistapered.Whenattachingthedustbag,push
itontothenozzlermlyasfarasitwillgotopreventit
from coming off during operation.
For tool with nozzle
Attachthedustbagontothenozzle.Thenozzleis
tapered.Whenattachingthedustbag,pushitontothe
nozzlermlyasfarasitwillgotopreventitfromcoming
off during operation.
►Fig.12: 1. Fastener
Whenthedustbagisabouthalffull,removethedust
bagfromthetoolandpullthefastenerout.Empty
thedustbagofitscontents,tappingitlightlysoasto
remove particles adhering to the insides which might
hamper further collection.
NOTE:
• If you connect a Makita vacuum cleaner to this
tool,moreefcientandcleaneroperationscan
beperformed.
Connecting a vacuum cleaner
►Fig.13
For tool without nozzle
When you wish to perform clean planing operation, con-
nect a Makita vacuum cleaner to your tool. Before con-
necting the vacuum cleaner, remove the chip cover from
the tool. Then connect a hose of the vacuum cleaner to
thenozzle(optionalaccessory)asshowninthegures.
For tool with nozzle
When you wish to perform clean planing operation, connect
a Makita vacuum cleaner to your tool. Then connect a hose
ofthevacuumcleanertothenozzleasshowninthegures.
Elbow (optional accessory)
►Fig.14: 1.Elbow2. Nozzle
Useofelbowallowschangeofchipdischargedirection
to perform cleaner work.
For tool without nozzle
Remove the chip cover and install the nozzle (optional acces-
sory).Attachtheelbow(optionalaccessory)onthenozzleof
thetoolbyjustslippingonit.Toremoveit,justpullitout.
For tool with nozzle
Attachtheelbow(optionalaccessory)onthenozzleof
thetoolbyjustslippingonit.Toremoveit,justpullitout.

 Loading...