Do you have a question about the Makita LS1040 and is the answer not in the manual?
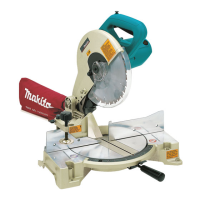
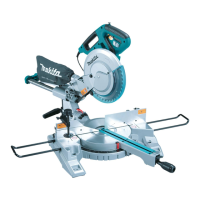
Details blade diameter, hole diameter, miter/bevel angles, and maximum cutting capacities.
Lists no load speed, tool dimensions (L x W x H), and net weight.
Emphasizes understanding the tool and keeping safety guards in place and functional for safe operation.
Covers removing adjustment wrenches and maintaining a clean work area to prevent accidents.
Covers safe use in environments, child safety, appropriate apparel, and mandatory eye protection.
Details securing work, avoiding overreach, tool maintenance, and essential electrical safety practices.
Covers eye protection, keeping hands clear of the blade, and the critical importance of securing the workpiece.
Ensures guards are functional, prohibits freehand operation, and mandates unplugging before servicing.
Covers safe material handling, blade inspection, base securing, and pre-operation checks for safety.
Emphasizes user alertness, proper accessory use, and avoiding unsafe practices like cross-armed cutting.
Instructions on how to install the auxiliary plate using the provided hex bolt for added support.
Guidance on securely bolting the tool to a stable surface using base holes to prevent tipping.
Explains the automatic rising/returning function of the blade guard and stresses its importance for safety.
Describes the kerf board's purpose in minimizing tear-out and how to cut a groove if necessary.
Guides on checking and adjusting the blade's lower limit position after installing a new blade.
Details the operation of the switch trigger, lock-off button, and necessary safety checks before use.
Provides crucial safety precautions and step-by-step instructions for blade installation and removal.
Step-by-step instructions for safely removing the blade using the socket wrench and shaft lock.
Guides on mounting the blade correctly, ensuring proper orientation and secure fastening.
Instructions on how to attach, use, and empty the dust bag for cleaner cutting operations.
Emphasizes the absolute necessity of securing the workpiece firmly with a vise to prevent injury or damage.
Details flipping the fence for left bevel cuts to prevent contact with the blade or tool.
Instructions for installing the vertical vise on the guide fence or holder assembly for workpiece stability.
Instructions for installing the optional horizontal vise, especially for miter cuts requiring opposite side mounting.
Describes installing holders and the holder assembly for supporting workpieces horizontally.
Mentions the holder-rod assembly for efficiently cutting repetitive lengths of stock.
Reminds users to release the handle and ensure the blade is clear before turning the switch on.
Details the procedure for making a straight cut, including achieving full blade speed and safe stopping.
Refers to angle adjustments and outlines the process for performing miter and bevel cuts safely.
Advises on managing cut-off pieces and applying parallel pressure during bevel cuts for accuracy.
Defines compound cutting and provides a table with angle settings for combined miter and bevel cuts.
Describes how to cut crown and cove moldings by laying them flat on the turn base.
Explains measuring wall length and positioning moldings on the base for accurate cuts.
Provides specific angle settings and positioning for cutting a 52/38° type crown molding.
Lists required bevel and miter angles for various wall angles when cutting 52/38 degree crown molding.
Lists required bevel and miter angles for various wall angles when cutting 45 degree crown molding.
Describes optional stoppers for easier crown molding cuts without tilting the blade.
Advises on using spacer blocks and lubricant when cutting aluminum extrusions to prevent damage.
Details the use of the optional set plate for efficiently cutting multiple pieces of the same length.
Instructions on how to safely carry the tool, ensuring all moving parts are secured.
General cautions for performing inspection or maintenance, emphasizing safety and unplugging the tool.
Steps to adjust the miter angle to 0 degrees and secure the guide fence using hex bolts.
Instructions on how to square the blade to the guide fence using a rule for accurate miter angles.
Detailed steps for adjusting the 0 degree bevel angle using the adjusting bolt and securing the hex nut.
Lists different types of saw blades and their specific applications for smooth and precise cutting.
Lists various optional accessories such as vises, holders, dust bags, and stoppers.
| Input power | 1650 W |
|---|---|
| Cable length | 2.5 m |
| Power source | AC |
| Blade diameter | 260 mm |
| Idle speed (max) | 4600 RPM |
| Dust bag included | Yes |
| Depth | 530 mm |
|---|---|
| Width | 532 mm |
| Height | 476 mm |
| Weight | 11600 g |