Do you have a question about the Makita LW1401 and is the answer not in the manual?
Keep work area clean and well lit. Avoid explosive atmospheres. Keep children and bystanders away.
Match plugs to outlets. Avoid contact with earthed surfaces. Do not expose to rain or wet conditions. Do not abuse the cord.
Stay alert. Use PPE. Prevent unintentional starting. Remove keys. Do not overreach. Dress properly. Use dust extraction.
Do not force tool. Check switch. Disconnect power. Store safely. Check alignment. Keep tools sharp. Use as intended.
Bolt tool to a level and stable surface using base bolt holes to prevent tipping.
Lock tool head when not in use or carrying. Methods vary for LW1400 and LW1401.
Check switch trigger actuation and return to 'OFF' position before plugging in.
Adjust interval settings for vise and guide plate. Follow specific procedures for changing spacing.
Adjust the cutting angle by turning the lever and tightening it. Ensure guide plate is secured.
Check and replace carbon brushes when worn to the limit mark. Use only identical brushes.
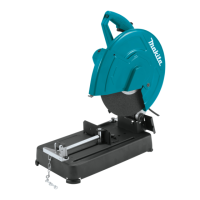
The Makita Portable Cut-Off Saw, models LW1400 and LW1401, is a robust power tool designed for cutting ferrous materials with an appropriate abrasive cut-off wheel. It is double-insulated, allowing for safe operation from single-phase AC supply sockets without an earth wire. This manual provides essential safety warnings, operational instructions, and maintenance guidelines to ensure safe and effective use.
The primary function of the Makita Portable Cut-Off Saw is to perform precise cuts in ferrous materials. The tool head can be locked for safety during transport or when not in use. For the LW1400, unlocking involves depressing the tool head slightly and pushing the lock pin, while locking requires returning the lock pin while holding down the tool head. The LW1401 features a lock chain that must be unhooked to unlock and re-hooked for locking.
The tool is equipped with a switch mechanism for starting and stopping. Models with a lock button allow for continuous operation by pulling the switch trigger, pushing in the lock button, and then releasing the trigger. To stop from a locked position, the trigger is pulled fully and then released. Models with a lock-off button require pressing the lock-off button before pulling the switch trigger to start, and releasing the trigger to stop. Users are cautioned against defeating the lock-off button, as this can lead to unintentional operation and serious injury.
The cutting capacity of the tool varies depending on the cutting angle and workpiece shape, with maximum capacities provided for brand-new cut-off wheels at 90° and 45° angles. The tool also features adjustable guide plates and a stopper plate to optimize cutting performance and extend the life of the cut-off wheel.
Before operation, the tool's base should be securely bolted to a level and stable surface using the provided bolt holes to prevent tipping and personal injury. This tool produces sparks during operation, so it is crucial to ensure no flammable or explosive materials are near the tool or in the work area.
The guide plate, which determines the cutting angle and interval between the vise and the guide plate, is adjustable. For the LW1400, a screw is loosened to move the guide plate to the desired position, then tightened. For the LW1401, two hex bolts are removed with a socket wrench, the guide plate is moved, and then secured with the hex bolts. When adjusting the interval, ensure the guide plate is properly secured to prevent personal injury. The manual outlines three available interval settings: 0-170 mm (original setting), 35-205 mm, and 70-240 mm. For cutting angle adjustment on the LW1400, the lever is turned counterclockwise, the guide plate is moved to the desired angle, and the lever is fully tightened. For the LW1401, hex bolts are loosened, the guide plate is turned to the desired angle, and then secured. It's important to note that the scale on the guide plate is a rough indication, and a protractor or triangle ruler should be used for more accurate angle settings.
The spark guard, specific to the LW1401, is factory-installed with its lower edge contacting the base. To minimize sparks, the screw can be loosened to adjust the spark guard to a higher position. The stopper plate, also specific to the LW1401, prevents the cut-off wheel from contacting the workbench or floor. It has two positions: (A) for a new wheel and (B) for a worn wheel to increase cutting capacity.
When securing a workpiece, the thread holder must be placed on the shaft threads to ensure sufficient securing and prevent the workpiece from being ejected or the wheel from breaking. The vise plate can be moved quickly when the thread holder is lifted. To grip the workpiece, the handle is pushed until the vise plate contacts the workpiece, then the thread holder is returned. Turning the handle clockwise securely retains the workpiece. For worn cut-off wheels, placing a sturdy, non-flammable spacer block behind the workpiece allows for more efficient utilization of the wheel. Long workpieces should be supported by non-flammable blocks on either side to keep them level with the base top. For wide workpieces cut at an angle, a straight piece of wood (spacer) can be attached to the guide plate to ensure proper cutting, making sure the cut-off wheel does not contact the spacer when depressed.
During operation, maintain a firm grip on the handle. Switch on the tool and allow the wheel to attain full speed before gently lowering it into the cut. Gradually bear down on the handle to perform the cut. Proper handle pressure, indicated by the amount of sparks produced, is crucial for maximum cutting efficiency. Avoid applying excessive pressure, as this can reduce efficiency, cause premature wheel wear, and potentially damage the tool, wheel, or workpiece. Once the cut is complete, switch off the tool and wait for the wheel to come to a complete stop before returning the handle to the fully elevated position.
The cut-off wheel installation and removal process is critical for safety. For tools with a center cap type safety guard, the clamping screw is loosened, and the guard is raised. For European type safety guards, the clamping screw is loosened, and the guard is opened as shown in the manual. To remove the cut-off wheel on the LW1400, the safety guard is raised, the toolless clamp is turned counterclockwise while holding down the shaft lock, and then the toolless clamp, outer flange, and cut-off wheel are removed. The inner flange, ring, and O-ring should not be removed. For the LW1401, the safety guard is raised, the hex bolt is turned counterclockwise with a socket wrench while holding down the shaft lock, and then the hex bolt, outer flange, and wheel are removed. When installing a new wheel, the process is reversed, ensuring the wheel's hole fits the ring and the safety guard is returned to its position. It is paramount to tighten the toolless clamp or hex bolt securely, as insufficient tightening can lead to severe injury. Always use only the proper inner and outer flanges provided with the tool and lower the safety guard after replacing the wheel.
Regular maintenance is essential for the safe and prolonged operation of the Makita Portable Cut-Off Saw. Always ensure the tool is switched off and unplugged before performing any inspection or maintenance.
Carbon brushes should be checked regularly and replaced when they wear down to the limit mark. Both carbon brushes must be replaced simultaneously with identical carbon brushes. To replace them, use a screwdriver to remove the brush holder caps, take out the worn brushes, insert the new ones, and secure the brush holder caps. Keep the carbon brushes clean and free to slip in their holders.
The manual advises against using gasoline, benzine, thinner, alcohol, or similar substances for cleaning, as they can cause discoloration, deformation, or cracks. Ensure ventilation openings are kept clear, especially when working in dusty conditions. If dust needs to be cleared, disconnect the tool from the mains supply and use non-metallic objects to avoid damaging internal parts.
Store wheels in a dry location only. If the wheel stops during operation, makes an odd noise, or vibrates excessively, switch off the tool immediately. Always switch off the tool and wait for the wheel to come to a complete stop before removing or securing workpieces, changing work positions, or adjusting the wheel itself. Do not touch the workpiece immediately after operation, as it will be extremely hot and could cause burns.
The tool should be serviced by a qualified repair person using only identical replacement parts to maintain safety. Lubrication and accessory changes should follow the provided instructions. Keep handles dry, clean, and free from oil and grease.
Optional accessories, such as abrasive cut-off wheels and a socket wrench (for LW1401 only), are recommended for use with this tool. Users should only use accessories or attachments specified in the manual to avoid the risk of injury. For assistance or more details regarding accessories, contact a local Makita Service Center.
| No Load Speed | 3, 800 RPM |
|---|---|
| Amperage | 15 A |
| Voltage | 120 V |
| Blade Diameter | 14 in |
| Cutting Capacity (Round) | 127 mm |
| Arbor Size | 1 in |
| Max Cutting Depth at 90° | 127 mm |