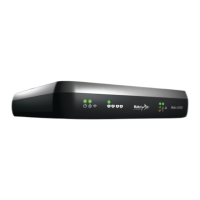
Firmware Installation
Normally, your Mako appliance will arrive pre-congured
for your location and network setup. However if your
Internet details or service provider settings have changed,
your Mako may not be able to connect.
On your Mako’s side, your connection to the Internet
should be running and capable. For instance, if sharing
a DSL line with a voice line, ensure the voice lines are
lteredappropriately.
3.1 Auto-Configuration Install (Ethernet/Cable)
1) Once your Ethernet cables are connected for your
network, connect power to your Mako.
2) The Mako will congure itself in two stages: verify and
Install. See the Troubleshooting section for descriptions
of the light sequences. Allow at least 10 minutes for this
process to complete. The Mako’s status lights will indicate
the stage of progress or error notications.
3) When the ‘Install’ light sequence nishes, disconnect
power from the Mako for 10 seconds, and re-connect
power. When the Error light switches o, your network is
ready for use.
3.1 DSL Configuration (using USB Key)
DSL accounts may auto-congure in certain countries,
provided the ISP has default routing for your Mako to
the Mako System. If this is the case, the procedure is the
same as in Auto-Connect Install.
For most DSL accounts, rmware for your Mako’s initial
deployment must use a USB key (one is enclosed with
every Mako).
USB Key format: Prior to 2014, only FAT-32 format USB
keys were usable for conguration. Now, general media
(‘o the shelf’) format as well as FAT-32 USB keys may
beused.
1) Your MSP will email a ‘conguration.zip’ le to an
accessible account. This le contains your Mako’s settings.
2) Load this le onto a USB key.
3) Disconnect power from your Mako, wait 10 seconds, and
plug in your USB key.
4) Re-connect power to your Mako.
5) The Mako will congure itself in two stages: verify and
Install. See the Troubleshooting section for descriptions
of the light sequences. Allow at least 10 minutes for this
process to complete. The Mako’s status lights will indicate
the stage of progress or error notications.
6) When the Install sequence nishes, disconnect power.
7) Wait 10 seconds, then remove the USB key and re-
connect power.
8) When the Error light on the front of the Mako goes out,
your network is ready to use.
Once your network is congured and connecting to the
CMS, further updates will occur automatically.
 Loading...