This document is an owner's manual and installation guide for Masport Woodfires, covering a range of free-standing and fireplace insert models. It provides comprehensive instructions for safe and efficient operation, installation, and maintenance of these wood-burning appliances.
Function Description:
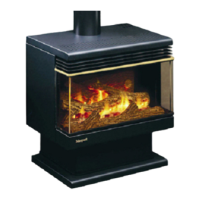
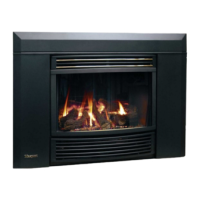
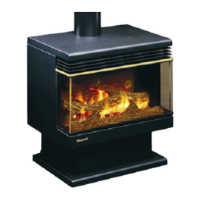
Masport Woodfires are designed to provide heating for residential spaces by burning wood fuel. The manual covers both free-standing models, which are self-contained units, and fireplace insert models, designed to be installed into existing masonry fireplaces or built-in cabinets. The woodfires are designed to comply with current emission standards in Australia and New Zealand, with specific models tested for different regulatory environments (e.g., models without a suffix for Australia, /S for NZ without water boosters, and /W for NZ with water boosters). Some models can be fitted with water heating boosters to provide hot water, and certain models include air circulating fans to improve heat distribution. The appliances feature heat output controls for adjusting the burn rate and are designed for clean burning, minimizing pollutants.
Important Technical Specifications:
The manual provides detailed minimum distances to heat-sensitive walls for various models in both parallel and corner installations, differentiating between New Zealand and Australian standards. These clearances are crucial for fire safety. For example, in New Zealand, a Horizon model with a 1200mm flue heat shield requires a minimum clearance of 50mm to the rear (A), 300mm to the side (B), and 220mm to the corner (C) in a parallel installation. In Australia, the same model with a flue heat shield might have different clearances, such as 150mm to the rear (A) and 320mm to the corner (C). The manual also specifies minimum floor protector (hearth) dimensions, including width (W), depth (B), and protrusion (S#), which vary by model and whether a flue heat shield is used. For instance, a LE 3000 & LE 5000 Series 2 in Australia requires a hearth width of 935mm and a depth of 840mm, with a minimum protrusion (S#) of 990mm.
Flue system specifications are also critical. For most models (except Toronto and Grandview), tested 150mm flue options are listed, including specific kits from manufacturers like Acorn Metal, Benja Pty Ltd, Floate Metal, Shamic Sheetmetal, Statewide Heating, and Woodland Fireplaces, each with particular heat shield configurations (e.g., 900mm 120° polished reflector, 900mm decorative heat shield with 120° solid back). For Toronto and Grandview models, tested 178mm (7") flue options are provided, such as Acorn Metal's 900mm long half-round enamelled mild steel or polished stainless steel flue shield. The manual emphasizes that only Masport-approved components should be used for installation to ensure compliance and performance.
For fireplace insert models, specific dimensions for the firebox outer case are given (e.g., LE 3000 models: 560mm high, 590mm wide, 460mm deep; LE 7000 model: 603mm high, 630mm wide, 485mm deep). Hearth dimensions for these models are also specified, with LE 3000 Provincial requiring at least 900mm wide and LE 7000 Provincial at least 1080mm wide, with minimum hearth extensions from the masonry surround (e.g., 375mm for LE 3000 Provincial in Australia).
Usage Features:
The Masport Woodfires are designed for ease of use with clear operating instructions.
- Door Handle: Front-mounted handles operate by swinging open/shut in the 12 o'clock position and latching by pushing in and turning to the 3 o'clock position. Side-mounted handles are pulled forward to open and pushed back to vertical to lock.
- Heat Output Control: A sliding control, marked with a wedge symbol, allows users to increase heat output by sliding towards the wide end and decrease it towards the narrow end. The design ensures a relatively slow reduction in heat output to minimize undesirable emissions.
- Overnight Burning: While modern designs avoid air starvation to reduce pollution, overnight burning is possible with suitable fuel (hardwood fuels burn longer) and thicker pieces of wood.
- Fan Operation: For models like the LE 7000 Provincial, a fan improves heating efficiency and warm air distribution. It is recommended to operate the fan at medium speed, especially when the fire is not on LOW, and to switch it off when the fire is burning at low heat outputs.
- Lighting Up: Instructions include spreading sand/ash evenly over the firebox floor, setting the heat output control to hot, using crumpled newspaper and dry kindling in a pyramid, lighting the paper, and leaving the door slightly ajar until the kindling catches before latching it shut. Larger pieces of wood are added once the kindling is well alight.
- Fuel: Only dry, air-dried wood (preferably for at least 12 months) should be used. In Clean Air Zones, wood moisture content must not exceed 25%. Driftwood and preservative-treated wood are explicitly warned against due to corrosion and hazardous emissions, respectively.
- Loading: Fuel should be added reasonably often to maintain combustion temperatures. Pieces should be placed front-to-back for good air access and clean burning, with specific length recommendations for Provincial Clean Air Zone models (approx. 250mm, not exceeding 300mm). Care must be taken to avoid damaging internal components like insulating boards, firebricks, or the top baffle.
- Safety Warnings: Numerous warnings are provided, including not using flammable liquids to start/rekindle fires, always moving the air control to the open position before opening the door, not throwing fuel into the firebox, not operating with cracked glass, keeping children and combustibles (furniture, clothing, firewood) away from the woodfire (minimum 420mm sides, 1m front), not leaving the fire unattended or with the door open, and proper disposal of ashes in a metal container with a lid. In case of a flue fire, the heat output control should be set to low, and the Fire Service called, without opening the woodfire door.
- Water Heating Booster: If fitted, the appliance must be connected to a vented hot water system with an open vent, and no shut-off or non-return valves in the piping system.
Maintenance Features:
The manual outlines several maintenance procedures to ensure the longevity and safe operation of the woodfire.
- Ash Removal: This is needed only occasionally. Excess ash should be shoveled out, leaving a bed of sand or ash up to the tops of the floor ribs. Removed ashes must be placed in a non-combustible container with a tight lid and moved outdoors away from combustibles.
- Cleaning the Glass: A good hot fire will burn away most deposits. A non-caustic oven cleaner can be used for stubborn residues.
- Cleaning the Cabinet or Fascia: A damp rag with a touch of household detergent is sufficient for cleaning.
- Adjusting the Door Latch: For front-mounted handles, the latch can be adjusted by transferring a washer to the outside of the door catch spindle. For side-mounted handles, the latch peg can be rotated after loosening the lock-nut to achieve the correct locking pressure. Hinges can also be adjusted to maintain even gasket pressure.
- Cleaning Inside: Internal components can be easily removed for flue cleaning or creosote debris removal. It is recommended to check the condition of all internal components at least once a season.
- Secondary Air Tube Removal: The tube is secured by one or two removable angle pins. To remove, withdraw the pin(s), move the tube sideways to disengage it from the firebox. When re-fitting, ensure the small air holes face the lower front of the firebox and the locating pin engages correctly.
- Firebox Top Baffle: This high-temperature material is crucial for clean burning. It should be handled with care. For cleaning or replacement, the secondary air tube must first be removed. When replacing, ensure it sits correctly on supporting shelves and behind retainer ribs.
- Firebox Liners: Insulating boards or firebricks are durable but will eventually need replacement. A cracked liner only needs replacing if it no longer stays in position.
- Fan Maintenance: Fans require little attention other than occasional cleaning of dust and lint from the impeller. For fireplace insert fires, fans are accessed by lifting off the ash shelf. For free-standing fires, the rear of the pedestal must be removed. For internally switched fans, the speed control knob and retaining screws must be removed to access the fan box. Impeller blades should be cleaned by blowing or vacuuming.
- Cleaning the Flue: This is typically needed once a year or more frequently under adverse conditions, indicated by inadequate draught, smoking, or a dull thud when tapped. Flue cleaning should be done by sweeping, and chemical chimney cleaners should not be used.
- Flue Inspection: Regular checks of the flue's soundness, especially the metal base of enamelled flues, are recommended.
- Before Each Heating Season: Check the condition of the flue system (especially sections nearest the firebox), the firebox top baffle, firebox liners (bricks and boards), and the door gasket. Only genuine Masport spares should be used for replacement parts.