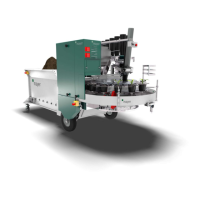
The MAYER TM 1010 frequency-controlled potting machine is designed for efficient planting and replanting of plants, minimizing both labor and time. Its intended use is strictly limited to these functions, and any other application is considered outside its intended purpose, potentially compromising safe operation. Adherence to the operating instructions, including all safety regulations and scheduled maintenance, is crucial for safe and proper use. The manufacturer and operator are not responsible for damages resulting from unintended use.
Functional Description
The machine can operate with or without an automatic pot dispenser.
Working without an automatic pot dispenser:
Empty pots are manually loaded onto the turntable, located on the right side of the machine when viewed from the front. The turntable, driven by a worm drive mechanism, moves intermittently in a counter-clockwise direction, forwarding pots under the elevator. Plates fixed on endless chains within the elevator housing scoop soil from the hopper. As these plates reach the upper turning point, the soil falls into the pots below. A controlled conveyor belt in the soil hopper continuously feeds soil towards the elevator. The turntable's intermittent movement is synchronized with a drilling motor, which uses a replaceable drill to create a hole in the soil within each pot. One or more persons can plant into the pots around the machine, with plant holding trays positioned either beside the machine, in a separate storage area, or on top of the turntable. A pot take-off mechanism removes planted pots from the turntable and transfers them to a connected conveyor belt. When operating without an automatic pot dispenser, special attention must be paid to the "General safety instructions" in section 2.
Working with an automatic pot dispenser:
When an automatic pot dispenser is installed, manual feeding is eliminated, potentially saving one person's labor. Further instructions for this mode are detailed in the pot dispenser's operating instructions.
Important Technical Specifications
- Make: Mayer
- Machine type: Potting machine
- Series: 1010 frequency controlled
- Dimensions (Length / Width / Height): 357 / 143 / 170 cm
- Weight: 880 kg
- Working height: approx. 85 cm
- Current consumption: 16 A
- Control voltage: 24 V DC
- Power connection: 400V/50Hz, 5-pole
- Power input: 3.2 kW
- Pot size:
- T = 16: 5 to 22 cm diameter
- T = 8: 15 to 30 cm diameter (extra accessory)
- Suitable for round and square pots
- Capacity of soil hopper: 1.5 m³ (4 m³ on request)
- Production speed: 800 - 4000 pots per hour
- Usable drill sizes: 2-13 cm (larger drill diameter on request)
- Workplace related emission value: 73dB (A)
Available accessories (for an additional charge):
- Pot clamper for diameters 15-30 cm (T8)
- Drill sleeve 100 mm
- Standard drills from 3.5 cm - 13 cm
- Special drills from 3.5 cm - 16 cm
- Container drill from 11 cm - 22 cm
- Plate from 4 cm - 14 cm
- Plates for tree nurseries from 12 cm - 29 cm
- Closed pressure plate
- Special pressure plate
- Chrysanthemum plate
- Plates for pouring edge
- Roller conveyor and roller curves
- Counting device
- Various belt storage magazines
- Automatic pot transport in combination with conveyor belts
- Broadening devices and attachments for soil hoppers
- Trailer coupling
- Heavy duty drive
- Stainless steel elevator buckets
When ordering accessories or spare parts, it is important to provide the machine type and number.
Usage Features
Initial Start-up:
Before initial start-up, ensure all safety instructions are followed to prevent injury and damage. Only qualified personnel should perform the start-up. Check that all tools and non-essential parts are removed, electrical connections are secure, and all safety equipment and EMERGENCY SHUT-OFF switches are activated. The "General Safety Instructions" section must be read.
Starting the machine for the first time:
- Ensure no foreign materials (tools, etc.) are left on the turntable.
- Set the main switch to OFF ("Null") before connecting the power cable.
- Once connected, set the main switch to "1 ON".
- Set the turntable switch to "1 ON", the elevator and conveyor belt switch to "1" (right), and the drill switch to "2". Press the "Start" pushbutton on the swinging cable. The turntable should rotate counter-clockwise. If it rotates clockwise, an electrician must change the phases at the connecting cable. Elevator plates should move from bottom to top when viewed from the soil hopper side.
- "Soil" potentiometer: Turning right increases soil amount and speed; turning left decreases soil amount and speed.
- "Drill" changeover switch: Position "2" rotates the drill clockwise (excavates soil); position "1" rotates it counter-clockwise (compacts soil, only with standard drill).
- If no problems or unusual noises are detected during test operation, the machine can be put into normal operation.
Stopping the machine:
The machine can be stopped in two ways:
- Normal stop: Using the "Stop" switch on the swinging cable. The machine can be restarted by pressing "Start".
- Emergency stop: Using the "Emergency Stop" switch. The machine stops immediately and remains stopped. After the emergency stop is cleared, the machine can be restarted by pressing "Start".
- Warning: Opening the doors of the drill or pot dispenser will immediately stop the machine. It can be restarted by closing the door and pressing "Start".
Normal Operation:
- Pre-operation check: Ensure sufficient pots, plants, and soil mixture are available. Plan for efficient soil transport, plant feeding, unloading, and pot preparation, using the shortest transport routes.
- Adjusting the pot turntable: Attach the hand wheel to the shifting spindle and turn left to open the adjustable pot holder. Load pots and adjust the pot holders' height so their upper edges are just below the pot's shoulder. Tighten the pot holder with the hand wheel until the clamps lightly grip the pots.
- Adjusting pot scraper: Adjust the pot scraper to remove excessive soil from the pot. The scraper's position is adjusted via a hand wheel.
- Adjusting scraper brushes: Adjust the lower scraper brush to clean the pot support and the upper scraper brush to clean the clamps of the pot holding discs.
- Soil feeding and emptying: The soil hopper holds 1,500 liters (1.5 m³) and can be fed manually (shovel, wheelbarrow) or by conveyor belt/shovel loader without interrupting work. Remaining soil can be conveyed out by opening the soil flap. If the soil heap is too high, the machine must be pulled back. Opening the soil flap also cleans the elevator deflection.
- Adjusting drill depth and pressure intensity: After fixing the soil drill and down holder, set the drilling depth according to the plant bale's height. Screw the down holder to the holding bars with self-locking nuts. Set the drilling slide to the lower position. Apply a suitable spindle to the drill and slide it onto the motor shaft, securing it with a threaded pin. Roughly set the drilling depth using an empty pot. Fine-tune the drilling depth by shifting the rod in the sleeve and fixing it with the threaded pin. Perform a test drilling with a soil-filled pot and readjust if necessary. For soft plastic, gridded, or Jiffy pots, set the pressing force of the press plate using clamping pieces.
- Adjusting speed of operation (hourly output) and soil amount:
- Hourly output: Infinitely variable adjustment by turning the potentiometer (scale 1-10). Start with a low output until workers are proficient.
- Soil amount: Soil is supplied by a continuous rubber conveyor belt.
- Potentiometer settings: Turning the elevator and rubber conveyor belt potentiometer right (clockwise) increases soil amount; turning left (anti-clockwise) decreases it.
- Caution: Right switch setting means elevator and conveyor belt run in work flow direction. Left switch setting means elevator runs against work flow direction, while the conveyor belt runs in work flow direction.
- Star wheel adjustment: Speed of the belt can be increased or decreased by rotating the star wheel. Loosen the clamping lever before adjusting, then tighten. This changes the quantity of soil carried by the elevator plates. Adjust in small increments (1-2 rotations) and wait for 40-50 pots to be filled before making further corrections.
- Elevator plates: The number of elevator plates can be doubled for an extra charge.
- Note: Correct soil quantity settings save the elevator and extend its lifetime.
- Setting compactness of the soil: This is a special feature of MAYER potting machines, depending on:
- Drilling in or out the soil mixture: The drill motor's reverse switch allows clockwise rotation (drills out soil) or counter-clockwise rotation (drills in/compacts soil). Standard drills with cross-shaped plates distribute soil and can be used in both directions. Special drills are for drilling out only, with flat edges and deep grooves suitable for thick soil mixtures, pine needles, and loose filling.
- Setting filling quantity by drawer: The drawer's adjustable height controls the filled quantity. More soil leads to more compact filling; soil drawn down at the pot's edge results in looser filling.
- Type and size of pressing plate: The pressing plate holds the pot and retains soil during drilling. A small gap between the drill's outer diameter and the pressing plate hole (e.g., 6 cm drill with 7 cm hole) removes less soil, resulting in compact filling. A larger gap (e.g., 6 cm drill with 9 cm hole) removes more soil, resulting in less compact filling. Pressing plates with soil addition leave a soil heap that can be compacted by repressing. Special accessories are available for specific tasks and pots.
Maintenance Features
General Notes:
An annual inspection by customer service is recommended. For service or repair, contact a Mayer service workshop. Use only original MAYER spare parts to ensure technical requirements are met.
Inspection and Preventive Maintenance:
- Elevator chains: Retension chains using tensioning bearings on both sides of the elevator. Regularly check tension; loose chains can jam, overtensioned chains cause excess wear and quick deterioration. Both chains should have equal tightness. With an empty soil hopper and the elevator at pot holder height, normal tension allows 3-4 cm movement by hand.
- Action: Grease elevator chain prior to a longer shutdown.
- Rubber conveyor belt: Generally requires no retensioning. If readjustment is needed (e.g., after repair work), adjust tension using nuts at the end of the soil hopper. Both sides must be tensioned with equal force. Regularly clean grooves of driving and guiding drums to prevent soil buildup.
- Action: Follow the maintenance schedule.
Maintenance Schedule:
- Quarterly:
- Grease shifting roll's groove and drive chains.
- Grease the brake (grease nipples on the back side of the turntable).
- Monthly:
- Grease holding-down bar at drill.
- Prior to a longer shutdown:
- Yearly:
- Grease all bearings fitted with grease nipples.
Measures prior to and after a longer shutdown:
- Before shutdown: Clean the machine carefully. Grease and oil specified parts according to the maintenance plan. Protect against dirt and moisture (cover the machine). Disconnect from power lines (electricity, compressed air).
- After shutdown: Grease and oil specified parts. Visually check the machine. Connect to required energy sources. Start the machine as described in "Initial start-up".
Safety during Maintenance:
- Only authorized, qualified personnel should perform cleaning, lubricating, and maintenance work, strictly following operating instructions.
- Only trained electricians may work on electrical equipment.
- Switch off and secure all voltage sources to prevent accidental re-engagement.
- Release pressure from all pressurized units.
- Only Mayer GmbH & Co. KG may manipulate the control program.
- Dispose of all un-recycled operational materials, lubricants, and supplies in an environmentally friendly manner.
- Refer to the "General Safety Instructions" section.
- Special dangers during maintenance: Incorrect spare parts can cause severe damage. Accidental power activation can cause injury and damage. Sharp machine parts/tools pose a risk of injury. Escaped lubricants or fertilizers can cause caustic burns. Unsecured manual operation increases the risk of crushing injuries.
Installation:
- Store and use the machine indoors to protect against weather damage.
- Electrical connection: 400V/50Hz. Connect only to socket-outlets protected by an AC/DC sensitive RCCB (residual-current circuit-breaker).
- Ensure sufficient space for feeding and filling pots, and for connected machines.
- To maximize efficiency, prepare soil mixture, seedlings, plants, pots, and trays in sufficient quantity and at optimal locations.
- Do not underestimate the task of removing and transporting filled pots; an inefficient solution can significantly reduce machine efficiency.
- Installing the machine: Provide a hard soil surface to prevent wheels and castors from sinking. The castors are equipped with a handbrake.
- Stability against overturning: No special activity is needed beyond the installation described in section 4.2.
Disassembly and Disposal:
After its operational lifespan, the machine must be disconnected from energy supply systems and disposed of according to valid legal regulations.