Do you have a question about the Maytag ELECTRIC RANGE and is the answer not in the manual?
Ensuring the anti-tip bracket is properly installed to prevent tip-over hazards.
Key precautions for safe operation, including warnings for fire, shock, and injury.
Important warnings regarding fire hazards and hot surfaces on the cooktop.
Step-by-step guide for using the AquaLift low-heat cleaning cycle.
Solutions for common issues like unresponsive controls or display errors.
Addressing problems with oven temperature or indicator lights.
Resolving issues related to uneven browning, timing, or rack placement.
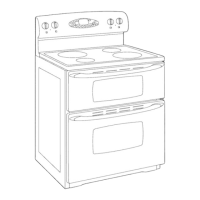
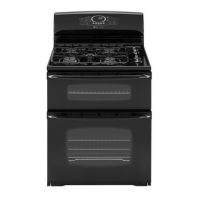
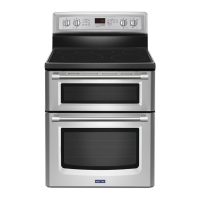
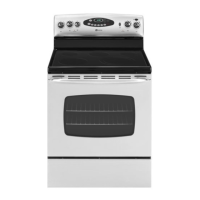
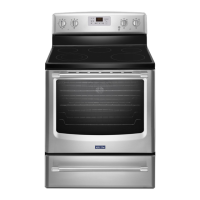
This document is a user manual for a Maytag electric range, providing comprehensive instructions for its safe operation, feature utilization, and maintenance.
The manual begins with crucial safety information, emphasizing the importance of reading and obeying all safety messages. It highlights the "DANGER" and "WARNING" alerts, which indicate potential hazards that could lead to serious injury or death if instructions are not followed. A significant safety feature is the anti-tip bracket, designed to prevent the range from tipping over. Users are instructed to verify its proper installation and engagement, especially if the range is moved, to prevent severe burns or death to children and adults. The manual also includes California Proposition 65 warnings regarding chemicals known to cause cancer or reproductive harm.
Further safety instructions cover proper installation and grounding by a qualified technician, and caution against using the range for room heating. It advises against leaving children unattended or allowing them to sit or stand on the range. Users are warned to wear proper apparel, avoid loose-fitting or hanging garments, and to refer all servicing to qualified technicians. Storage of flammable materials in or on the range is prohibited. Specific warnings are given for grease fires (smother, do not use water), and the use of dry potholders to avoid steam burns. Users are cautioned not to touch hot surface units or oven interior surfaces during or after use. The importance of using proper pan sizes with flat bottoms is stressed for efficient heating and to prevent clothing ignition. Never leaving surface units unattended at high heat settings is advised to prevent boilovers, smoking, and greasy spills. The manual also covers the importance of having reflector pans or drip bowls in place to prevent damage to wiring.
Regarding protective liners, it advises against using aluminum foil to line drip bowls or oven bottoms unless specifically suggested, as improper installation can lead to electric shock or fire. Glazed cooking utensils should be suitable for range-top service to avoid breakage from sudden temperature changes. Utensil handles should be turned inward to prevent burns and spills. Removable heating elements should never be immersed in water. If the cooktop breaks, users are warned about the risk of electric shock from cleaning solutions and spills. Cleaning a hot cooktop requires caution to avoid steam burns, and some cleaners can produce noxious fumes. When opening the oven door, users should allow hot air or steam to escape before removing food. Unopened food containers should not be heated in the oven to prevent bursting. Oven vent ducts must remain unobstructed. Oven racks should be positioned when the oven is cool, and potholders should not contact hot heating elements if moving racks while the oven is hot. For self-cleaning ranges, users are advised not to clean the door gasket, avoid commercial oven cleaners, and remove all utensils before self-cleaning.
The range's control panel features various keypads for different functions. The "CLOCK" keypad allows setting the time of day in a 12-hour cycle. The "LIGHT" keypad controls the oven cavity light, which also illuminates when the oven door is opened. The "KITCHEN TIMER" can be set for up to 12 hours and 59 minutes, with end-of-cycle tones sounding when complete. The "START" keypad initiates any oven function, with a "PUSH" reminder if not pressed within 2 minutes. The "CANCEL" keypad stops all functions except the Clock, Kitchen Timer, and Oven Control Lockout. The "TEMP/TIME" "+" or "-" keypads adjust time and temperature settings.
For "BAKE" functions, users press the keypad, set the desired temperature between 170°F (75°C) and 500°F (260°C), and press START. Temperature can be adjusted during baking. "BROIL" involves pressing the keypad, setting the temperature between 300°F (150°C) and 500°F (260°C), preheating for 5 minutes, and positioning cookware with the oven door open to the broil stop position. "CONVECT BAKE" operates similarly to bake, allowing temperature settings between 170°F (75°C) and 500°F (260°C).
The "KEEP WARM" function maintains food at serving temperature (170°F/75°C) for 60 minutes. "DELAY START" allows users to set a future starting time for an oven function, though it's not recommended for breads and cakes. "COOK TIME" enables setting the oven to turn on, cook for a specific duration, and shut off automatically. The "AQUALIFT SELF CLEAN" keypad activates the clean cycle. The "START (hold 3 sec to lock)" keypad activates the oven control lockout, disabling all keypads except Clock, Kitchen Timer, and Oven Light, without affecting cooktop functions.
The manual provides detailed instructions for cooktop use, emphasizing safety and maintenance. Users are warned to turn off all controls after cooking to prevent fire hazards. The control knobs allow settings between HIGH and LOW. The ceramic glass cooktop glows red when an element is on, and some parts may cycle on and off to maintain heat. Light-colored ceramic glass may change color when hot, returning to its original color when cool.
Regular cleaning of the cooktop after each use is crucial to prevent scratches, pitting, and abrasions. Ceramic glass cooktop cleaner and a scraper are recommended for stubborn soils, while abrasive cleaners or harsh chemicals are to be avoided. Users are warned against storing jars or cans above the cooktop, as dropping heavy objects can crack it. Leaving a hot lid on the cooktop is also discouraged, as trapped air can cause the glass to break. Sugary spills should be cleaned immediately while the cooktop is still warm using a scraper. Sliding cookware or bakeware across the cooktop is discouraged to prevent scratches, especially with aluminum or copper bottoms. Cooking popcorn in prepackaged aluminum containers is not recommended due to potential aluminum marks. Objects that could melt, like plastic or aluminum foil, should not touch the cooktop. The cooktop should not be used as a cutting board.
The "Cooktop On Indicator Light" illuminates when any control knob is turned on. The "Hot Surface Indicator Light" (on ceramic glass models) glows as long as any surface cooking area is too hot to touch, even after being turned off.
The warming center element is designed to keep cooked foods warm, with a recommended maximum time of one hour to maintain food quality. It should not be used to heat cold foods. The element can be used alone or with other surface cooking areas. It does not glow red but the "Element On" light illuminates when in use. Only cookware recommended for oven and cooktop use should be used. Foods should be covered with a lid or aluminum foil, with a small opening for baked goods to allow moisture to escape. Plastic wrap should not be used to cover food on the warming center. To use, press the "WARMING CENTER" push button once to turn on, and a second time to turn off.
Ideal cookware has a flat bottom, straight sides, a well-fitting lid, and medium-to-heavy thickness. Rough finishes can scratch the cooktop. Aluminum and copper can be used as a core or base but may leave permanent marks. Cookware material affects heat transfer and cooking results. Nonstick finishes have the same properties as their base material. Nonstick surfaces should not be used under the broiler. Cookware flatness can be checked by placing a ruler across the bottom; no space or light should be visible.
The manual provides a chart detailing cookware material characteristics:
Canning can be done on glass smooth top or traditional coil element cooktops. For long periods, alternate surface cooking areas to allow cooling. Canners should be centered on the largest surface cooking area and not extend more than 1/2" (1.3 cm) beyond the element. Avoid placing canners on two surface areas simultaneously. On ceramic glass models, use only flat-bottomed canners. Users are advised to contact their local agricultural extension office or refer to published home canning guides for more information.
Initial use of the oven or heavy soiling may produce odors and smoke. The health of birds is sensitive to fumes, so they should be moved to a well-ventilated room.
The control display flashes after power-up or loss, and "CANCEL" clears it. In Energy Save mode, the display is blank. Tones indicate valid pad presses, preheating, function entry, and end-of-cycle. Three tones indicate an invalid pad press, and four tones signal the end of a cycle.
Energy Save: This feature reduces power consumption when the range is idle. To enter, press and hold "CLOCK" for 10 seconds until "ES" appears. The display will show "ES" followed by "On" twice, then return to the time of day. If active, the display will show "ES" followed by "On" twice after 5 minutes of idle time, then go blank until a key is pressed or the door is opened. To exit, press and hold "CLOCK" for 10 seconds until "ES" followed by "Off" twice appears.
Oven Temperature Control: Users are advised not to use a thermometer to measure oven temperature. The oven provides accurate temperatures, but can be adjusted if cooking is faster or slower than desired. To adjust, press and hold "BAKE" for 5 seconds, then use "Temp/Time" "+" or "-" to change the temperature in 10°F (5°C or 6°C) increments, and press "START."
Options Mode: Press and hold "KITCHEN TIMER" for 5 seconds to enter "Opt" mode. Use "Temp/Time" "+" or "-" to cycle through options.
Sabbath Mode keeps the oven on in a Bake setting until turned off, or for a set time with Timed Bake. The Oven Control Lockout is disabled, no tones sound, the display doesn't show temperature, and the Kitchen Timer is canceled. Only "+" or "-" keypads and "CANCEL" function. The oven light won't turn on/off immediately when the door is opened/closed, and heating elements won't turn on/off immediately. If power is restored, the oven returns to Sabbath Mode with elements off until "CANCEL" is pressed. Pressing "CANCEL" at any time returns to normal cooking.
Before entering Sabbath Mode, decide if the oven light should be on or off for the entire period. If on, it stays on; if off, it stays off. For convection bake models, the oven light is controlled by a separate switch. To have the light off, the bulb must be removed before entering Sabbath Mode. During Sabbath Mode, oven temperature can be changed by 25°F (14°C) using "+" or "-" keypads, with no display change or sounds.
To Bake Using Sabbath Mode: Press "BAKE," set temperature with "+" or "-", press "START," then press and hold "TIMER" for 5 seconds until "SAb" flashes. Press "START" within 5 seconds to confirm. To Set a Timed Bake Using Sabbath Mode: Press "BAKE," set temperature, press "COOK TIME," set cook time, press "START," then press and hold "TIMER" for 5 seconds until "SAb" flashes. Press "START" within 5 seconds to confirm. To Set a Delayed Timed Bake Using Sabbath Mode: Press "BAKE," set temperature, press "COOK TIME," set cook time, press "DELAY START," set start time, press "START," then press and hold "TIMER" for 5 seconds until "SAb" flashes. Press "START" within 5 seconds to confirm.
To prevent permanent damage, do not line the oven bottom with foil. For best cooking, do not cover the entire oven rack with foil to allow free air movement.
To avoid damage to the porcelain finish, do not place food or bakeware directly on the oven door or bottom. For even cooking, allow 2" (5 cm) of space around bakeware and oven walls, and ensure no bakeware piece is directly over another. Racks should be positioned before turning on the oven, not moved with bakeware, and must be level. To move a rack, pull it to the stop position, raise the front edge, and lift out. The oven has 7 positions for a flat rack. For broiling/searing meats, rack position 7 is recommended. For baking cakes on 2 racks, use positions 2 and 5. For baking cookies on 2 racks, use positions 2 and 5.
The oven vent releases hot air and moisture and should not be blocked or covered, as this affects air circulation, cooking, and cleaning. Plastics, paper, or other items that could melt or burn should not be placed near the vent.
Precision Cooking™ System - Precise Bake: This system electronically regulates oven heat levels during preheat and bake to maintain a precise temperature range. Bake and broil elements cycle on and off. This feature is automatically activated when the oven is in use. Racks should be positioned according to the "Positioning Racks and Bakeware" section. For roasting, preheating is not necessary unless recommended by the recipe.
Preheating: When "START" is pressed, the oven preheats. The display temperature increases once 100°F (38°C) is reached. A tone sounds and the selected temperature appears when preheat is complete. Preheating to 350°F (175°C) takes approximately 10-15 minutes.
To ensure proper broiling temperature, leave the oven door open 6" (15 cm) at the broil stop position. Preheat the oven for 5 minutes unless otherwise specified. Food should be placed on a grid in a broiler pan in the center of the oven rack. Odors and smoke are normal during initial use or heavy soiling. Changing the temperature allows for more precise control; lower settings result in slower cooking, suitable for thicker cuts. For best results, use a broiler pan and grid to drain juices and avoid spatter/smoke.
In a convection oven, the fan circulates hot air more evenly, maintaining a consistent temperature, cooking foods more evenly, crisping surfaces, and sealing in moisture. Convection cooking can be done at a temperature 25°F (15°C) lower than a standard thermal oven, shortening cooking time by up to 30%. Bake and broil elements cycle on and off, and the fan circulates hot air. The fan turns off if the oven door is opened and resumes when closed.
To Set a Timed Cook: Press "BAKE," set temperature, press "COOK TIME," set cook time, and press "START." The oven counts down and shuts off automatically when done. To Set a Delayed Timed Cook: Ensure the clock is set. Press "BAKE," set temperature, press "COOK TIME," set cook time, press "DELAY START," set start time, and press "START." The oven turns on automatically at the start time and shuts off when done.
AquaLift® Self-Cleaning Technology: This innovative cleaning solution uses heat and water to release baked-on spills in less than an hour, offering a low-heat, odor-free alternative to traditional self-cleaning. The oven must be cool (below 200°F/93°C) to activate the cycle. To Clean: Remove all racks and accessories, wipe excess soil, and use a plastic scraper for easily removed soils. Pour 2 cups (16 oz [500 mL]) of distilled or filtered water onto the empty oven bottom and close the door. Do not use chemicals or additives. Press "CLEAN" then "START." Allow 40 minutes for cleaning and cool down. A beep sounds when complete. Press "CANCEL" to end. Remove residual water and loosened soils with a sponge or cloth. If soils remain, use a non-scratch scrubbing sponge or plastic scraper, or run additional clean cycles. Do not use oven cleaners or metal scouring pads. The range should be level for water coverage. Tap water may leave mineral deposits. Insert a cloth between the door and frame to prevent spills. Soil baked on through several cycles is harder to remove. affresh® Kitchen Appliance Cleaner and Cooktop Cleaner can be used after the cycle. AquaLift® Technology Cleaning Kits can be ordered.
Before cleaning, ensure all controls are off and the oven and cooktop are cool. Follow label instructions on cleaning products. Soap, water, and a soft cloth or sponge are suggested first.
Exterior Porcelain Enamel Surfaces: Clean food spills containing acids (vinegar, tomato) as soon as the range is cool to prevent finish damage. Use glass cleaner, mild liquid cleaner, or nonabrasive scrubbing pad. affresh® Kitchen and Appliance Cleaner is also recommended.
Stainless Steel: To avoid damage, do not use soap-filled scouring pads, abrasive cleaners, steel-wool pads, gritty washcloths, or abrasive paper towels. Rub in the direction of the grain. affresh® Stainless Steel Cleaner or liquid detergent/all-purpose cleaner followed by clean water and a lint-free cloth are recommended.
Metallic Paint: Do not use abrasive cleaners, cleaners with bleach, rust removers, ammonia, or sodium hydroxide (lye) as they may stain.
Ceramic Glass: Use affresh® Cooktop Cleaner, Cooktop Cleaning Pads, and Cooktop Scraper. Cooktop Protectant is recommended to avoid stain buildup, pitting, and scratching. Store razor blades out of reach of children. Do not use steel wool, abrasive powder cleansers, chlorine bleach, rust remover, or ammonia.
Cooktop Controls: To avoid damage, do not use steel wool, abrasive cleansers, or oven cleaner. Do not soak knobs. When replacing knobs, ensure they are in the Off position. Remove seals under knobs on some models. Clean with soap and water; pull knobs straight off to remove.
Control Panel and Oven Door Exterior: To avoid damage, do not use abrasive cleaners, steel-wool pads, gritty washcloths, or abrasive paper towels. Clean with glass cleaner and a soft cloth/sponge, or affresh® Kitchen and Appliance Cleaner.
Oven Racks: Clean with a steel-wool pad. For discolored or hard-to-slide racks, apply a light coating of vegetable oil to the rack guides.
Storage Drawer or Warming Drawer (on some models): Ensure it's cool and empty before cleaning. Clean with mild detergent.
Oven Cavity: Use AquaLift® Technology regularly. Do not use oven cleaners. Clean food spills when the oven cools to prevent staining, etching, pitting, or white spots.
The oven light is a standard 40-watt appliance bulb. Before replacing, ensure the oven and cooktop are cool and controls are off. To replace, unplug the range or disconnect power, turn the glass bulb cover counterclockwise to remove, turn the bulb counterclockwise to remove from the socket, replace the bulb, then turn the bulb cover clockwise. Plug in the range or reconnect power.
The manual provides a troubleshooting guide for common issues, suggesting solutions or directing users to the website for FAQs.
The manual lists various accessories available for purchase, including:
The Maytag Electric Range comes with a Ten Year Limited Warranty. First Year Limited Warranty (Parts and Labor): Covers factory-specified replacement parts and repair labor for defects in materials or workmanship for one year from the purchase date, provided the appliance is installed, operated, and maintained according to instructions. Second Through Tenth Year Limited Warranty (Certain Component Parts Only - Labor Not Included): Covers factory-specified parts for non-cosmetic defects in materials or workmanship for the following components: Glass-Ceramic Cooktop (due to thermal breakage), Electric Surface Elements, Electric Bake/Broil Elements (excludes Convection Element), and Cavity (rust through and broken welds only). Labor is not included.
Sole and Exclusive Remedy: Product repair as provided in the warranty, performed by a Maytag designated service company. Valid only in the U.S. or Canada when the appliance is used in the country of purchase. Proof of original purchase date is required.
What Is Not Covered:
Disclaimer of Implied Warranties: Implied warranties (merchantability, fitness for a particular purpose) are limited to one year or the shortest period allowed by law. Disclaimer of Representations Outside of Warranty: Maytag makes no representations about quality, durability, or need for service beyond the warranty. Limitation of Remedies; Exclusion of Incidental and Consequential Damages: Product repair is the sole and exclusive remedy. Maytag is not liable for incidental or consequential damages.
| Fuel Type | Electric |
|---|---|
| Number of Ovens | 1 |
| Number of Burners | 4 |
| Self-Cleaning | Yes |
| Convection Oven | Yes |
| Color | Stainless Steel |
| Type | Freestanding |