01-2021 MC-Bauchemie Müller GmbH & Co. KG 13
Instruction handbook
Dispensing the material
Refer to figures {G} and {H} on page 2:
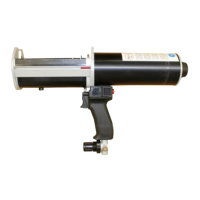
1. Press the trigger (7). Dispensing starts and the red dispense volume indicator (3)
moves forward. When the trigger (7) is released, dispensing stops.
2. The dispensed volume flow-rate can be controlled with the pressure regulation
valve (8).
Removing the cartridge
Refer to figure {I} on page 2:
1. Release the trigger (7) and press the retract button (10) until the plungers have
moved to the rear stop.
2. Using the cartridge ejector button (5), press the cartridge out of the cartridge
holder and remove the cartridge upwards.
Dispose of the cartridge and mixer in accordance with the adhesive /
sealant manufacturer’s instructions.
Removing and replacing cartridge holder and plunger discs
1. Disconnect dispenser from compressed air supply.
2. Squeeze sides of cartridge holder (6) and remove from top of the dispenser.
3. Remove and replace plunger discs (2) using 4 mm hex key. Smaller plunger disk is
installed on the lower rod closest to handle (9).
4. Install new cartridge holder (6) from the top of the dispenser until click. Cartridge
ejector button (5) should be closest to cartridge guide (1).
5. Re-connect compressed air supply.