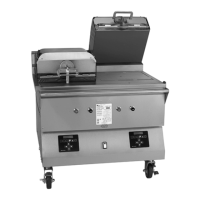
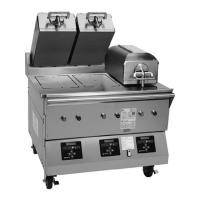
The provided document is a device manual for the Clamshell Grill Models C832 & C834, manufactured by Taylor Company for McDonald's. This grill is designed for cooking various food items, particularly patties, and features automatic leveling platens.
Function Description:
The Clamshell Grill Models C832 and C834 are designed to cook food items using upper and lower platens. The grills automatically detect the product placed on the grill plate (menu items that are cooked using the upper platen) and set the appropriate cooking parameters. They are capable of cooking a variety of products and feature two cooking options: AUTO and MANUAL. The AUTO option automatically detects the product and sets cooking parameters, while the MANUAL option allows the operator to select the desired product and cooking parameters. The grills provide features of a flat grill as well as the advantages of two-sided cooking.
Important Technical Specifications:
The manual does not explicitly list detailed technical specifications such as power consumption, dimensions, or weight. However, it does mention that the grills are equipped with a power cord and a plug or other device to disconnect the appliance from the power source. It specifies that stationary appliances must have a multi-pole disconnection device with a contact gap of at least 3 mm installed in the external installation. Supply cords used with this unit should be oil-resistant, sheathed flexible cable, not lighter than ordinary polychloroprene or other equivalent synthetic elastomer-sheathed cord. The grill is designed to operate at a noise level not exceeding 70 dB(A) when measured at a distance of 1.0 meter from the surface of the machine and at a height of 1.6 meters from the floor.
Usage Features:
The grill features a control panel with various keys for operation, including:
- Fan Interlock Switch: Activates power to the grill and the exhaust fans.
- ON/OFF Key: Turns the controller on and off, and starts preheating mode.
- AM/PM Key: Toggles back and forth between AM and PM menu items.
- MANUAL/AUTO Key: Toggles back and forth between Manual and Auto modes.
- Left/Down/Right/Up Arrow Keys: Used to scroll through menu items, decrease/increase numerical values, and enter new menu items or modify existing ones.
- OK Key: Used to accept information entered.
- Program Key: Used to enter and exit the Programming mode.
- Temperature Key: When pressed and held for 3 seconds, this key will access the Probe Calibration screen.
- Cook Time Key: Used to change the cook time.
- Liquid Crystal Display: Displays menu options and information.
The grill supports product selection, allowing operators to choose between AUTO and MANUAL modes. In AUTO mode, the grill automatically detects the product and sets cooking parameters. In MANUAL mode, the operator selects the desired product. Patty placement guides are provided for various patty types (regular, quarter pound, Angus, sausage, circular bacon) and quantities (1 to 8 patties), indicating the optimal placement on the grill for even cooking.
The grill also features a "Standby" mode to keep the grill idle and product not being cooked. To resume cooking, the "RAISE" button is pressed. The upper platen automatically raises when the Auto Leveling is complete.
Maintenance Features:
The manual outlines extensive daily cleaning procedures for both the upper and lower release sheets, as well as the grill surfaces.
Daily Cleaning Procedures (Grills Using Lower Release Sheets):
- Installing Upper Platen Release Sheets: Slide the release material retention bar through the loop in the release sheet, engage the material retention bar into the hooks, and center the release material bar.
- Installing Lower Release Sheets: The following steps pertain to grill markets using lower release sheets only. If lower release sheets are not used, proceed to "Start-Up of the Grill."
- Cleaning the Grill: Clean the grill with a sanitizer-soaked grill cloth to remove any debris.
- Using a Sundae Spoon: Distribute two level spoonfuls of soy adhesion flakes over a warm 3 ft. (1 m.) lower grill surface, allowing the flakes to melt.
- Using a Grill Squeegee: Spread the flakes on the cooking zone.
- Wearing Heat-Resistant Gloves: Put on heat-resistant gloves.
- Aligning Release Sheet: With the longest side of the lower release sheet facing the back of the grill, hold the release sheet about one inch from the end of each side. Align the back edge of the release sheet with the back splash and the side edge of the grill.
- Using a Grill Squeegee (for release sheet): Gently squeegee out air bubbles, making sure not to crease or fold the release sheet.
- Repeat for Other Half: Repeat the last 2 steps for the other half of the grill surface. The release sheets will overlap about 1" (25 mm) in the middle.
- Release Sheet Placement: When properly applied, the release sheet will lay flat, with only a few small air bubbles.
- Pressing Standby Button: Press the Standby button to close the platen.
- After Platen Has Closed: The grill will start heating up to the proper temperature. The control will display the following message until the grill has reached the proper temperature: "TOO COOL FOR AUTO LEVELING".
- When Grill Has Reached Temperature: The screen will display "PLEASE WAIT FOR AUTO LEVELING".
- When Auto Leveling is Complete: The upper platen will raise. The screen will display the product that had been selected.
The release sheet must be changed when:
- Product sticks to the release sheet.
- Carbon builds up, causing problems in taste or appearance.
- There is a tear in the release sheet in the cooking area.
- The release material substance is worn from the release sheet.
Care of Release Sheets:
- DO NOT fold or crease.
- DO NOT touch with any sharp object or abrasive.
- DO NOT hose with hot water or soak in water.
- DO NOT place under other objects.
Cleaning Procedure - 24 Hour Stores Only (Grills Using Lower Release Sheets):
- Clean the grill using the Daily Cleaning Procedures on pages 28 - 35, steps 1 - 45.
- After the grill pad has cooled, remove, wash, and rinse it thoroughly at the 3-compartment sink. Turn the grill pad over and re-install on the grill pad holder.
- Wash, rinse, and sanitize all utensils and tools used to clean the grill at the 3-compartment sink.
- Place the fan interlock switch in the OFF position. Wait 10 seconds and then place the switch back in the ON position. The display will read "OFF".
- Press the Standby button to close the platen.
- After the platen has closed, the control will display "GRILL TOO COOL FOR AUTO LEVELING" until the grill reaches the proper temperature. When the proper temperature is reached, the platen will self-level and open when completed. The grill will be in the AM Manual mode.
- The grill is now ready to use.
Daily Cleaning Procedures (Grills Not Using Lower Release Sheets):
- Raise Upper Platen: Raise the upper platen to the OPEN position by pressing the red RAISE key.
- Wipe Exposed Surface: Wipe the exposed surface of the release sheets with a clean, sanitizer-soaked grill cloth.
- Remove Release Sheet Locking Clips: Remove the release sheet locking clips, the bars, and the upper and lower release sheets. Wash and rinse the clips and bars in the 3-compartment sink. If necessary, soak them in a hot solution of SolidSense APSC to remove carbon accumulation.
- Place Release Sheets Flat: Place all release sheets flat on the release sheet storage tray. DO NOT fold, crease, or place them on sharp objects. DO NOT clean them in the 3-compartment sink.
- Remove, Empty, and Reinstall Grease Pans: Remove, empty, and reinstall the grease pans.
- Open Packet of McD Hi-Temp Grill Cleaner (HTGC): Empty the contents into an entrée base or stainless steel pan.
- Dip Grill Cloth: Dip a clean, sanitizer-soaked grill cloth into the grill cleaner. Do not saturate the cloth.
- Apply Grill Cleaner: Spread a light coating of the grill cleaner over the entire lower grill surface, using front to back strokes. Allow the product to remain on the grill while spreading across all surfaces.
- Apply Grill Cleaner (Upper Platen): Apply the grill cleaner to the front side of the platens, starting from the right platen to the left platen.
- Apply Grill Cleaner (Upper Platen): Apply the grill cleaner to the platen surfaces, starting from the right platen to the left platen.
- Apply Grill Cleaner (Upper Platen): Apply the grill cleaner to the back side of the platens, from the right platen to the left platen.
- Apply Grill Cleaner (Upper Platen): Apply the grill cleaner to the outer edges of the right and left platens.
- Apply Grill Cleaner (Upper Platen): Apply the grill cleaner to the inner edges of the right and left platens.
- Press Standby Button: Press the black STANDBY button to lower the right platen.
- Press Raise Button: Press the red RAISE button to raise the right platen.
- Using Kay Grill Cleaning Pad Holder: Using the Kay Grill Cleaning Pad Holder, scrub the front side of the platens from the right platen to the left platen.
- Scrub Platen Surfaces: Scrub the platen surfaces, starting from the right platen to the left platen.
- Scrub Back Side of Platens: Scrub the back side of the platens from the right platen to the left platen.
- Scrub Outer Edges: Scrub the outer edges of the right and left platens.
- Scrub Inner Edges: Scrub the inner edges of the right and left platens.
- Rinse All Areas: Rinse all areas of the platen surfaces with a clean, sanitizer-soaked grill cloth, starting from the front platen to the left platen. Lower and raise the platens as needed to gain access to the sides of the platens.
- Rinse Lower Grill Surface: Rinse the lower grill surface with a clean, sanitizer-soaked grill cloth.
- Clean Surrounding Areas: Clean the surrounding areas such as the hood, bull nose, and back splash, with a clean, sanitizer-soaked grill cloth.
- Place Upper and Lower Release Sheets: At one a time, place the upper and lower release sheets on the lower grill surface. Wipe both sides of each release sheet with a clean, sanitizer-soaked grill cloth.
- Re-install Upper Release Sheets: Secure the sheets with the locking clips and bars.
- Re-install Grease Pans: Re-install the grease pans.
- Press Standby Button: Press the Standby key for 3 - 5 seconds. "AM TOO COOL" and "AM FOLDED EGGS - CLAM" will be displayed on the control screen.
- Screen Display: The screen will display, "CLEAN GRILL SURFACES," followed by "CLOSE PLATEN FOR AUTO LEVELING."
- Using Sundae Spoon: Distribute two level spoonfuls of soy adhesion flakes over a warm 3 ft. (1 m.) lower grill surface, allowing the flakes to melt.
- Using Clean Squeegee: Spread the flakes on the cooking zone.
- With Longest Side of Lower Release Sheet: With the longest side of the lower release sheet facing the back of the grill, hold the release sheet about one inch from the end of each side. Align the back edge of the release sheet with the back splash and the side edge of the grill.
- Gently Squeegee: Gently squeegee the air bubbles and wrinkles out of each release sheet. Do not crease or fold the release sheets.
- Repeat Last 2 Steps: Repeat the last 2 steps for the other half of the grill surface. The release sheets will overlap about 1" (25 mm) in the middle.
- Leave Upper Platens in OPEN Position: Leave the upper platens in the OPEN position overnight.
- Place Fan Interlock Switch in OFF Position: Place the fan interlock switch in the OFF position.
- After Grill Cleaning Pad Has Cooled: After the grill cleaning pad has cooled, remove it from the pad holder. Wash and rinse it thoroughly at the 3-compartment sink. Turn the grill pad over and re-install it on the holder.
- Wash, Rinse, and Sanitize Utensils: Wash, rinse, and sanitize all utensils and tools used to clean the grill at the 3-compartment sink.
Troubleshooting Guide:
The manual includes a comprehensive troubleshooting guide that lists common problems, probable causes, and remedies. This section covers issues such as the grill not heating, fan interlock problems, platens not staying in position, product being under- or over-cooked, and display errors. Remedies often involve checking electrical connections, resetting circuit breakers, or calling a service technician.
Limited Warranty:
Taylor Company provides a limited warranty on new Taylor-branded IntelliGap grill equipment. The warranty period for "Parts" is two (2) years. The warranty covers defects in materials or workmanship under normal use and service. It does not cover damage due to improper installation, maintenance, or use. Specific exclusions include normal maintenance and cleaning, damage from improper cooking or assembly, and damage from external factors like fire or natural disaster.
The manual provides sections for recording data label information (model number, serial number, electrical specs, maximum fuse size) and parts warranty information. It also lists part numbers for upper platen release material and lower release material. For service or ordering parts, customers are directed to contact Taylor Company.