IM-447 / Page 3
Checking for Damage
Upon receipt of the equipment, check carton for visible
damage. Make a notation on the shipper’s delivery ticket
before signing. If there is any evidence of rough handling, the
cartons should be opened at once to check for concealed
damage. If any damage is found, notify the carrier within 48
hours to establish your claim, and request their inspection
and a report. The Warranty Claims Department should then
be contacted.
Do not stand or transport the machines on end. For storing,
each carton is marked with “up” arrows.
In the event that elevator transfer makes upended
positioning unavoidable, absolutely insure that the machine
is in the normal upright position for at least 24 hours
before operating.
Temporary storage at the jobsite must be indoors, completely
sheltered from rain, snow, etc. High or low temperatures
naturally associated with weather patterns will not harm the
conditioners. Excessively high temperatures of 140˚F (60˚C)
may deteriorate certain plastic materials and cause permanent
damage. In addition, the solid-state circuit boards may
experience operation problems.
Note: Care should be taken when handling this equipment.
Rough handling can create damage to internal electrical and
refrigeration components.
General:
1. Units must be installed in accordance with all appli-
cable codes.
2. To prevent damage, this equipment should not be
operated for supplementary heating and cooling during
the construction period.
3. Inspect the carton for any specific tagging numbers
indicated by McQuay International per a request from
the installing contractor. At this time, the voltage, capacity
and model should be checked against the plans.
4. Check the unit size against the plans to be sure that the
unit will be installed in the correct location.
5. Units should be kept in shipping carton until installed.
At the time the unit is to be placed in its final position –
and only then – should the carton be removed. Retain
the carton and cut away one side and bottom. Take the
remaining portion of the carton and place it over the
unit. This will insure the unit is protected from paint
spotting, dirt, dust and lint that can affect proper unit
operation, and will also prevent needless cleaning
adding to installation cost.
6. The installing contractor will find it beneficial to confer
with other contractors; i.e., plumbing, electrical, pipe
fitters, etc., before installing any conditioners.
7. Remove the front panel by removing a screw on each
side of the cabinet at the subbase.
8. All piping and electrical wiring should be flexible so
that vibrations are not transmitted to the building
structure. Ensure all electrical connections are in place
and tight.
9. Locate the unit in an area that allows easy removal or
accessibility for service personnel to perform mainte-
nance and repair.
10. If units are placed on a concrete floor, it is recom-
mended that the floor be free from all construction
debris that may add to the operating noise level of the
unit. It may be advisable to place a portion of rubber
matting under the unit to prevent distortion and/or
vibration.
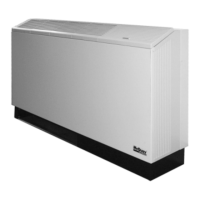
Unit Location
1. Console water source heat pumps are designed to be
installed in a controlled environment.
2. All units are to be installed against a wall.
3. Each unit should be located on the architectural plans.
The supply, return, and condensation piping should be
located accordingly, making sure the piping will fit into
the confines of the subbase and cabinet.
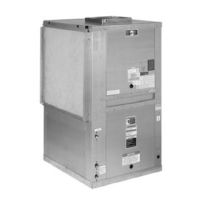
Installing the Unit
1. Consult job blueprints for unit location. Clean area
where unit is to be installed, removing all construction
dirt and debris.
2. Remove unit from shipping carton and save the carton.
Remove the front panel by removing a screw on each
end of the cabinet. Lift the cabinet up, forward and off.
3. Each chassis is mounted to cabinet backwrap and
subbase assembly by six screws for shipment. Re-
move four screws, two on each side of the chassis at
the subbase.
4. Position cabinet backwrap and subbase against the
wall where unit is to be installed. Ensure adequate
room exists for piping and electrical connection in the
subbase by checking the connection end of the sub-
base.
5. Using a carpenter’s square and level, make sure unit is
level and that it is at a 90-degree angle with the wall
and floor. (Note: If the floor and wall are not at right
angles, it may be necessary to shim the subbase to
insure proper installation. McQuay International will not
accept responsibility for units that may need to be
shimmed. Poor or inadequate installation could create
noisy unit operation.)
6. The cabinet backwrap has slots on the back flange to
mount the assembly to the wall. It is the contractor’s
responsibility to select the correct fastener for each unit.
7. After securing the subbase and backwrap assembly in
place, insert the chassis if it has been removed. Next,
the electrical connection should be made.
Installation
Installation and maintenance are to be performed by qualified personnel who are familiar with local codes and
regulations, and experienced with this type of equipment. Caution: Sharp edges and coil surfaces are a potential injury
hazard. Avoid contact with them.
 Loading...