EN
Preparation for use | 17
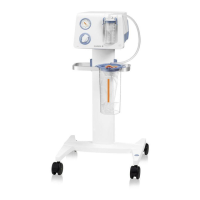
Assembly of the
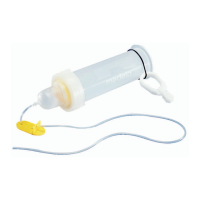
DISPOSABLE
collection system
1. If you use a REUSABLE collection system proceed with
step 6.4a
2. 2.1 Choose the size neces-
sary for the application.
Yellow colour code: 1.5 l,
Orange colour code: 2.5 l.
2.2 Attach the jar to the
carrying handle (portable
version only) or to the
optional clampholder on
the trolley (see step 5.4).
positions for jars:
4.1 Connect tubing from the
jar (A) to the Safety Set
(B).
3.1 Prepare and insert
corresponding liner size
according to instructions
delivered with liners. The
disposable liner has an
integrated overflow pro-
tection filter. No action is
necessary to activate it.
5.1 Connect patient tubing to
the lid of the liner using
either the coloured angle
piece or the patient port
directly (depending on
tubing size).
Install equipotential
bonding
1. 1.1 Connect the equipotential
conductor at the back of
the Basic with the bus bar
as advised by your techni-
cian and according to
inhouse directives. The
respective cable is not
supplied from Medela.
to bus bar
and
The equipotential conductor and connecting cables are
used to equalise the potential between equipment placed
in the hospital environment.
6.4b
6.5
4.
A B
3.
5.