EasyManua.ls Logo

Mercury PI865GVM7 Series User Manual

Mercury PI865GVM7 Series
42 pages
To Next Page IconTo Next Page
Page #1 background imageLoading...
Page #1 background image
i
Motherboard User’s Guide
This publication, including photographs, illustrations and software, is under the
protection of international copyright laws, with all rights reserved. Neither this
users guide, nor any of the material contained herein, may be reproduced
without the express written consent of the manufacturer.
The information in this document is subject to change without notice. The
manufacturer makes no representations or warranties with respect to the
contents hereof and specifically disclaims any implied warranties of merchant-
ability or fitness for any particular purpose. Further, the manufacturer reserves
the right to revise this publication and to make changes from time to time in the
content hereof without obligation of the manufacturer to notify any person of
such revision or changes.
Trademarks
IBM, VGA, and PS/2 are registered trademarks of International Business
Machines.
Intel, Pentium/II/III, Pentium 4, Celeron and MMX are registered trademarks of
Intel Corporation.
Microsoft, MS-DOS and Windows NT/2000/XP are registered trademarks of
Microsoft Corporation.
AMI is a trademark of American Megatrends Inc.
It has been acknowledged that other brands or product names in this manual are
trademarks or the properties of their respective owners.
Static Electricity Precautions
1. Don’t take this motherboard and components out of their original static-
proof package until you are ready to install them.
2. While installing, please wear a grounded wrist strap if possible. If you
don’t have a wrist strap, discharge static electricity by touching the bare
metal of the system chassis.
3. Carefully hold this motherboard by its edges. Do not touch those
components unless it is absolutely necessary. Put this motherboard on
the top of static-protection package with component side facing up
while installing.
Pre-Installation Inspection
1. Inspect this motherboard whether there are any damages to components
and connectors on the board.
2. If you suspect this motherboard has been damaged, do not connect
power to the system. Contact your motherboard vendor about those
damages.
Copyright © 2005
All Rights Reserved
PI865GVM7 Series, V3.0
April 2005
Question and Answer IconNeed help?

Do you have a question about the Mercury PI865GVM7 Series and is the answer not in the manual?
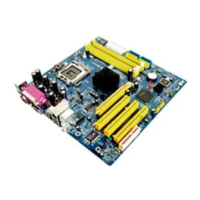
Mercury PI865GVM7 Series Specifications

General IconGeneral
Form FactorMicro ATX
ChipsetIntel 865GV
Socket TypeSocket 478
Memory Slots2 x DIMM
Maximum Memory2 GB
Integrated GraphicsIntel Extreme Graphics 2
Expansion Slots1 x AGP 8X, 3 x PCI
Memory TypeDDR
AudioRealtek ALC655 6-channel
LAN10/100 Mbps
Storage Interfaces2 x ATA100, 2 x SATA 1.5Gb/s
USB Ports8 x USB 2.0 (4 rear, 4 via headers)

Summary

Initial Setup and Safety Information

Trademarks and Copyright

Lists registered trademarks and copyright information for the publication.

Static Electricity Precautions

Guidelines to prevent damage from static discharge during handling.

Pre-Installation Inspection

Steps to visually inspect the motherboard for damage before installation.

Chapter 1 Introduction

Key Features Overview

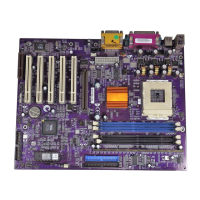
Highlights the main technical specifications and capabilities of the motherboard.

Chapter 2 Motherboard Installation

Motherboard Component and I/O Port Identification

Identifies motherboard components and describes rear panel I/O ports.

Processor Installation Guide

Detailed instructions for safely installing the CPU into the LGA775 socket.

Memory Module Installation

Step-by-step guide for installing DDR SDRAM modules into DIMM sockets.

Jumper Settings and Configuration

Information on configuring motherboard jumpers, including CMOS clearing.

Motherboard Installation into Computer Case

Procedures for physically mounting the motherboard into a system chassis.

Connecting Optional Devices

Guides on connecting front panel audio, USB, speaker, and infrared headers.

Installing Other Devices

Instructions for connecting floppy, IDE, and Serial ATA drives.

Expansion Slot Installation Guide

Procedures for installing various expansion cards into available slots.

Chapter 3 BIOS Setup Utility

Navigating and Accessing BIOS

Instructions on how to enter and navigate the BIOS configuration interface.

Core System Configuration

Setting basic system parameters like date, time, drives, and advanced features.

Peripheral Device Configuration

Configuring onboard devices, serial/parallel ports, and PCI slot settings.

System Management and Security

Managing power, security, CPU settings, and hardware monitoring.

BIOS Setup Utility Load and Exit Options

Loading defaults, saving, or discarding changes before exiting BIOS.

Chapter 4 Software & Applications

Installing Support Software and Drivers

Guides on installing essential drivers and utility software from the support CD.

Manual Installation Procedures

Steps for manual installation on Windows NT or other systems.

Bundled Software Installation

Instructions for installing additional bundled applications from the CD.

Hyper-Threading CPU Functionality

Explains the functionality and usage of Hyper-Threading CPU features in Windows XP.

Related product manuals