Viresolve
®
Pro
Micro Device
User Guide
Millipore, Viresolve and Milli-Q are registered trademarks of Millipore Corporation. The M
logo is a trademark of Millipore Corporation.
Copyright © 2008 Millipore Corporation. All rights reserved.
00104257PU Rev A, 02/2008
Standard Warranty
Millipore Corporation (“Millipore”) warrants its products will meet their applicable published
specifications when used in accordance with their applicable instructions for a period of one year
from shipment of the products. MILLIPORE MAKES NO OTHER WARRANTY, EXPRESSED
OR IMPLIED. THERE IS NO WARRANTY OF MERCHANTABILITY OR FITNESS FOR A
PARTICULAR PURPOSE. The warranty provided herein and the data, specifications and descriptions
of Millipore products appearing in Millipore’s published catalogues and product literature may not be
altered except by express written agreement signed by an officer of Millipore. Representations, oral or
written, which are inconsistent with this warranty or such publications are not authorized and if given,
should not be relied upon. In the event of a breach of the foregoing warranty, Millipore’s sole obligation
shall be to repair or replace, at its option, the applicable product or part thereof, provided the customer
notifies Millipore promptly of any such breach. If after exercising reasonable efforts, Millipore is unable
to repair or replace the product or part, then Millipore shall refund to the customer all monies paid for
such applicable product or part. MILLIPORE SHALL NOT BE LIABLE FOR CONSEQUENTIAL,
INCIDENTAL, SPECIAL OR ANY OTHER INDIRECT DAMAGES RESULTING FROM
ECONOMIC LOSS OR PROPERTY DAMAGE SUSTAINED BY ANY CUSTOMER FROM THE
USE OF ITS PRODUCTS.
Technical Assistance
For more information, contact the Millipore office nearest you. In the U.S.,
call 1-800-MILLIPORE (1-800-645-5476). Outside the U.S., see your
Millipore catalogue for the phone number of the office nearest you or go
to our web site at www.millipore.com/offices for up-to-date worldwide
contact information. You can also visit the tech service page on our web
site at http://www.millipore.com/techservice.
Notice
The information in this document is subject to change without notice
and should not be construed as a commitment by Millipore Corporation.
Millipore Corporation assumes no responsibility for any errors that may
appear in this document. This manual is believed to be complete and
accurate at the time of publication. In no event shall Millipore Corporation
be liable for incidental or consequential damages in connection with or
arising from the use of this manual.
Introduction
Viresolve Pro Micro Devices are typically used for process optimization,
viral clearance validation and filtration of small batch volumes of proteins.
This manual applies to the following devices:
Process Development
Kit
Validation Kit
Catalogue No. VPMCPDKNB9 VPMCVALNB9
Color
Solid Teal
Teal and White
Integrity
Testing
Not Binary Gas Tested Binary Gas Tested
Primary
Intended Use
Process Development
Optimization, scale-up,
etc.
Virus Validation
Installing the Device
Testing should be conducted with a user supplied pump at a constant
flow rate or a constant pressure. A low volume constant pressure holder
(Millipore Catalog number VIRUSVMAX or equivalent) is recommended
for constant pressure testing of Viresolve Pro devices. This user guide
provides instructions for conducting testing at a constant pressure. Contact
Millipore for instructions on testing at a constant flow rate.
Remove caps from all devices. Attach a two-way luer valve to both the 1.
feed port (V1) and vent port (V2) of the device. Connect the feed vessel
to the luer valve on the feed port. Close both luer valves.
Position a filtrate 2.
collection vessel and
a weighing balance
(to record filtrate
mass) beneath the
device. Fill the feed
vessel with at least
125 mL of
Milli-Q
®
water,
water for injection
(WFI) or equivalent.
Record the 3.
temperature of the
fl uid.
Purge the system by 4.
following the device
purging sequence.
Purging the Device
Purging is recommended to remove air from the device before use.
Open V2. Open V1 until fluid begins to drain from V2 (approximately 1.
five seconds).
Close V2. Close V1.2.
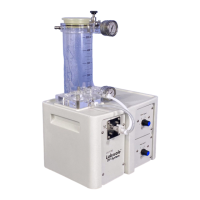
Figure 1. Typical setup
Feed Port
Balance/Weigh
Scale
Collection
Vessel
Feed
Reservoir
Outlet Port
Vent Port
V2
V1
Prefilter
(optional)