Getting Started
New Patient
1. Press [Patient], ll in the basic patient information via Touch screen or keyboard.
2. Press [Probe], select probe and exam mode via Touch screen.
Scanning
B Mode
1. Adjust the interested parameters via Touch screen.
2. Rotate the [B] knob to adjust the gain.
CDFI/Power Mode
1. Press [Color] to enter Color mode.
2. Move [Trackball] to change the position of ROI.
3. Press [Set], and then move [Trackball] to change the size of ROI, press [Set].
PW/CW Mode
1. Press [PW] to enter PW mode.
2. Move [Trackball] to change the position of sample volume.
3. Change the size and angle of sample volume via Touch screen or its relative knob.
Press [Update] or [PW] to get the Pulse Wave Doppler.
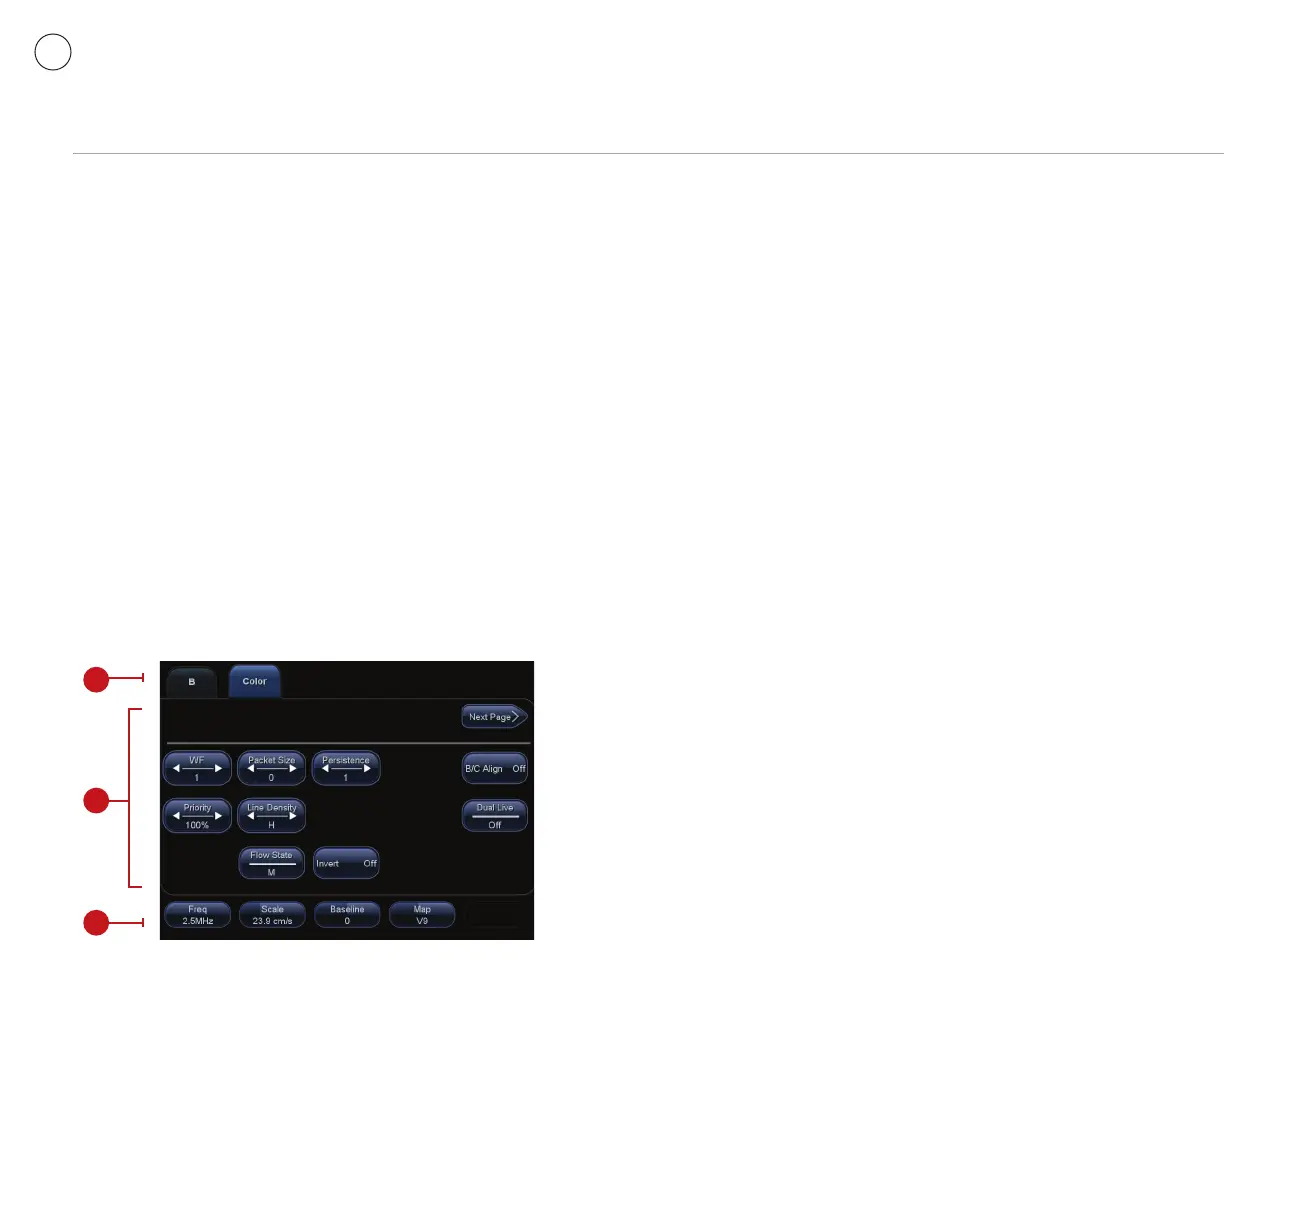
Image Adjustment
1. Mode displaying areas: Click to display the active imaging mode.
2. Parameter adjusting areas: Display the parameters in the current imaging mode.
3. Knob adjusting areas: Display the knob controlled parameters that can be
adjusted by the knobs under the Touch screen.
The parameters in B mode: iClear, Dynamic Range, IP, L/R Flip, iBeam, Noise Reject,
Quad Mode, THI, Focus Number, Colorize, FOV, Frequency, Focus Position, Colorize
Map, Gray Map, B Steer, Acoustic Power, Tissue Specic Imaging, Trapezoid, U/D Flip,
Persistence, Smooth, Image Merge, Rotation and Line Density (the parameters might
be displayed on dierent pages).
DC-7
Quick Reference Guide
The parameters in Color mode: WF, Packet Size, Persistence, B/C Wide, Priority, Line
Density, Dual Live, Flow State, Invert, Frequency, Scale, Baseline, Map, Steer, Color IP, B
Display, Acoustic Power, Smooth, Focus Position (the parameters might be displayed
on dierent pages).
Special Imaging Mode (Optional)
3D/4D
1. Press [Probe], select the volume probe and the exam mode via Touch screen.
2. Click [3D/4D] via Touch screen to enter and adjust the ROI and curve VOI.
3. Click [Start] or press [Update] to enter the 4D image real-time status.
Measurement
1. Press [Freeze] to freeze the image before the measurement.
2. Press [Measure] to enter the application measurement status.
3. Move the cursor or use Touch screen to choose the measurement tool, and then
go to the desired position to measure.
Post Scanning
Comments and Body Marks
Comment
1. Press [Comment] to change the comment setting position and add the comment
to the image.
Body Mark
1. Press [Body Mark] and choose the desired one via Touch screen.
2. Move [Trackball] to place the probe marker and rotate the [Multi-functional Knob]
to adjust the orientation of the probe.
Save Images or Cine
1. Press [Save1] or [Save2] to save a single-frame image or cine to the system.
Report and Print
1. Press [Report], move the cursor to the comment text box and type the text.
2. Press [Report] and click [Image Select] to add images, and then click [Print View] to
preview, click [Print] to print.
End Exam
Press [End Exam] to end one examination. You may start a new exam by repeating
the instructions above.
Image Management
Image Transfer
1. Press [iStation] to enter image management and select the image to send to USB
or DICOM, etc.
2. Or, Press [Review] and select the image to send to USB, DICOM, etc.
Note: For detailed information, please refer to the operation manual.
Mindray DS USA, Inc. 800 MacArthur Blvd., Mahwah, NJ 07430 Tel: 1.800.288.2121 or 201.995.8000 www.na.mindray.com
P/N: 046-003454-00 Rev A
1
2
3

 Loading...