16
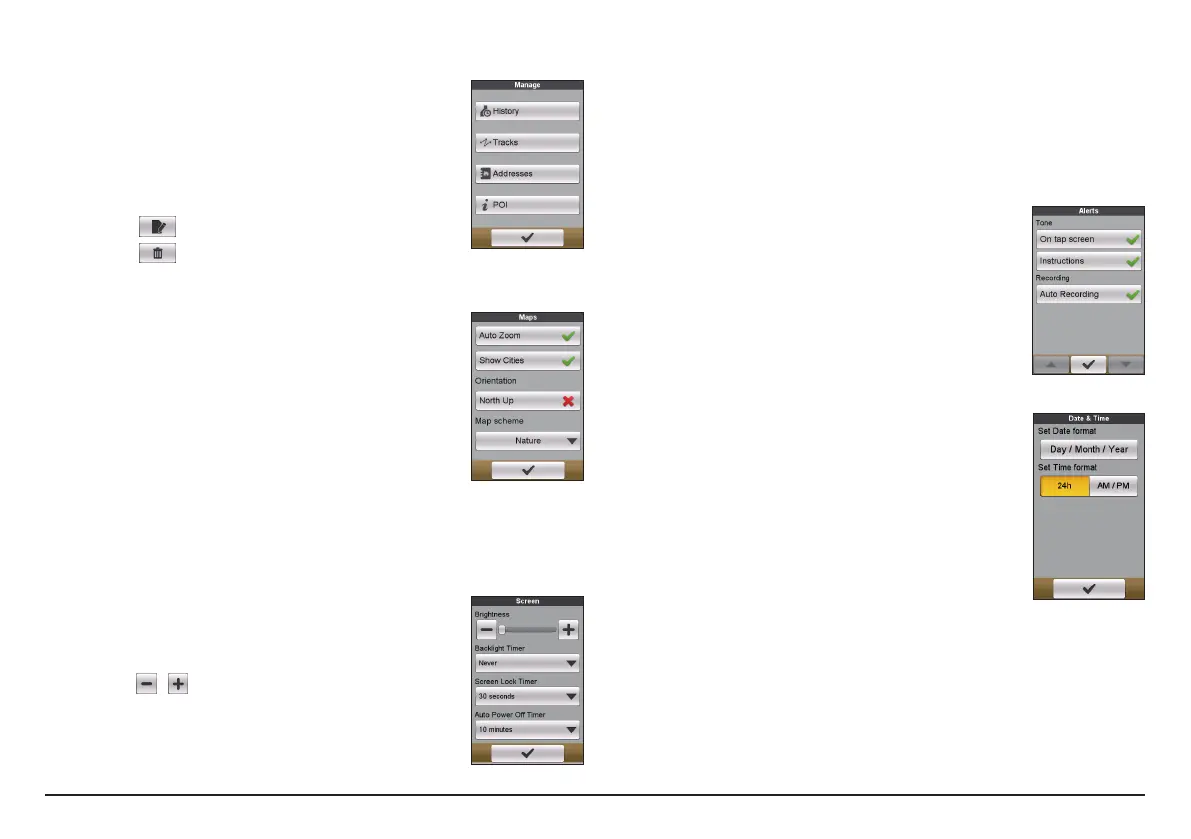
Manage
This setting allows you to manage the recorded data on the
device, including: History, Tracks, Addresses, and POI.
To manage the data:
1. Tap the corresponding button in the Manage screen.
2. Select the desired entry and then do one of the
following:
• Tap
to edit the name of the entry.
• Tap
to delete the entry.
Maps
• Auto Zoom: Enable or disable automatic zooming
during navigation.
If selected, the Map screen will automatically zoom
in or out, depending on your speed, to allow optimal
viewing of your route.
• Show Cities: Display or hide the current city name on
the navigation screen.
• Orientation: Enable or disable displaying North at the
top of the map screen.
• Map scheme: Select the preferred map display style.
System
Screen
• Brightness: Drag the slider to the left to decrease the
screen brightness or to the right to increase the screen
brightness.
Note: You can also decrease/increase the screen brightness by
tapping
/ .
Note: To increase your battery life during a ride, ,make sure
the screen brightness is turned down to reduce the battery
consumption.
• Backlight Timer: Tap the option to select how long (from 15 seconds to
Never) the display screen remains lit after you press the POWER button.
• Screen Lock Timer: Tap the option to select how long of inactivity (from 5
seconds to Never) will lock the device screen.
• Auto Power Off Timer: Tap the option to select how long of inactivity (from
10 minutes to Never) will turn off the device automatically.
Alerts
• On tap screen: Enable or disable the feedback sound
while tapping on the screen.
• Instructions: Enable or disable the sound while getting
instructions.
• Auto Recording: When disabled, a message will display
asking if you want to start recording when movement
is detected.
Date & Time
The device will display the date and time based on the
current GPS location. The Date & Time screen lets you set
the date/time format.
• Set Date format: Tap the button to select the displayed
date format: Day/Month/Year, Month/Day/Year or
Year/Month/Day.
• Set Time format: You can set the displayed time format
as 12-hour or 24-hour by tapping the 24h or AM/PM
button.