31
6
Service and Maintenance
en
In addition to annual servicing it is necessary to replace or inspect some parts after a certain period of system operation. Please see tables below for detailed instructions.
Replacement and inspection of parts should always be done by a competent person with relevant training and qualications.
Parts which require regular replacement
Parts Replace every Possible failures
Pressure relief valve (PRV)
Air vent (Auto/Manual)
Manometer
6 years Water leakage
Parts which require regular inspection
Parts Check every Possible failures
Immersion heater 2 years
Earth leakage causing
circuit breaker to activate
(Heater is always OFF)
Water circulation pump 20,000 hrs (3 years)
Water circulation pump
failure
Parts which must NOT be reused when servicing
* O-ring
* Gasket
Note:
Always replace the gasket for pump with a new one at each regular maintenance
(every 20,000 hours of use or every 3 years).
Annual Maintenance
It is essential that the hydrobox is serviced at least once a year by a qualied individual. Any required parts MUST be purchased from Mitsubishi Electric (safety matter).
NEVER bypass safety devices or operate the unit without them being fully operational.
Engineers Forms
Should settings be changed from default, please enter and record new setting in ‘Field Setting’ column. This will ease resetting in the future should the system use change
or the circuit board need to be replaced.
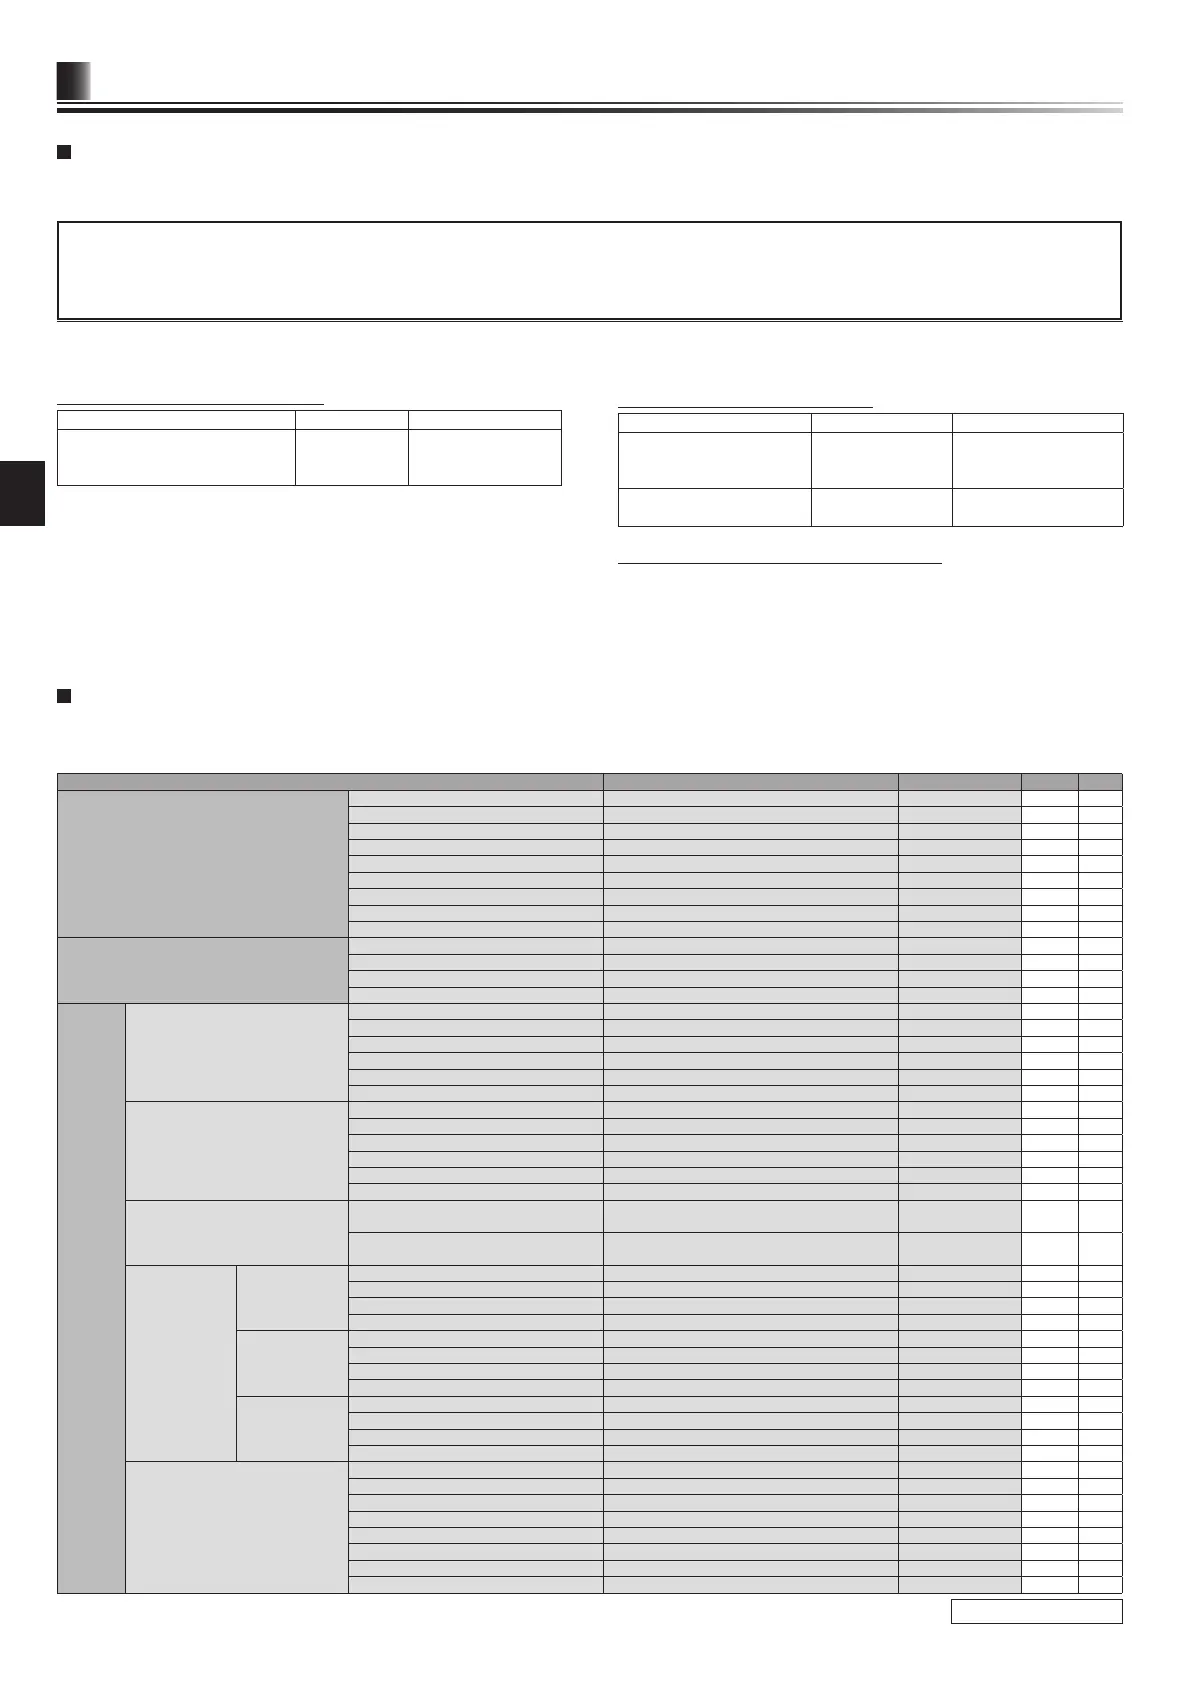
Commissioning/Field settings record sheet
Main remote controller screen Parameters Default setting
Field setting
Notes
Main Zone1 heating room temp. 10°C - 30°C 20°C
Zone2 heating room temp. *14 10°C - 30°C 20°C
Zone1 heating ow temp. 20°C - 60°C 45°C
Zone2 heating ow temp. *1 20°C - 60°C 35°C
Zone1 cooling ow temp. *12 5°C - 25°C 15°C
Zone2 cooling ow temp. *12 5°C - 25°C 20°C
Zone1 heating compensation curve −9°C - + 9°C 0°C
Zone2 heating compensation curve *1 −9°C - + 9°C 0°C
Holiday mode Active/Non active/Set time —
Option Forced DHW operation On/Off —
DHW On/Off/Timer On
Heating/Cooling On/Off/Timer On
Energy monitor Consumed electrical energy/Delivered energy —
Setting DHW *13 Operation mode Normal/Eco *16 Normal
DHW max. temp. 40°C - 60°C *2 50°C
DHW temp. drop 5°C - 30°C 10°C
DHW max. operation time 30 - 120 min 60 min
DHW mode restriction 30 - 120 min 30 min
DHW recharge Large/Standard Large *19
Legionella prevention *13 Active Yes/No Yes
Hot water temp. 60°C - 70°C *2 65°C
Frequency 1 - 30 days 15 days
Start time 00.00 - 23.00 03.00
Max. operation time 1 - 5 hours 3 hours
Duration of maximum temp. 1 - 120 min 30 min
Heating/ Cooling *12 Zone1 operation mode Heating room temp./ Heating ow temp./ Heating
compensation curve/ Cooling ow temp.
Room temp.
Zone2 operation mode *1 Heating room temp./ Heating ow temp./ Heating
compensation curve/ Cooling ow temp.
Compensation curve
Compensation
curve
Hi ow temp. set
point
Zone1 outdoor ambient temp. −30°C - +33°C *3 −15°C
Zone1 ow temp. 20°C - 60°C 50°C
Zone2 outdoor ambient temp. *1 −30°C - +33°C *3 −15°C
Zone2 ow temp. *1 20°C - 60°C 40°C
Lo ow temp. set
point
Zone1 outdoor ambient temp. −28°C - +35°C *4 35°C
Zone1 ow temp. 20°C - 60°C 25°C
Zone2 outdoor ambient temp. *1 −28°C - +35°C *4 35°C
Zone2 ow temp. *1 20°C - 60°C 25°C
Adjust Zone1 outdoor ambient temp. −29°C - +34°C *5 —
Zone1 ow temp. 20°C - 60°C —
Zone2 outdoor ambient temp. *1 −29°C - +34°C *5 —
Zone2 ow temp. *1 20°C - 60°C —
Holiday DHW *13 Active/Non active Non active
Heating/ Cooling *12 Active/Non active Active
Zone1 heating room temp. 10°C - 30°C 15°C
Zone2 heating room temp. *14 10°C - 30°C 15°C
Zone1 heating ow temp. 20°C - 60°C 35°C
Zone2 heating ow temp. *1 20°C - 60°C 25°C
Zone1 cooling ow temp. *12 5°C - 25°C 25°C
Zone2 cooling ow temp. *12 5°C - 25°C 25°C
(Continued to next page.)
Note
▪ Within the rst couple of months of installation, remove and clean the hydrobox’s strainer plus any additional lter items that are tted external to the
hydrobox. This is especially important when installing on an old/existing pipe work system.
▪ The PRV valve (No. 10 on Figure 3.3) should be checked annually by turning the knob manually so that the medium is discharged, thus cleaning the seal
seat.