Chagter 8 Clutch and driveline 8-11
rl
!
/
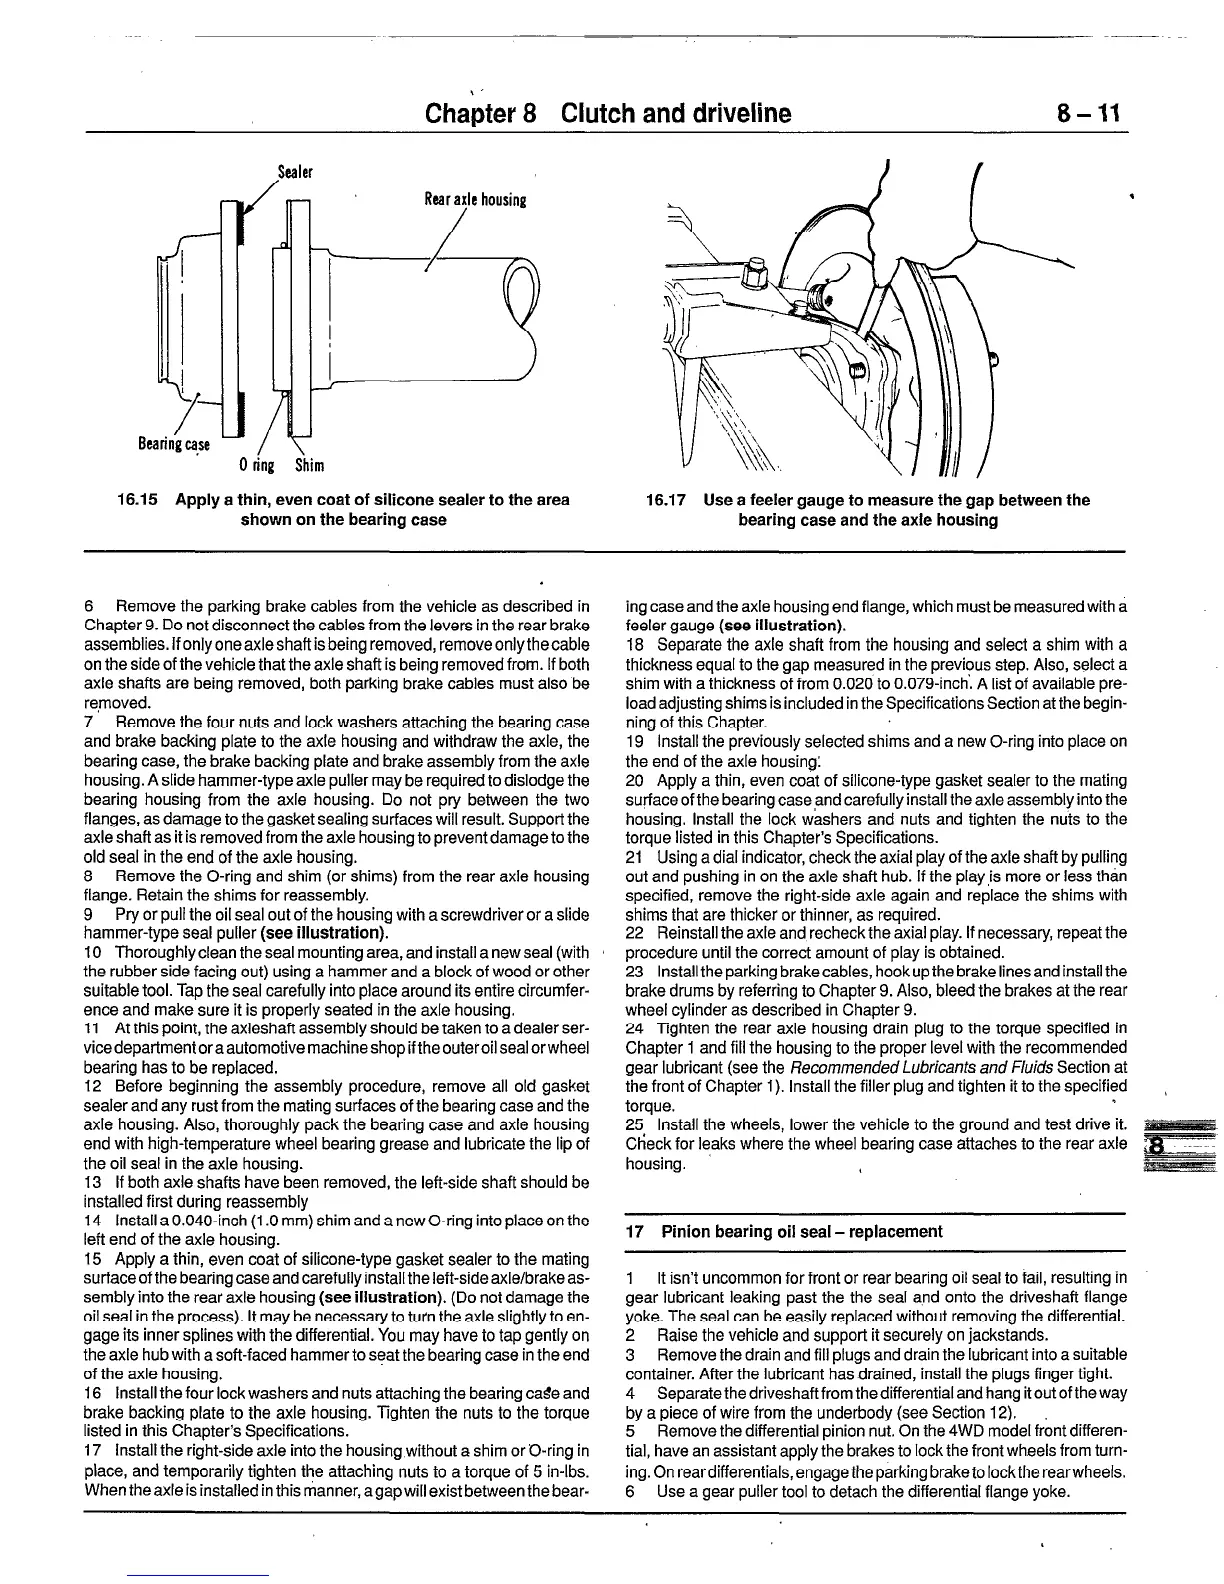
Bearing ca,se
Sealer
Rear axle housing
/
0 ring Shim
.
16.15 Apply a thin, even coat of silicone sealer to the area 16.17 Use a feeler gauge to measure the gap between the
shown on the bearing case bearing case and the axle housing
6 Remove the parking brake cables from the vehicle as described in
Chapter 9. Do notdisconnect the cables from the levers in the rear brake
assemblies. If only one axle shaft is being removed, remove only the cable
on the side of the vehicle that the axle shaft is being removed from. If both
axle shafts are being removed, both parking brake cables must also be
re,moved.
7 Remove the four nuts and lock washers attaching the bearing case
and brake backing plate to the axle housing and withdraw the axle, the
bearing case, the brake backing plate and brake assembly from the axle
housing. A slide hammer-type axle puller may be required to dislodge the
bearing housing from the axle housing. Do not pry between the two
flanges, as damage to the gasket sealing surfaces will result. Support the
axle shaft as it is removed from the axle housing to prevent damage to the
old seal in the end of the axle housing.
8 Remove the O-ring and shim (or shims) from the rear axle housing
flange. Retain the shims for reassembly.
9 Pry or pull the oil seal out of the housing with a screwdriver or a slide
hammer-type seal puller (see illustration).
10 Thoroughly clean the seal mounting area, and install a new seal (with
the rubber side facing out) using a hammer and a block of wood or other
suitable tool. Tap the seal carefully into place around its entire circumfer-
ence and make sure it is properly seated in the axle housing.
11 At this point, the axleshaft assembly should be taken to a dealer ser-
vicedepartmentoraautomotivemachineshopiftheouteroilsealorwheel
bearing has to be replaced.
12 Before beginning the assembly procedure, remove all old gasket
sealer and any rust from the mating surfaces of the bearing case and the
axle housing. Also, thoroughly pack the bearing case and axle housing
end with high-temperature wheel bearing grease and lubricate the lip of
the oil seal in the axle housing.
13 If both axle shafts have been removed, the left-side shaft should be
installed first during reassembly
14 Install a 0.040-inch (1 .O mm) shim and a new O-ring into place on the
left end of the axle housing.
15 Apply a thin, even coat of silicone-type gasket sealer to the mating
surface of the bearing case and carefully install the left-side axle/brake as-
sembly into the rear axle housing (see illustration). (Do not damage the
oil seal in the process). It may be necessary to turn the axle slightly to en-
gage its inner splines with the differential. You may have to tap gently on
the axle hub with a soft-faced hammer to seat the bearing case in the end
of the axle housing.
16 Install the four lock washers and nuts attaching the bearing cage and
brake backing plate to the axle housing. Tighten the nuts to the torque
listed in this Chapter’s Specifications.
17 Install the right-side axle into the housing without a shim or O-ring in
place, and temporarily tighten the attaching nuts to a torque of 5 in-lbs.
When theaxle is installed in this manner, agapwill existbetween the bear-
ing case and the axle housing end flange, which must be measured with a
feeler gauge (see illustration).
18 Separate the axle shaft from the housing and select a shim with a
thickness equal to the gap measured in the previous step. Also, select a
shim with a thickness of from 0.020 to 0.079-inch. A list of available pre-
load adjusting shims is included in the Specifications Section at the begin-
ning of this Chapter.
19 Install the previously selected shims and a new O-ring into place on
the end of the axle housing:
20 Apply a thin, even coat of silicone-type gasket sealer to the mating
surface of the bearing case and carefully install the axle assembly into the
housing. Install the lock washers and nuts and tighten the nuts to the
torque listed in this Chapter’s Specifications.
21 Using a dial indicator, check the axial play of the axle shaft by pulling
out and pushing in on the axle shaft hub. If the play,is more or less than
specified, remove the right-side axle again and replace the shims with
shims that are thicker or thinner, as required.
22 Reinstall the axle and recheck the axial play. If necessary, repeat the
procedure until the correct amount of play is obtained.
23 Install the parking brake cables, hookup the brake linesand install the
brake drums by referring to Chapter 9. Also, bleed the brakes at the rear
wheel cylinder as described in Chapter 9.
24 Tighten the rear axle housing drain plug to the torque specified in
Chapter 1 and fill the housing to the proper level with the recommended
gear lubricant (see the Recommended Lubricants and Fluids Section at
the front of Chapter 1). Install the filler plug and tighten it to the specified ,
torque.
i
25 Install the wheels, lower the vehicle to the ground and test drive it.
Check for leaks where the wheel bearing case attaches to the rear axle i
housing.
17 Pinion bearing oil seal - replacement
1 It isn’t uncommon for front or rear bearing oil seal to fail, resulting in
gear lubricant leaking past the the seal and onto the driveshaft flange
yoke. The seal can be easily replaced without removing the differential.
2 Raise the vehicle and support it securely on jackstands.
3 Remove the drain and fill plugs and drain the lubricant into a suitable
container. After the lubricant has drained, install the plugs finger tight.
4 Separate the driveshaft from the differential and hang it out of the way
by a piece of wire from the underbody (see Section 12).
5 Remove the differential pinion nut. On the 4WD model front differen-
tial, have an assistant apply the brakes to lock the front wheels from turn-
ing. On reardifferentials, engage the parking braketo locktherearwheels.
6 Use a gear puller tool to detach the differential flange yoke.
 Loading...


