4-42 Chapter 4 Fuel and exhaust systems
23 Fuel rail assembly - removal and installation
Warning:
Gasoline is extremely flammable, so take extra precautions
when you work on any part of the fuel system. Don’t smoke or allow open
flames or bare light bulbs near the work area, and don’t work in a garage
wherea naturalgas-typeappliance (suchasa waterheaterorclothesdry-
er) with a pilot light is present. If you spill any fuel on your skin, rinse it off
immediately with soap and water. When you perform any kind of work on
the fuel system, wear safety glasses and hqve a Class B type fire extin-
guisher on hand.
1 Relieve the fuel system pressure (see Section 2).
2 Disconnect the negative cable from the battery.
3 Disconnect all hoses, cables and connectors from the throttle body
(see Section 20)
4 Remove the throttle body and air intake plenum as an assembly (see
Section 22).
2.4L engine
Refer to illustration 23.5
5 Pull up the retaining clip on each injector electrical connector and un-
plug the connector from the fuel injector
(see illustration).
6 Cover the connection for the fuel high-pressure hose with a shop rag
to absorb any spilled fuel (there’s still residual pressure in the line, even
afterthefuel pressure has been relieved). Remove the fuel high-pressure
hose attaching bolts and detach the high-pressure hose. Discard the old
O-ring.
7 Loosen the hose clamp and disconnect the fuel return hose.
8 Detach the vacuum hose from the fuel pressure regulator.
/
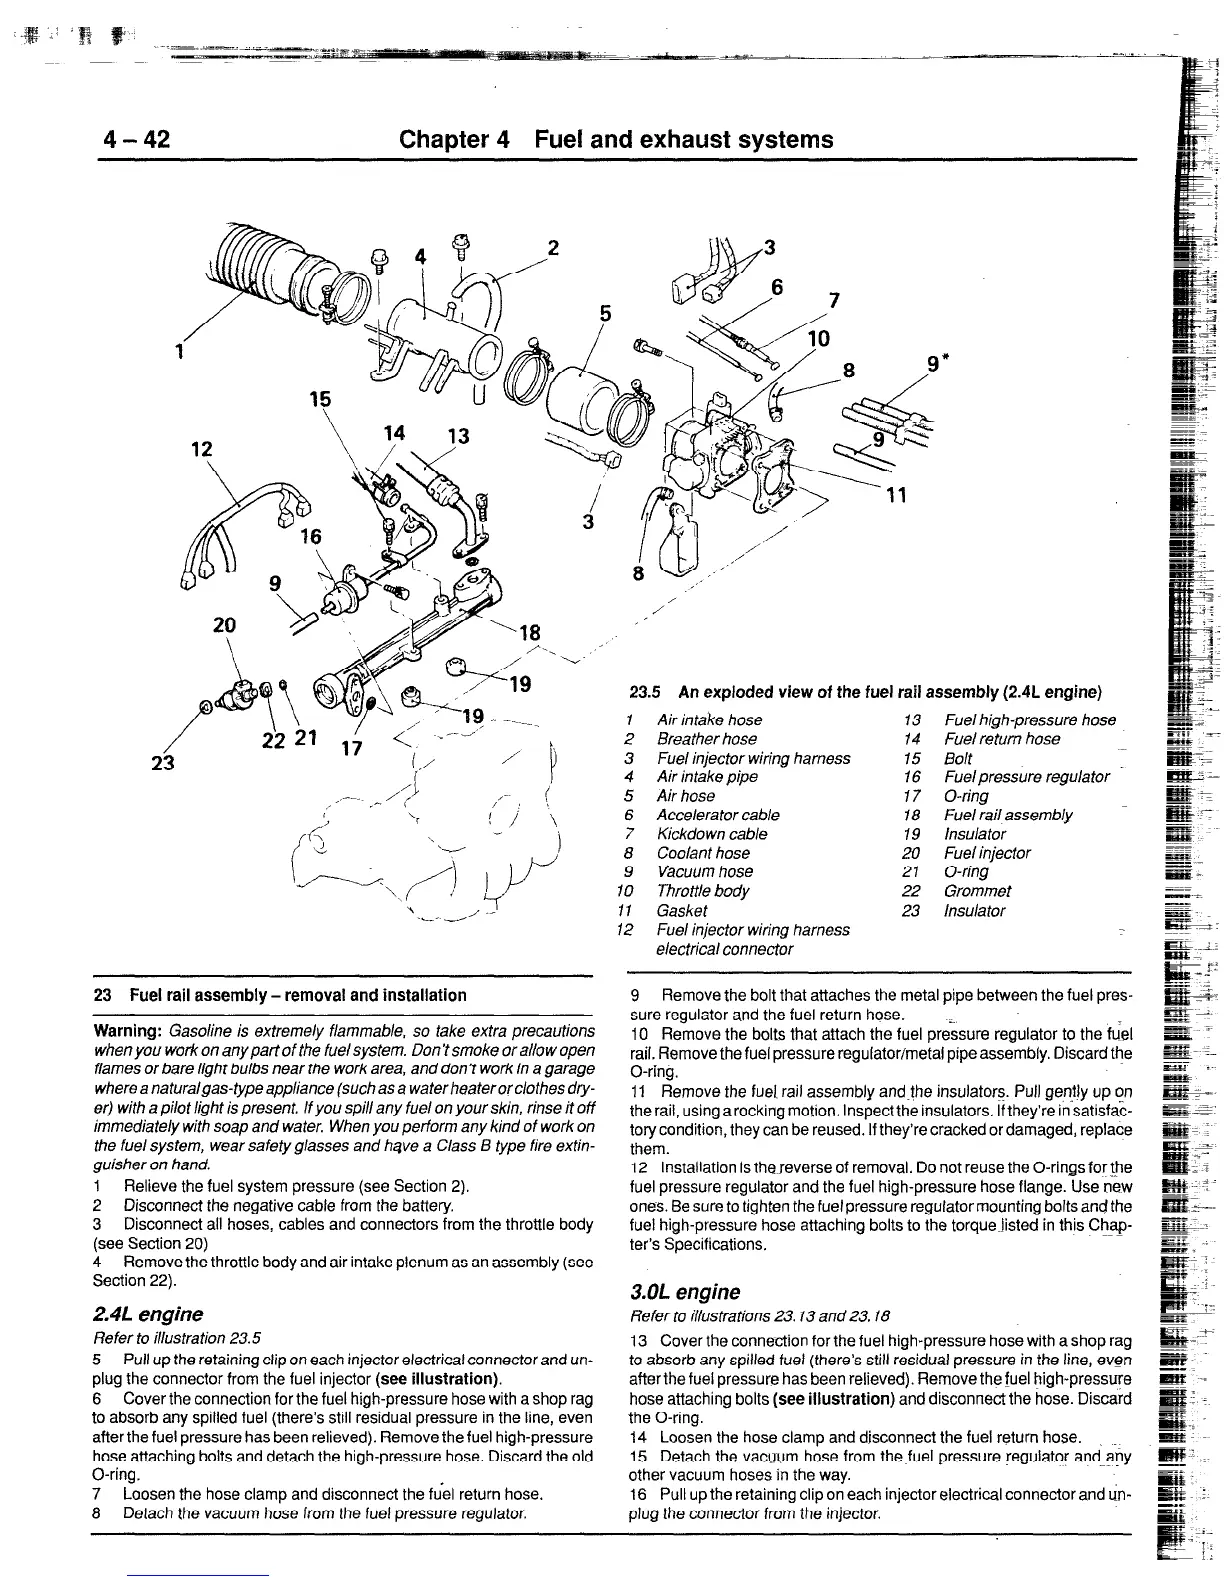
23.5 An exploded view of the fuel rail assembly (2.4L engine)
1
Air intake hose 13 Fuel high-pressure hose
2 Breather hose 14 Fuel return hose
3 Fuel injector wiring harness 15 Bolt
4 Air intake pipe 16 Fuelpressure regulator -
5 Air hose 17 O-ring
6 Accelerator cab/e 18 Fuel rail assembly
7 Kickdown cable 19 Insulator
8 Coolant hose 20 Fuel injector
9 Vacuum hose 27 O-ring
10 Throttle body 22 Grommet
11 Gasket 23 Insulator
/2 Fuel injector wiring harness
electrical connector
9 Remove the bolt that attaches the metal pipe between the fuel pres-
sure regulator and the fuel return hose.
10 Remove the bolts that attach the fuel pressure regulator to the fuel
rail. Remove the fuel pressure regulator/metal pipe assembly. Discard the
O-ring.
11 Remove the fuel rail assembly andthe insulators. Pull gently up on
the rail, using
a
rocking motion. Inspect the insulators. If they’re in-satisfac-
tory condition, they can be reused. If they’re cracked or damaged, replace
them.
12 Installation is thereverse of removal. Do not reuse the O-rings for the
fuel pressure regulator and the fuel high-pressure hose flange. Use new
ones. Be sure to tighten the fuel pressure regulator mounting bolts and the
fuel high-pressure hose attaching bolts to the torquefisted in this Chap-
ter’s Specifications.
3.OL engine
Refer to illustrations 23.13 and 23.18
13 Cover the connection for the fuel high-pressure hose with a shop rag
to absorb any spilled fuel (there’s still residual pressure in the line, even
afterthefuel pressure has been relieved). Remove the fuel high-pressure
hose attaching bolts
(see illustration)
and disconnect the hose. Discard
the O-ring.
14 Loosen the hose clamp and disconnect the fuel return hose.
15 Detach the vacuum hose from the fuel pressure regulator and any
other vacuum hoses in the way.
16 Pull up the retaining clip on each injector electrical connector and un-
plug the connector from the injector.
 Loading...


