&aMer 1 Tune-w and routine maintenance
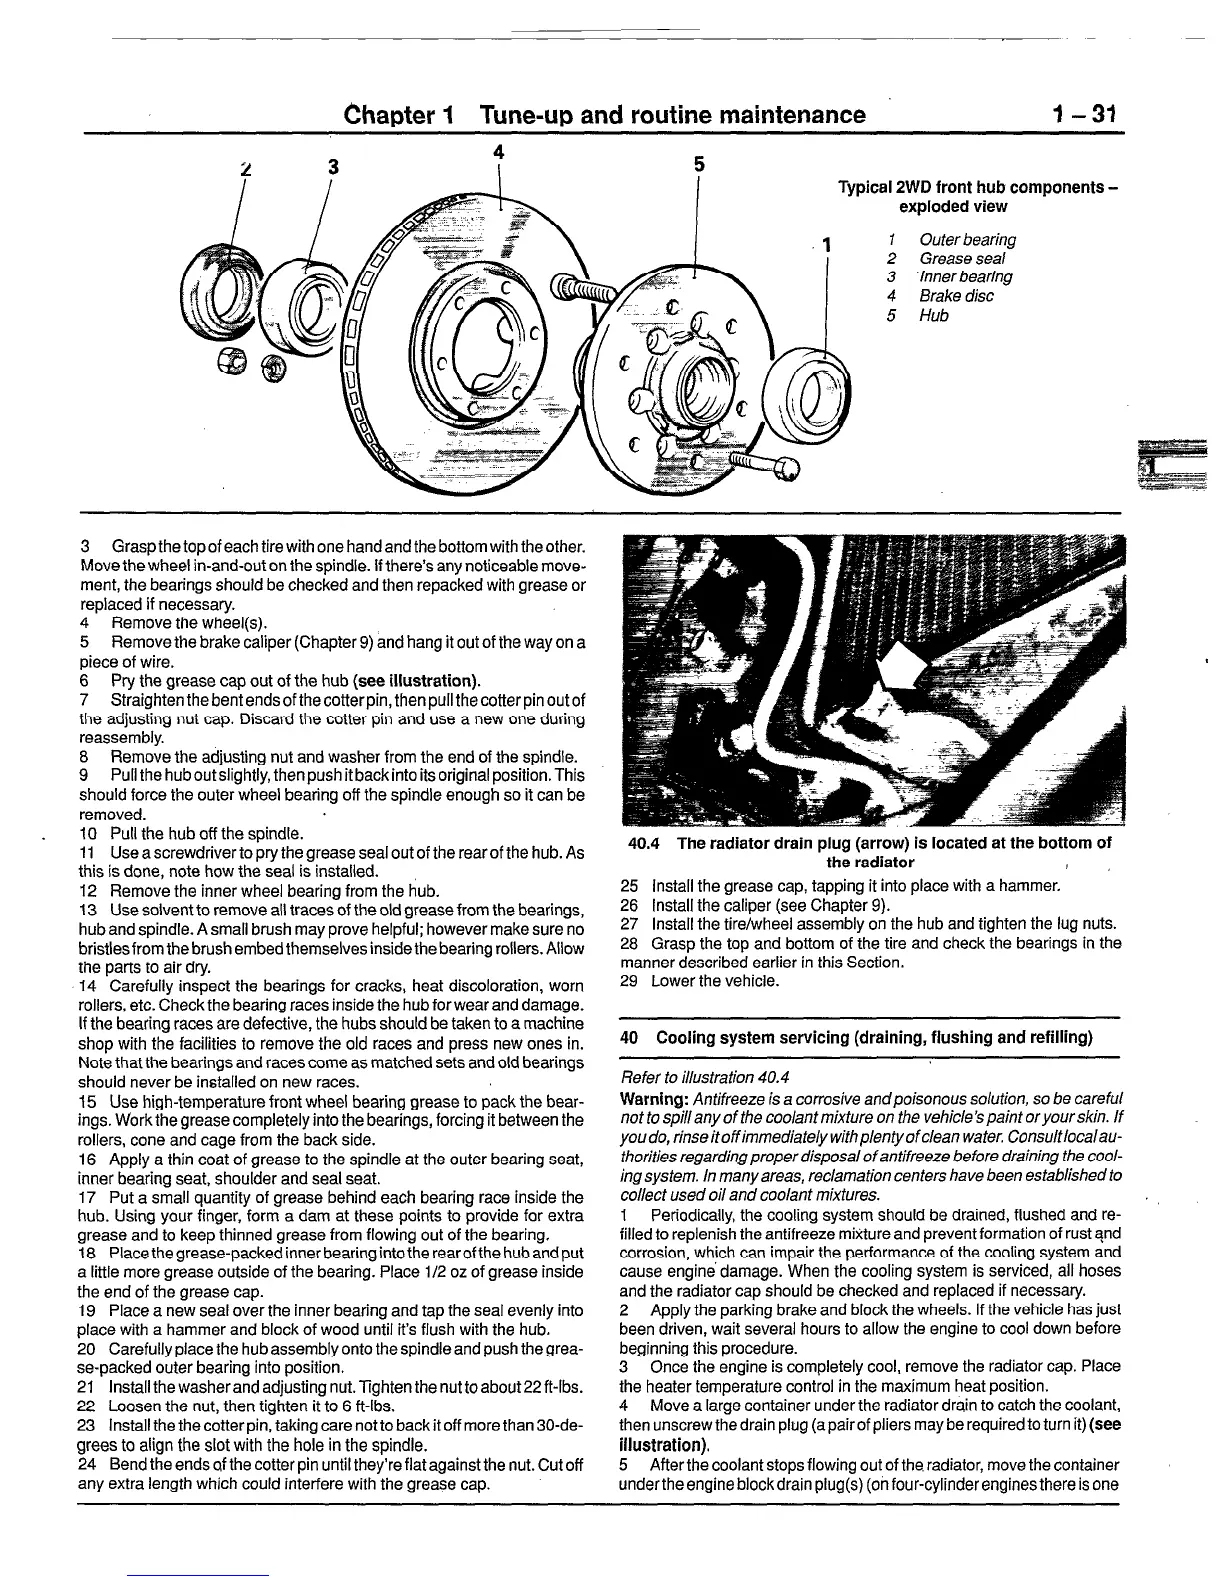
Typical 2WD front hub components -
exploded view
1 Outer bearing
2 Grease seal
3 ‘Inner bearing
4 Brake disc
5 Hub
3 Graspthetopofeachtirewithonehandandthebottomwiththeother.
Move the wheel in-and-out on the spindle. If there’s any noticeable move-
ment, the bearings should be checked and then repacked with grease or
replaced if necessary.
4
Remove the wheel(s).
5 Remove the brake caliper (Chapter 9) and hang it out of the way on a
piece of wire.
6 Pry the grease cap out of the hub (see
illustration).
7 Straightenthebentendsofthecotterpin,thenpullthecotterpinoutof
the adjusting nut cap. Discard the cotter pin and use a new one during
reassembly.
8 Remove the adjusting nut and washer from the end of the spindle.
9 Pull the hub out slightly, then push it back into its original position. This
should force the outer wheel bearing off the spindle enough so it can be
removed.
. 10 Pull the hub off the spindle.
11 Use a screwdriver to pry the grease seal out of the rear of the hub. As
this is done, note how the seal is installed.
12 Remove the inner wheel bearing from the hub.
13 Use solvent to remove all traces of the old grease from the bearings,
hub and spindle. A small brush may prove helpful; however make sure no
bristles from the brush embed themselves inside the bearing rollers. Allow
the parts to air dry.
14 Carefully inspect the bearings for cracks, heat discoloration, worn
rollers, etc. Check the bearing races inside the hub for wear and damage.
If the bearing races are defective, the hubs should be taken to a machine
shop with the facilities to remove the old races and press new ones in.
Note that the bearings and races come as matched sets and old bearings
should never be installed on new races.
15 Use high-temperature front wheel bearing grease to pack the bear-
ings. Work the grease completely into the bearings, forcing it between the
rollers, cone and cage from the back side.
16 Apply a thin coat of grease to the spindle at the outer bearing seat,
inner bearing seat, shoulder and seal seat.
17 Put a small quantity of grease behind each bearing race inside the
hub. Using your finger, form a dam at these points to provide for extra
grease and to keep thinned grease from flowing out of the bearing.
18 Placethegrease-packedinnerbearingintotherearofthehubandput
a little more grease outside of the bearing. Place l/2 oz of grease inside
the end of the grease cap.
19 Place a new seal over the inner bearing and tap the seal evenly into
place with a hammer and block of wood until it’s flush with the hub.
20 Carefully place the hub assembly onto the spindle and push the grea-
se-packed outer bearing into position.
21 Install the washer and adjusting nut. Tighten the nut to about 22 ft-lbs.
22 Loosen the nut, then tighten it to 6 ft-lbs.
23 Install the the cotter pin, taking care not to back it off more than 30-de-
grees to align the slot with the hole in the spindle.
24 Bend the ends of the cotter pin until they’re flat againstihe nut. Cut off
any extra length which could interfere with the grease cap.
40.4 The radiator drain plug (arrow) is located at the bottom of
the radiator
!
25 Install the grease cap, tapping it into place with a hammer.
26 Install the caliper (see Chapter 9).
27 Install the tire/wheel assembly on the hub and tighten the lug nuts.
28 Grasp the top and bottom of the tire and check the bearings in the
manner described earlier in this Section.
29 Lower the vehicle.
40 Cooling system servicing (draining, flushing and refilling)
Refer to illustration 40.4
Warning:
Antifreeze
is a corrosive andpoisonous solution, so be careful
not to spill any of the coolant mixture on the vehicle’s paint or your skin. If
youdo, rinse itoffimmediately withplenty ofclean water. Consultlocalau-
thorities regarding proper disposal of antifreeze before draining the cool-
ingsystem. In many areas, reclamation centers have been established to
collect used oil and coolant mixtures.
1 Periodically, the cooling system should be drained, flushed and re-
filled to replenish the antifreeze miicture and prevent formation of rust and
corrosion, which can impair the performance of the cooling system and
cause engine’ damage. When the cooling system is serviced, all hoses
and the radiator cap should be checked and replaced if necessary.
2 Apply the parking brake and block the wheels. If the vehicle has just
been driven, wait several hours to allow the engine to cool down before
beginning this procedure.
3 Once the engine is completely cool, remove the radiator cap. Place
the heater temperature control in the maximum heat position.
4 Move a large container under the radiator drain to catch the coolant,
then unscrew the drain plug (a pair of pliers may be required to turn it) (see
illustration).
5 Afterthe coolant stops flowing out of the radiator, move the container
under the engine block drain plug(s) (on four-cylinder engines there is one
 Loading...


