7
WIRING SPECIFICATIONS
FIELD ELECTRICAL WIRING (power wiring specifications)
2XWGRRUXQLWPRGHO
6:96+:96:96+:9
6:<6+:<
2XWGRRUXQLWSRZHUVXSSO\
a1VLQJOH+]9a1VLQJOH+]9
1aSKZLUHV+]9
2XWGRRUXQLWLQSXWFDSDFLW\0DLQVZLWFK%UHDNHU
$$$
:LULQJ:LUH
1RîVL]H
PP
2XWGRRUXQLWSRZHUVXSSO\
î0LQî0LQî0LQ
,QGRRUXQLW2XWGRRUXQLW
îSRODUîSRODUîSRODU
,QGRRUXQLW2XWGRRUXQLWHDUWK
î0LQî0LQî0LQ
5HPRWHFRQWUROOHU,QGRRUXQLW
î1RQSRODUî1RQSRODUî1RQSRODU
&LUFXLWUDWLQJ
2XWGRRUXQLW/1VLQJOH
2XWGRRUXQLW/1/1/1SKDVH
9$&9$&9$&
,QGRRUXQLW2XWGRRUXQLW66
9$&9$&9$&
,QGRRUXQLW2XWGRRUXQLW66
9'&9'&9'&
5HPRWHFRQWUROOHU,QGRRUXQLW
9'&9'&9'&
$EUHDNHUZLWKDWOHDVWPPFRQWDFWVHSDUDWLRQLQHDFKSROHVKDOOEHSURYLGHG8VHHDUWKOHDNDJHEUHDNHU19
0DNHVXUHWKDWWKHFXUUHQWOHDNDJHEUHDNHULVRQHFRPSDWLEOHZLWKKLJKHUKDUPRQLFV
$OZD\VXVHDFXUUHQWOHDNDJHEUHDNHUWKDWLVFRPSDWLEOHZLWKKLJKHUKDUPRQLFVDVWKLVXQLWLVHTXLSSHGZLWKDQLQYHUWHU
7KHXVHRIDQLQDGHTXDWHEUHDNHUFDQFDXVHWKHLQFRUUHFWRSHUDWLRQRILQYHUWHU
0D[LPXPP
,IPPðLVXVHGPD[LPXPP
,IPPðLVXVHGDQG6LVVHSDUDWHGPD[LPXPP
7KHPZLUHLVDWWDFKHGLQWKHUHPRWHFRQWUROOHUDFFHVVRU\
7KH¿JXUHVDUH127DOZD\VDJDLQVWWKHJURXQG
6WHUPLQDOKDV9'&DJDLQVW6WHUPLQDO+RZHYHUEHWZHHQ6DQG6WKHVHWHUPLQDOVDUH127HOHFWULFDOO\LQVXODWHGE\WKHWUDQVIRUPHURURWKHUGHYLFH
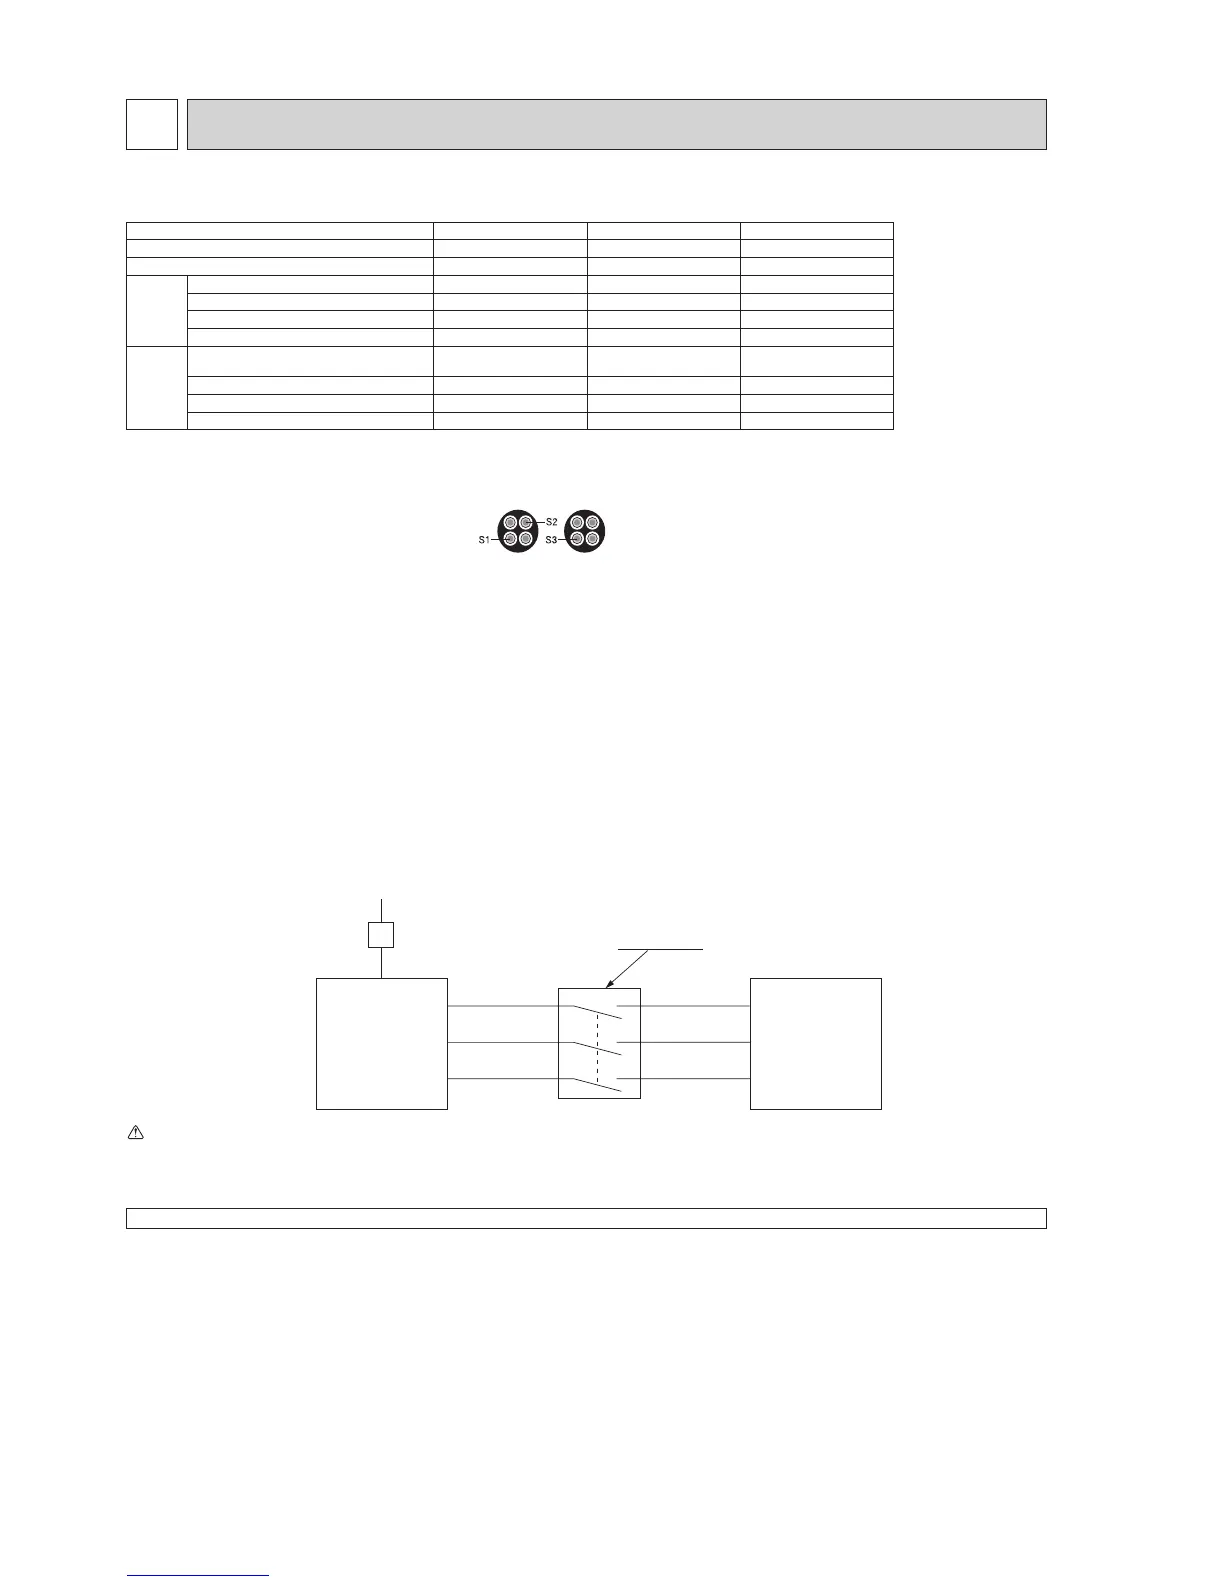
S1
S2
S3
S1
S2
S3
Warning:
· In case of A-control wiring, there is high voltage potential on the S3 terminal caused by electrical circuit design that has no electrical insulation
between power line and communication signal line. Therefore, please turn off the main power supply when servicing. And do not touch the S1, S2, S3
terminals when the power is energized. If isolator should be used between indoor unit and outdoor unit, please use 3-pole type.
Notes: 1. Wiring size must comply with the applicable local and national codes.
2.
Power supply cables and the cables between Interface unit/Flow temp. controller and outdoor unit shall not be lighter than polychloroprene
VKHDWKHGÀH[LEOHFDEOHV'HVLJQ,(&
)
3. Be sure to connect the cables between
Interface unit/Flow temp. controller
and outdoor unit directly to the units (no intermediate connections
are allowed).
,QWHUPHGLDWHFRQQHFWLRQVPD\UHVXOWLQFRPPXQLFDWLRQHUURUV,IZDWHUHQWHUVDWWKHLQWHUPHGLDWHFRQQHFWLRQSRLQWLWPD\FDXVHLQVXI¿FLHQW
insulation to ground or a poor electrical contact .
(If an intermediate connection is necessary, be sure to take measures to prevent water from entering the cables.)
4. Install an earth longer than other cables.
5.
Do not construct a system with a power supply that is turned ON and OFF frequently.
6. Use self-extinguishing distribution cable for power supply wiring.
7. Properly route wiring so as not to contact the sheet metal edge or screw tip.
2XWGRRU8QLW
SROHVLVRODWRU
3RZHU
VXSSO\
,VRODWRU
,QGRRUXQLW
,QWHUIDFHXQLW
)ORZWHPS
FRQWUROOHU
1HYHUVSOLFHWKHSRZHUFDEOHRUWKHLQGRRURXWGRRUFRQQHFWLRQFDEOHRWKHUZLVHLWPD\UHVXOWLQVPRNHHPLVVLRQD¿UHRUFRPPXQLFDWLRQIDLOXUH
 Loading...