25
MOBIUSTRIMMER.COM
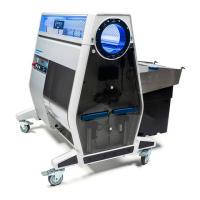
TRIM TOTE CHANGES
TUMBLER EMPTY SEQUENCE
1. Ensure that one of the trim team resources in the room is assigned to keep an eye out for when
it is time to change out the trim tote. Note, if the trim tote is allowed to overll, trimmed material
will be forced to bypass the tote and get directed into the impeller and fan housing exhaust.
Always empty the trim tote prior to it becoming completely full.
2. When the trim tote is ready for change out, stop the infeed conveyor (if using), turn off the
blades, vacuum and tumbler by pressing in these dials on the control panel, and activate the
e-stop switch.
3. Once the trimmer is at a full stop, disengage the trim tote lock levers and pull out the full trim tote.
4. Install an empty trim tote into the separator and engage the trim tote lock levers. Ensure that
the trim tote is properly seated and that the trim tote gasket is fully sealed against the separator.
5. To recommence trimming operations, turn on the vacuum rst. This will hold the material in the
tumbler and prevent it from spilling out the end in a big batch during start-up.
6. Once the vacuum has ramped up to full power (5 – 10 seconds), turn on the blades, tumbler,
and, if using them, the infeed and outfeed conveyors.
1. Once the last of the material has been loaded into the tumbler, begin to slowly raise the tilt
angle of the machine. If using conveyors, the infeed conveyor can be backed out at this point.
2. Slowly ramp down the vacuum over a period of approximately one minute and then shut off the
vacuum and the blades. Leave the tumbler running. If operating in tandem, perform this step on
the infeed machine rst and then perform this same step on the outfeed machine.
3. Continue running the tumbler until all of the material has exited the machine.
VACUUM (dry trim only): Because dry material is so much lighter than wet material, the vacuum
can be used to adjust how long material is held in the tumbler, thus how tightly it is trimmed.
Reducing the vacuum will allow material to ow through the tumbler more quickly with a looser
trim; increasing the vacuum holds the material in the tumbler longer and tightens the trim. See
below for more tips on dry trimming.
6. Once the desired trim quality has been dialed in, the job of the resources on the outfeed is to
perform QC on the material. The specic criteria to look for is established by the end-user and
could include things like bud size or mold, but with respect to trimming, it is generally crow’s feet
that the QC line is on the lookout for. As a general rule of thumb, a bud that requires 2 – 3 snips
to clean-up should get addressed on the outfeed line; a bud that requires more that that should
be set aside in a separate bin for clean-up off the outfeed line or run through the machine a
second time. If more than 5% of material is being set aside like this, consider adjusting the machine
parameters (tilt angle, feed rate) to tighten up the trim quality.
Depending on the material being run, the trim tote may ll up every 15 – 25 minutes. Below are the
steps to take when changing out the trim tote:
At the end of a batch or trim session, there is no longer material being fed into the infeed end of the
trimmer to push material through to the outfeed. To ensure that the material at the end of a batch is
properly trimmed and exits the tumbler without being over-trimmed, follow these steps: