Thermostatic Cartridge Servicing/Replacement
1. Shut off water to the valve by either closing valves in the supply supply lines or closing the valves’ internal flow stops (follow
steps 2 & 3 in the Flushing section).
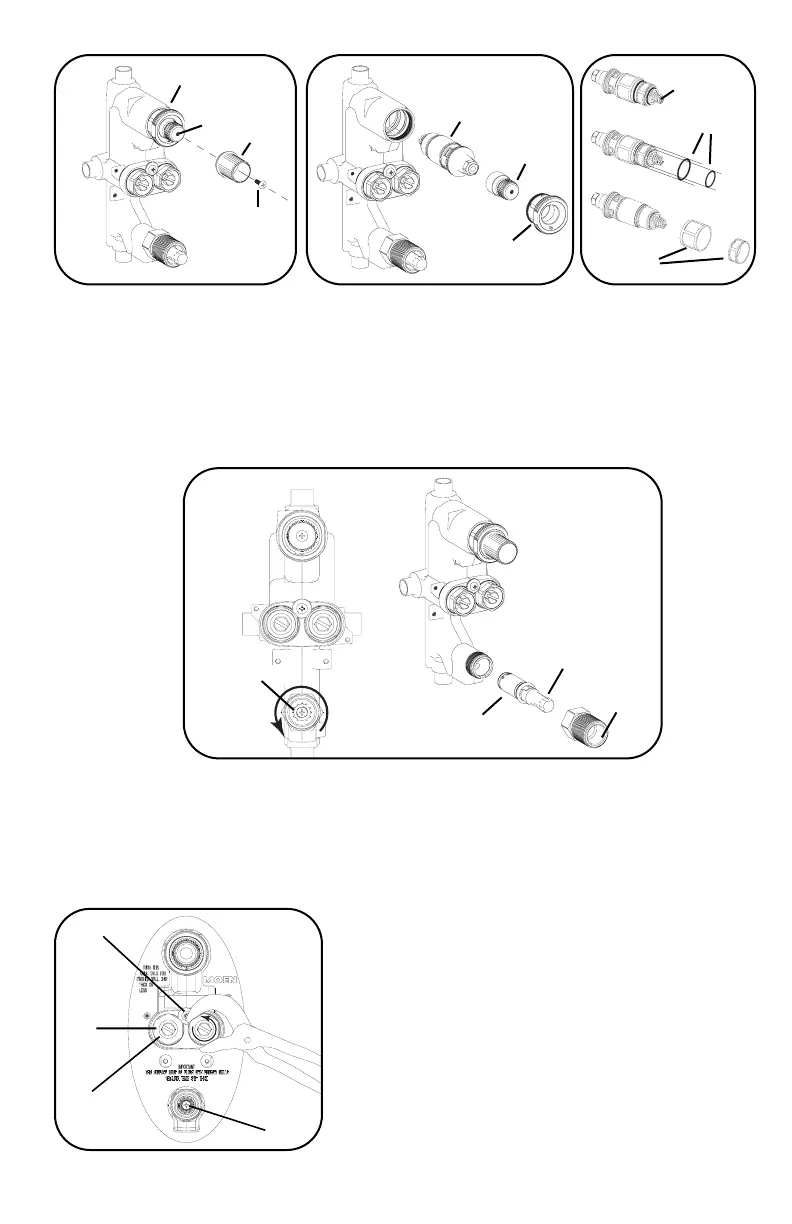
2. Remove the temperature extension (5) and spindle extension screw (6).
3. Next, unscrew the cartridge retainer nut (4) counterclockwise with a wrench while holding the temperature spindle (3) in place.
Remove the thermostatic cartridge (2).
4. Remove the two O-rings located at the base of the screens and replace if damaged.
5. Next, remove the two screens and rinse thoroughly under lukewarm water. If the screens are damaged, replace with new ones
(A service kit containing the O-rings and screens is available). Reassemble by reversing the preceding steps.
6. After reassembly, the valve needs to be recalibrated. See “Recalibration Procedure.”
4
3
2
2
3
4
5
6
O-rings
Screens
7
Flow Control Valve Cartridge Replacement
1. Shut off water to the valve by either closing valves in the supply supply lines or closing the valve’s internal flow stops (follow
steps 2 & 3 in the Flushing section).
IMPORTANT: After shutting off flow using either the external supply valve or the internal flow stops, turn the flow
extension fully counterclockwise to relieve the remaining pressure in the valve.
2. Remove the brass flow cartridge retaining nut (12) by turning the nut counterclockwise using a wrench.
3. Remove the flow cartridge (11) with the attached flow extension (13) and replace with new one. It may be necessary to remove
the flow extension from the old cartridge and reinstall it onto the new cartridge.
Protection Against Damage By Freezing
The valve needs to be winterized if it will not be used during long periods of
cold weather.
1. Begin by shutting off the water supply to the valve by closing the valve in
the supply supply lines and drain the remaining water from the lines.
2. Remove both flow stops (7) and check valve cartridges (8) by removing
the flow stop washer (9) and screw (10) and turning the large (1.125”) hex
nuts counterclockwise. Nuts are located in the center of the valve, as
shown.
3. Next, turn the flow extension (13) fully counterclockwise to drain any
remaining water in the valve. Winterizing is now complete.
Flow extension
9, 10
7
8
13
13
12
11