4.1 Rackeinbau
Für den Einbau in ein Rack die beiden mitgelieferten
Montagewinkel an die Geräteseiten anschrauben.
Im Rack werden für den Verstärker 2 Höheneinhei-
ten (PA-900S) bzw. 3 Höheneinheiten (PA-940S)
benötigt (1 Höheneinheit HE = 44,5 mm).
Damit das Rack nicht kopflastig wird, muss der
Verstärker im unteren Bereich des Racks eingescho-
ben werden. Für eine sichere Befestigung reicht die
Frontplatte allein nicht aus. Zusätzlich müssen Sei-
tenschienen oder eine Bodenplatte das Gerät halten.
5 ELA-Verstärker anschließen
Alle Anschlüsse sollten nur durch eine qualifizierte
Fachkraft und unbedingt bei ausgeschaltetem Ver-
stärker vorgenommen werden!
5.1 Lautsprecher
Bei dem Modell PA-940S zum Anschluss der Laut-
sprecher die Schutzabdeckung (15) abschrauben.
Nach dem Anschluss diese Abdeckung unbedingt
wieder festschrauben, damit die Kontakte vor Be-
rührungen geschützt sind!
Es können ELA-Lautsprecher oder Lautsprecher
bzw. Lautsprechergruppen mit einer Gesamtimpe-
danz von mindestens 4Ω angeschlossen werden.
Die Anschlussmöglichkeiten für die Lautsprecher sind
in den Abb. 4 –8 dargestellt. Je nach Lautsprechertyp
die entsprechenden Kontakte der Klemmleiste
SPEAKER OUTPUT (10) verwenden. Bei dem Mo-
dell PA-900S lässt sich die Klemmleiste zur besseren
Handhabung von ihrer Steckverbindung abziehen.
Beim Anschluss auf die richtige Einzel- oder
Gesamtimpedanz der Lautsprecher und auf ihre
richtige Polung achten (Plus- und Minusanschlüsse
wie in Abb. 4 – 8 gezeigt). Der Plusanschluss der
Lautsprecher ist immer besonders gekennzeichnet.
5.2 Signalquelle
Als Signalquelle ein Gerät mit einem Line-Ausgang
(Vorverstärker, Mischpult, ELA-Mischverstärker etc.)
an den XLR-Eingang (13) oder an die Anschluss-
leiste (14) anschließen.
5.3 Zusätzlicher Verstärker
Werden mehr Lautsprecher benötigt als für den Ver-
stärker zulässig sind, ist ein weiterer Verstärker
erforderlich. Den Eingang des zusätzlichen Verstär-
kers mit der Buchse LINE OUT (11) verbinden. Der
Ausgangspegel der Buchse ist vom Regler MASTER
VOLUME (2) abhängig, nicht jedoch von den Klang-
reglern BASS und TREBLE (1).
5.4 Strom- und Notstromversorgung
Soll der Verstärker bei einem eventuellen Netzaus-
fall weiterarbeiten, an die Klemmleiste DC INPUT
(9) eine 24-V-Notstromeinheit (z. B. PA-24ESP von
MONACOR) anschließen. Bei dem Modell PA-900S
lässt sich die Klemmleiste zur besseren Handha-
bung abziehen. Zum Schluss das beiliegende Netz-
kabel zuerst in die Netzbuchse (6) und dann in eine
Steckdose (230 V~/50 Hz) stecken.
Hinweise
1. Bei anliegender 24-V-Spannung ist der Verstär-
ker sofort in Betrieb und die LED ON (3) leuchtet.
Der Verstärker kann nicht mit dem Schalter
POWER (5) ausgeschaltet werden.
2. Im Notstrombetrieb gibt der Verstärker eine ge-
ringere Leistung als im Netzbetrieb ab.
6 Bedienung
1) Vor dem ersten Einschalten zunächst den Regler
MASTER VOLUME (2) in die Position „0“ stellen.
2) Mit dem Schalter POWER (5) den Verstärker ein-
schalten. Die Anzeige ON (3) leuchtet.
Ist eine Notstromversorgung angeschlossen,
leuchtet die Anzeige ON ständig und der Verstär-
ker ist immer in Betrieb. Mit dem Schalter
POWER lässt sich dann lediglich zwischen Netz-
versorgung und Notstromversorgung umschalten.
Für den normalen Betrieb den Schalter POWER
in die Position „Ein“ stellen. Bei einem Netzaus-
fall schaltet der Verstärker dann automatisch auf
die Notstromversorgung um.
3) Den Regler MASTER VOLUME (2) auf die ge-
wünschte Lautstärke einstellen. Die 5-stufige LED-
Kette (4) zeigt den Ausgangspegel an.
4) Die Klangregler BASS und TREBLE (1) auf opti-
malen Klang einstellen. Eventuell die Lautstärke
mit dem Regler MASTER VOLUME korrigieren.
5) Treten unerwünschte tieffrequente Störgeräu-
sche auf (z. B. Brummen), die Taste LOW CUT
(12) drücken.
7 Technische Daten
Vorsicht! Bei ELA-Lautsprechern mit 70-V- oder
100-V-Audiotransformator (Abb. 4 und 5) darf die
Gesamtbelastung durch die Lautsprecher nicht
mehr als 120W Sinus (PA-900S) bzw. 240W Sinus
(PA-940S) betragen, sonst wird der Verstärker über-
lastet und eventuell beschädigt.
3 Applications
The amplifier is specially designed for PAsystems. It
is able to supply 120 W
RMS (PA-900S) or 240 WRMS
(PA-940S) to 100V or 70 V speakers or to a speaker
group with a total impedance of 4 Ω. Possibilities of
connecting the speakers can be found in the figures
4 to 8 on page 3.
4 Setting up the Amplifier
The amplifier is designed for installation into a rack
(482 mm/19"), however, it can also be used as a
table top unit. In any case, air must be allowed to
pass freely through all air vents to ensure sufficient
cooling of the power amplifier.
4.1 Rack installation
For rack installation, screw the two mounting brackets
supplied to the sides of the unit. In the rack, 2 rack
spaces (PA-900S) or 3 rack spaces (PA-940S) are
required for the amplifier (1 rack space = 44.5mm).
To prevent top-heaviness of the rack, the ampli-
fier must be inserted into the lower part of the rack.
The front panel alone will not be able to secure the
unit. Side rails or a base plate must additionally be
provided.
5 Connecting the PA Amplifier
All connections should only be made by skilled per-
sonnel and with the amplifier switched off!
5.1 Speakers
With PA-940S, unscrew the protective cover (15) for
connecting the speakers. After connecting, always
screw on this cover again to make sure that you will
not touch the contacts!
It is possible to connect PAspeakers or speakers/
speaker groups with a minimum total impedance of
4Ω. The possibilities of connecting the speakers are
shown in figs. 4 to 8. Depending on the speaker type,
use the corresponding contacts of the terminal strip
SPEAKER OUTPUT (10). For PA-900S: To facilitate
handling, the terminal strip can be removed from its
plug-in connection.
When connecting, observe the correct individual
or total impedance of the speakers and their correct
polarity (positive and negative connections as
shown in figs. 4 to 8). The positive connection of the
speakers is always specially coded.
5.2 Signal source
As a signal source, connect a unit with a line output
(preamplifier, mixer, PA mixing amplifier, etc.) to the
XLR input (13) or to the terminal strip (14).
5.3 Additional amplifier
If the number of the required speakers is higher than
the number admissible for the amplifier, an addition-
al amplifier will be required. Connect the input of the
additional amplifier to the jack LINE OUT (11). The
output level of the jack depends on the MASTER
VOLUME control (2), however, not on the tone con-
trols BASS and TREBLE (1).
5.4 Power supply and emergency power supply
For continued operation of the amplifier after a pos-
sible mains failure, connect a 24 V emergency
power supply unit (e. g. MONACOR PA-24ESP) to
the terminal strip DC INPUT (9). For PA-900S: To
facilitate handling, the terminal strip can be removed
from its plug-in connection. Finally connect the sup-
plied mains cable to the mains jack (6) first and then
to a mains socket (230 V~/50 Hz).
Notes
1. With a voltage of 24 V applied, the amplifier will
be in operation immediately and the LED ON (3)
will light up. It will not be possible to switch off the
amplifier with the POWER switch (5).
2. With emergency power supply, the amplifier will
deliver less power than with mains supply.
6 Operation
1) Prior to switching on the amplifier for the first
time, set the MASTER VOLUME control (2) to
position “0” for the time being.
2) Switch on the amplifier with the POWER switch
(5). The LED ON (3) will light up.
With an emergency power supply connected,
the LED ON will light permanently and the ampli-
fier will always be in operation. With the POWER
switch it will be only possible to switch between
mains supply and emergency power supply in
this case. For normal operation, set the POWER
switch to position “On”. In case of mains failure,
the amplifier will automatically switch to emer-
gency power supply.
3) Set the MASTER VOLUME control (2) to the
desired volume. The 5-step LED VU-meter (4)
will show the output level.
4) Adjust the tone controls BASS and TREBLE (1)
to optimum sound. Readjust the volume with the
MASTER VOLUME control, if required.
5) In case of unwanted low-frequency interference
(e.g. hum noise), press the button LOW CUT (12).
Caution! With PA speakers with a 70V or 100V
audio transformer (figs. 4 and 5), the total load by
the speakers must not exceed 120W
RMS (PA-900S)
or 240W
RMS (PA-940S), otherwise the amplifier will
be overloaded and may be damaged.
5
GB
D
A
CH
Diese Bedienungsanleitung ist urheberrechtlich für
MONACOR
®
INTERNATIONAL GmbH & Co. KG geschützt.
Eine Reproduktion für eigene kommerzielle Zwecke – auch
auszugsweise – ist untersagt.
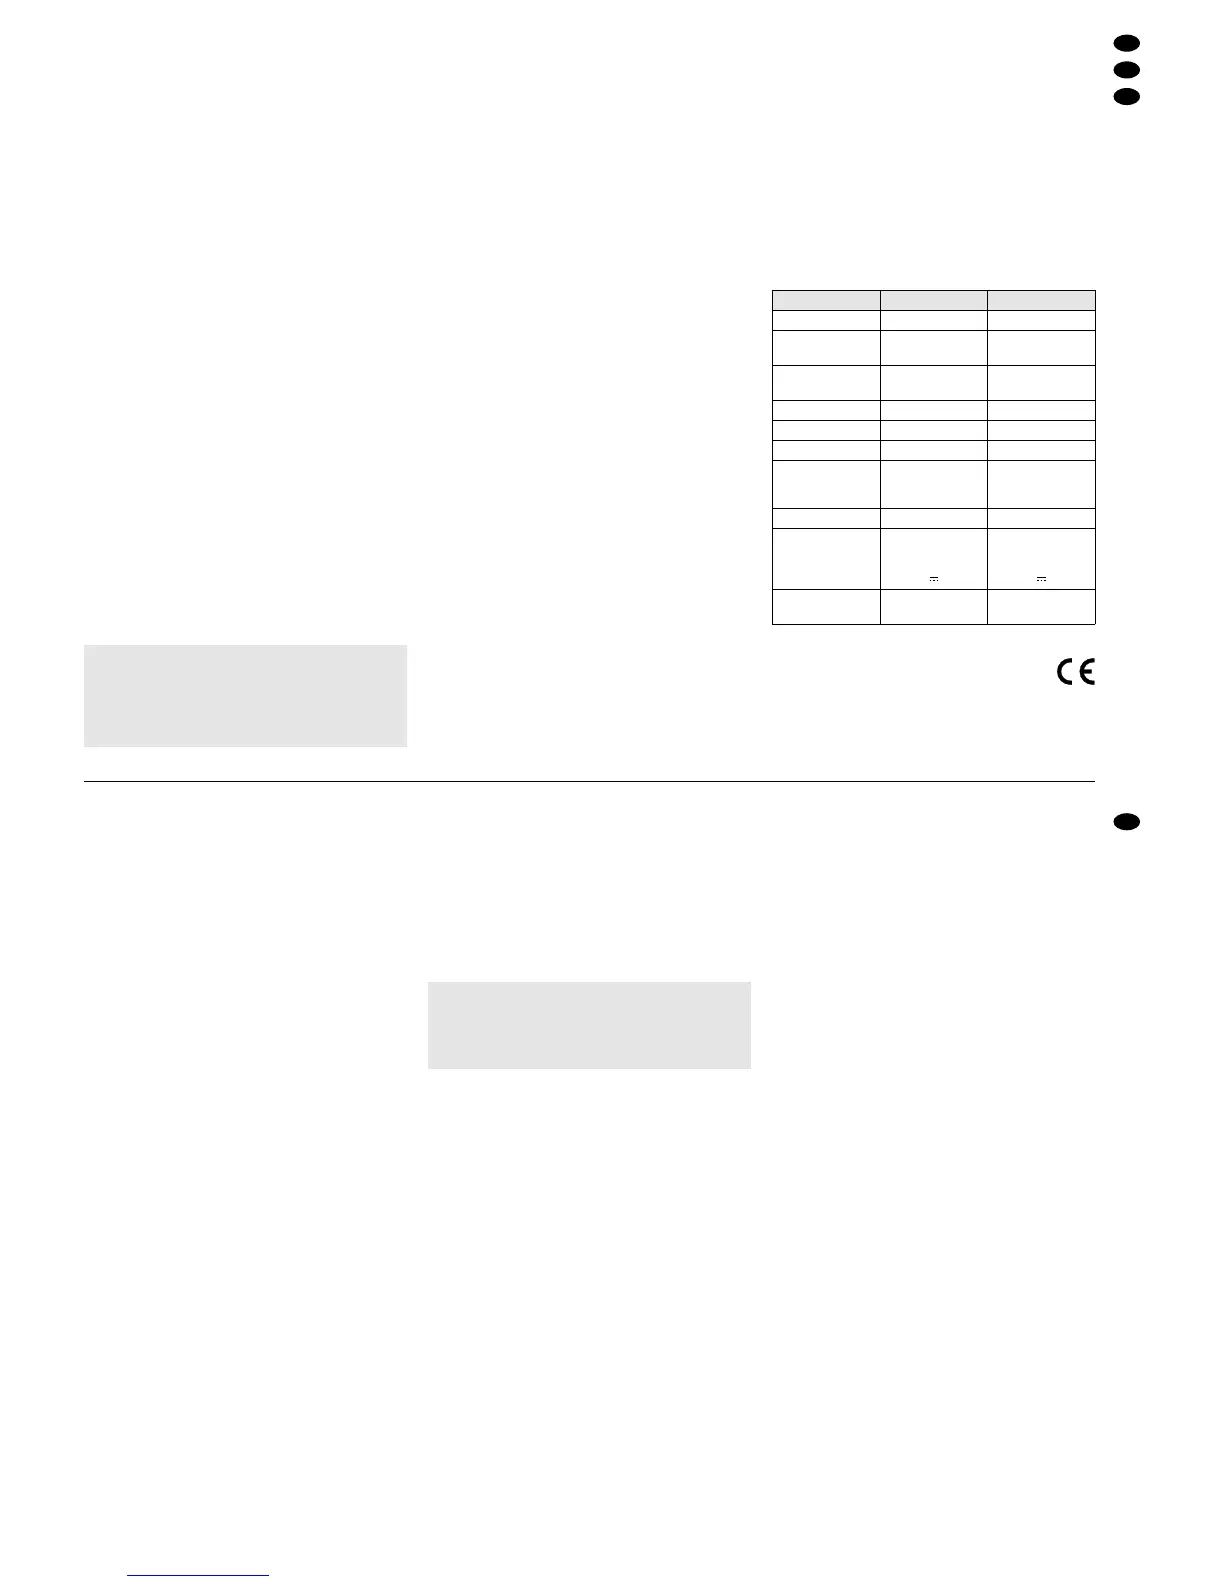
*Entweder die 70-V- und 100-V-Ausgänge
oder den 4-Ω-Ausgang verwenden!
Änderungen vorbehalten.
PA-900S PA-940S
Ausgangsleistung 120 WRMS, 160 WMAX 240 WRMS, 340 WMAX
Lautsprecherausgang*
Ausgang LINE OUT
min. 4 Ω, 70 V, 100 V
1 V/600 Ω
min. 4 Ω, 70 V, 100 V
1 V/600 Ω
Eingang
0,765 V/10 kΩ,
XLR, symmetrisch
0,765 V/10 kΩ,
XLR, symmetrisch
Frequenzbereich 50 – 15 000 Hz, ±3 dB 50 – 15 000 Hz, ±3 dB
Klirrfaktor < 2 % bei 120 WRMS < 2 % bei 240 WRMS
Störabstand > 80 dB > 80 dB
Klangregelung
Tiefen
Höhen
±10 dB bei 100 Hz
±10 dB bei 10 kHz
±10 dB bei 100 Hz
±10 dB bei 10 kHz
Stromversorgung
Netzspannung
Leistungsaufnahme
Notstromversorgung
230 V~/50 Hz
300 VA
24 V /9 A
230 V~/50 Hz
520 VA
24 V /9 A
Abmessungen
Gewicht
482 x 88 x 275 mm
(2 HE), 9,5 kg
482 x 135 x 380 mm
(3 HE), 19 kg
Einsatztemperatur 0–40°C 0–40°C
 Loading...